
Adjustment layers are a great tool, and layer masks make them even more powerful. Masks make it possible to selectively adjust the image areas an effect is applied to and the intensity with which it is applied. Without a mask, the entire image will be affected.
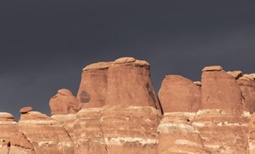
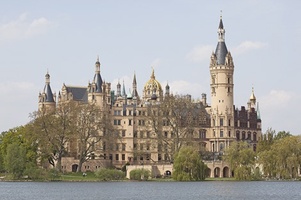
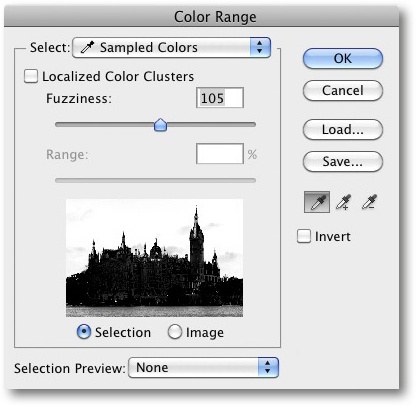
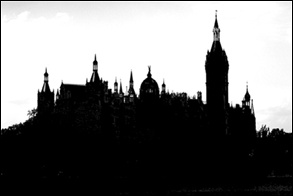
We will use the rock formation in Figure 7-16 as an example. In order to increase contrast on the rocks, we first select the sky using the Color Range tool and then invert our selection (Figure 7-17 and Figure 7-18).
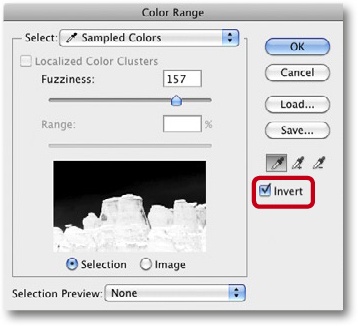
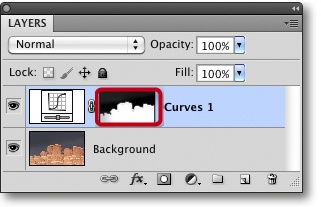
We then create a new Curves adjustment layer for the active selection, which automatically generates a layer mask (Figure 7-19) with the selection shown in white and the nonselected areas in black.
An ![]() -click (Mac:
-click (Mac: ![]() -click) on the mask icon displays the mask instead of the image in the preview window (Figure 7-20). A second
-click) on the mask icon displays the mask instead of the image in the preview window (Figure 7-20). A second ![]() -click reverts the display to normal.
-click reverts the display to normal.
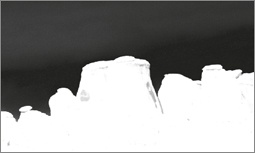
It is clear from Figure 7-20 that the Color Range selection tool hasn’t created a perfect mask. We don’t often need such complex masks in the course of our workflow, but if you are interested in the intricacies of masking, we recommend books on the subject by Martin Evening [13] and Katrin Eismann [12].
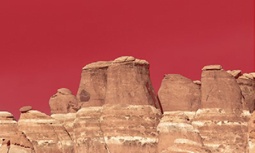
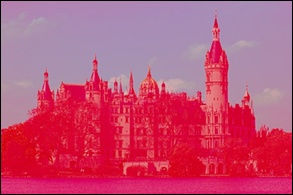
Figure 7-21. The mask (in red) is shown as an image overlay. You get this view by ![]() -clicking the mask icon.
-clicking the mask icon.
For less complicated situations, you can use a range of other Photoshop tools to improve your mask, as we will show you later.
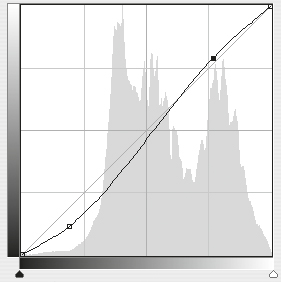
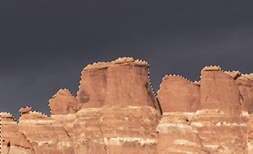
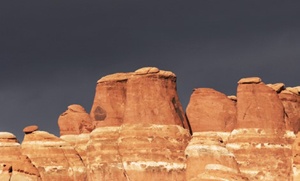
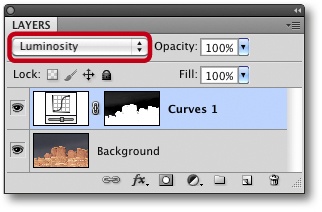
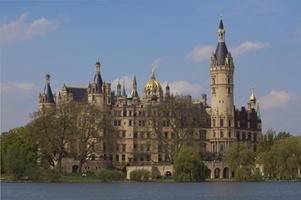
In order to increase contrast in the rock formation, we now create a conventional “S” curve in the Curves dialog (Figure 7-22). The layers mask ensures that the effect is only applied to the rocks, and the result is shown in Figure 7-23. Increasing the contrast has also increased color saturation; so we change the adjustment layer mode to Luminosity instead of Normal, creating the result in Figure 7-24. Figure 7-25 shows the resulting layers stack.

You can also create a layer mask for an adjustment layer by making a selection in a pixel layer and clicking ![]() . The active selection is then automatically used to create the mask.
. The active selection is then automatically used to create the mask.
A layer mask is, in fact, an 8-bit grayscale image. The adjustment applied using the mask is 100% effective in the white areas and becomes less and less effective right down to 0% in areas where the mask is black. The most important parts of the scale are usually somewhere between the two extremes in the gray parts of the mask.
A black-to-white gradient allows us to produce a soft transition. We can adjust the mask’s other characteristics (and with them its effect) selectively using brushes and filters.
If you apply a layer mask to a regular layer, the portions of the mask that are white completely cover the parts of the layer directly beneath them (with opacity set to 100%). The black portions of the mask allow the layer beneath to show through. Gray areas are partially visible. You can use this effect to superimpose identical images while using a gradient to ensure smooth transitions between light and dark areas.
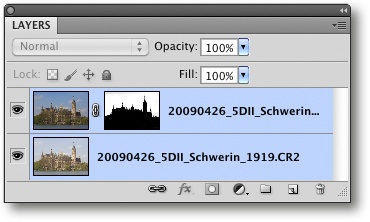
Let’s look at the sample images in Figure 7-26 and Figure 7-27. They show exactly the same scene but with differing exposures. To blend them together, we open both and copy and paste the second image into a new layer above the first one. We can also select and open multiple images as layers directly from Bridge or Lightroom.[106] At first, we can only see the upper image with its correctly exposed sky.
The two photos were shot handheld, and therefore need to be aligned before we blend them together. To do this, we select both layers and use the Edit ▸ Auto-Align Layers command[107] (with Perspective selected). Finally, we then use the Crop tool ![]() to cut away any excess, nonaligned borders.
to cut away any excess, nonaligned borders.
The next step involves selecting just the upper layer and using Select ▸ Color Range to select the sky (Figure 7-28). Here, we use the eyedropper to click in the sky and adjust Fuzziness until we like the resulting selection. Clicking OK then activates our selection.
The selection is, however, still too sharp for blending; so we use the Select ▸ Refine Edge dialog (Figure 7-30), introduced with CS4, to feather the edges of our selection by 2.2 pixels. The size of a soft border will depend on the image resolution and the type of selection you are adjusting.
Clicking the layer mask button ![]() with our selection active now creates a layer mask from the selection. If necessary, we can further refine our selection using brush tools.
with our selection active now creates a layer mask from the selection. If necessary, we can further refine our selection using brush tools.
Here, we used the brush to mask the lake and finish our virtual merge. The result is shown in Figure 7-29. Figure 7-31 shows the layer stack the process created. The sky portion of the mask is gray, which means that the sky wasn’t entirely blended into the finished image. We like the result anyway!

Figure 7-29. The result of using a layer mask to blend two layers containing Figure 7-26 and Figure 7-27
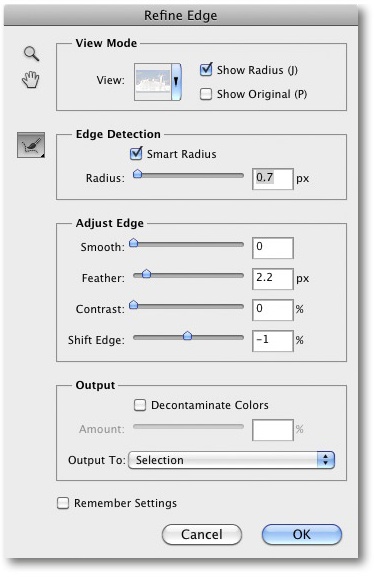
Figure 7-30. Refine Edge allows you to make a number of subtle improvements to your selection. The function has been further enhanced in CS5.
Instead of the blending method, we could also have used Hue/Saturation or Curves adjustment layers to improve brightness and color in our sky selection.
If you want to see the effect of a layer without the mask, click on the mask icon while holding down the ![]() key. Photoshop deactivates the mask and marks it with a red cross, as shown on the left. The same keystroke also reactivates the mask.
key. Photoshop deactivates the mask and marks it with a red cross, as shown on the left. The same keystroke also reactivates the mask.
You can also refine the effects of a mask using Photoshop’s built-in brush tools. We generally use a soft-edge brush and change the brush size according to the job at hand.[108] In order to paint in a grayscale mask, we set our brush color to either black or white and click on the mask icon in the appropriate layer entry. A dotted line around the mask profile then indicates that the mask (and not the image) is active.
Any changes you make to the mask are visible in the image preview and the mask icon. If you want to superimpose your mask on the image, click on the mask icon while pressing ![]() (Mac:
(Mac: ![]() ). Photoshop then displays the mask as a transparent red layer that you can adjust using a brush. A second
). Photoshop then displays the mask as a transparent red layer that you can adjust using a brush. A second ![]() -click switches off the mask display.
-click switches off the mask display.
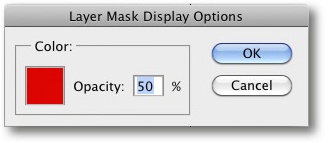
A double click on the mask icon activates the mask display options dialog, where you can change the basic color or opacity settings for the mask display (Figure 7-33).
You can also toggle between a large preview of the mask and the preview image itself by pressing the ![]() key (Mac:
key (Mac: ![]() ) and clicking on the mask icon.
) and clicking on the mask icon.
Photoshop CS5 introduces further enhancements to the Refine Edge dialog, including the Shift Edge slider for enlarging or reducing your selection.
The ![]() button activates an adjustment brush for adjusting your selection in Add or Delete mode.
button activates an adjustment brush for adjusting your selection in Add or Delete mode.
Smart Radius adjusts the edges of your selection automatically to suit the image content – i.e., it looks for edges and other transitions and adjusts the radius selectively (instead of universally, as in previous versions).
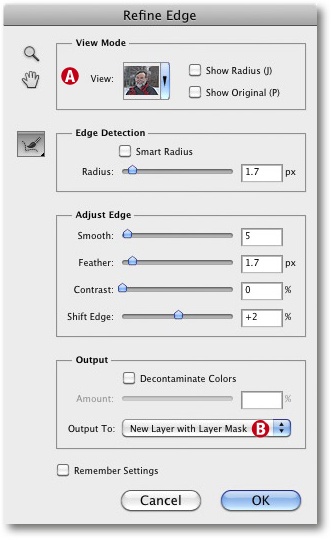
Increasing Contrast makes soft-edged transitions along the selection border more abrupt.
The Decontaminate Colors option can help you to select and “clean” fine details with color casts (due to reflections, for example).
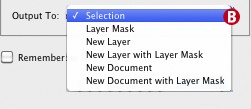
Use the menu B to select a procedure from a simple selection to a complete, new layer with a layer mask.
If you are using a layer mask, the Refine Edge dialog is replaced by the Refine Mask dialog. This dialog includes the same range of options as the Refine Edge dialog. It can also be activated from the Masks panel.
If necessary, you can soften the edges of your mask using the Gaussian Blur filter.[109]
You can apply a mask to another layer by selecting the mask in the layers panel, pressing the ![]() key (Mac:
key (Mac: ![]() ) and dragging it to a different layer entry. This copies the mask and applies it to the new layer.
) and dragging it to a different layer entry. This copies the mask and applies it to the new layer.
You can delete a mask by dragging it to the Trash icon ![]() at the bottom of the Layers panel. Deleting empty, white layer masks saves disk space when you save images in Layers mode.
at the bottom of the Layers panel. Deleting empty, white layer masks saves disk space when you save images in Layers mode.
Because a mask is a special type of selection, it can also be saved and reapplied, just like a selection. To save a mask, use the Add Mask To Selection option in the mask icon’s context menu. You can then use the Save Selection option in the image context menu, as described in Saving and Loading Selections.
To apply a saved mask selection, load the selection using Select ▸ Load Selection and click ![]() in the Layers panel to create a new mask. The selection is then activated as a mask and can be inverted like other selections.
in the Layers panel to create a new mask. The selection is then activated as a mask and can be inverted like other selections.
A simple click on the ![]() button creates an empty, white layer mask, whereas
button creates an empty, white layer mask, whereas ![]() -click (Mac:
-click (Mac: ![]() -click) creates a black layer mask. This can be useful if you want to selectively apply layer effects. Use a white brush in a black mask to paint the areas where you want the layer effect.
-click) creates a black layer mask. This can be useful if you want to selectively apply layer effects. Use a white brush in a black mask to paint the areas where you want the layer effect.
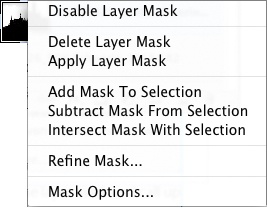
Figure 7-37. Select the layer mask and call up the context menu (right mouse button) to see a number of mask options.
If you want to apply a single mask to multiple layers, group the appropriate layers (Layer Groups) and apply a mask to the resulting group (i.e., to the entry in the layers panel with the ![]() icon).
icon).
Masks can be adjusted using most Photoshop tools and filters (e.g., Curves for contrast or Gaussian Blur for soft focus effects). They can also be applied to regular layers using the layer’s context menu. The layer’s pixels are then transformed into transparent pixels according to the distribution of black areas within the mask. The mask itself is then deleted.
The Masks panel was introduced with Photoshop CS4 and is activated using Window ▸ Masks. The panel contains most of the basic mask tools, including edge refinement and Color Range, as well as the ![]() button for applying a mask as a selection, the
button for applying a mask as a selection, the ![]() button for deactivating a mask, and the
button for deactivating a mask, and the ![]() button for deleting an active layer mask.
button for deleting an active layer mask.
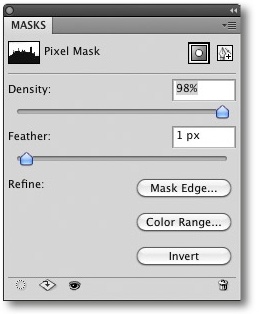
The Density mask slider, also introduced with CS4, allows you to reduce the blackness of a mask, thus reducing the strength of the mask’s effect on an image.
Clicking ![]() applies a mask to a regular layer and then deletes it. We avoid using this function, as we prefer to be able to readjust our corrections later. It does, however, save the disk space used by the deleted mask.
applies a mask to a regular layer and then deletes it. We avoid using this function, as we prefer to be able to readjust our corrections later. It does, however, save the disk space used by the deleted mask.
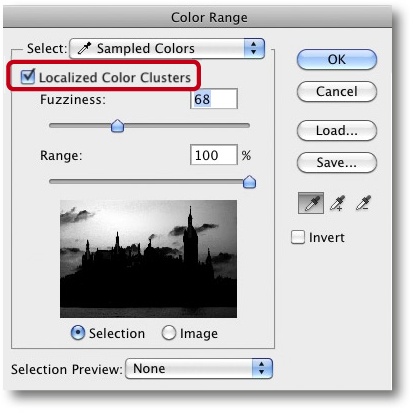
The Color Range selection tool was extended in its CS4 version to include the Localized Color Clusters option. This option takes into account the location of the eyedropper tool in the image and activates the Range slider. The selection (still controlled by the Tolerance setting) is now applied to the selected color range and in the physical area selected by the eyedropper. The Range slider functions like a radius setting – a 100% setting selects the entire image, whereas a lower value selects a smaller area around the click point. The result is a selection that ignores identical tonal values outside the selected area. You can also make multiple selections that are then automatically combined into a single selection. You can use either the plus/minus eyedroppers (![]() and
and ![]() ) or the
) or the ![]() or
or ![]() keys to refine your selection.
keys to refine your selection.
Photoshop also allows you to create vector masks. Vector masks have precise, pixel-perfect edges[110] and can be scaled, rotated, and transformed manually without loss of detail. Vector masks generally use less disk space than pixel masks.
Vector masks function just like pixel masks. If an image has both a pixel mask and a vector mask, all detail that is covered by both masks will be protected. A vector mask is a kind of closed curve, or path, and a path is a scalable graphic object that limits the boundaries of a selection. Paths consist of multiple complex curves (or splines) that can be combined to form virtually any shape you can imagine. They are therefore very useful for making complex selections and masks.
Paths can be selected in Photoshop using either the Direct Selection Tool ![]() or the Path Selection Tool
or the Path Selection Tool ![]() .
.
You can use the path tools to create an open-ended curve or a closed form that can then be used to perform a number of operations. These can be selected using a right-click within the image, appropriate keystrokes, or the Paths panel (Figure 7-47):
Load path as a selection. Photoshop can convert selections into paths using the Load path as a selection button at the bottom of the Paths panel. Such selections can also be saved as masks or alpha channels.
Fill path fills the selected path with the current foreground color.
Stroke a path using any selected tool. This function follows the selected path with the chosen tool.
Save as a vector shape for later use.
Save as a vector mask. This only works on non-background layers and mask areas outside the path.
Transform (using conventional transform tools). You can transform the entire path or just selected anchor points.
Save as a path for use with other images.
Paths can be adjusted by moving, deleting, adding anchor points, or shifting direction lines. Paths can be named like layers, and individual paths or anchor points can be adjusted using selected tools.
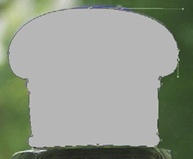
You only need to apply a few anchor points to form a complex spline curve (Figure 7-40). Finding and placing the right points requires practice. Readers who already have experience using Adobe Illustrator or other drawing programs will be familiar with the techniques involved. A path connects segments using either smooth or corner anchor points.
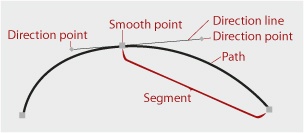
Smooth points form the basis of straight or curved spline curves (Figure 7-43) and have two associated direction points that always move in conjunction with the smooth point. The farther you move a direction point from a smooth point, the less pronounced the curve becomes. Pressing the ![]() (or
(or ![]() ) key allows you to drag an individual direction point separately from the corresponding point at the other end of a direction line, thus allowing you to create a corner point from a smooth point.
) key allows you to drag an individual direction point separately from the corresponding point at the other end of a direction line, thus allowing you to create a corner point from a smooth point.
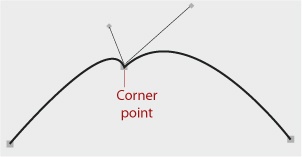
Corner points have two independent direction lines and allow you to form kinks in a spline curve (Figure 7-44).
Paths are generally drawn using the Pen tool ![]() in conjunction with anchor points selected using the mouse. A simple click sets an anchor point, whereas clicking and dragging sets a corner point. You can then close your path by double-clicking its start point. If you don’t close the path any other way, the start and end points of a path form its default closing line. All areas outside a path are masked and are filled gray in the vector mask preview. A vector mask can contain multiple paths. The area where paths cross is masked.
in conjunction with anchor points selected using the mouse. A simple click sets an anchor point, whereas clicking and dragging sets a corner point. You can then close your path by double-clicking its start point. If you don’t close the path any other way, the start and end points of a path form its default closing line. All areas outside a path are masked and are filled gray in the vector mask preview. A vector mask can contain multiple paths. The area where paths cross is masked.
You can use the Add Anchor Point Tool ![]() to add new anchor points, the Delete Anchor Point Tool
to add new anchor points, the Delete Anchor Point Tool ![]() to delete anchor points, and the Free Form Pen Tool
to delete anchor points, and the Free Form Pen Tool ![]() tool to draw free-form paths; Photoshop automatically creates and sets the appropriate anchor points. You can also use the Shape tools to draw shaped paths (Figure 7-45).
tool to draw free-form paths; Photoshop automatically creates and sets the appropriate anchor points. You can also use the Shape tools to draw shaped paths (Figure 7-45).

The Convert Point Tool ![]() allows you to convert corner points into smooth points (and back) and to adjust the curve gradient. An anchor point selected using the Direct Selection Tool
allows you to convert corner points into smooth points (and back) and to adjust the curve gradient. An anchor point selected using the Direct Selection Tool ![]() can be shifted directly, complete with its direction points. The context menu for a selected path contains a range of a path options (Figure 7-46).
can be shifted directly, complete with its direction points. The context menu for a selected path contains a range of a path options (Figure 7-46).
The Paths panel Photoshop includes a dedicated Paths panel (under Window ▸ Paths, Figure 7-47), where you can activate most Paths options, including Make work path from selection ![]() , Create new path
, Create new path ![]() , Fill path with foreground color
, Fill path with foreground color ![]() , Stroke path with brush
, Stroke path with brush ![]() , Load path as selection
, Load path as selection ![]() , or
, or ![]() Delete current path (which does not, however, delete the contents of the current path).
Delete current path (which does not, however, delete the contents of the current path).
Because a path is an extension of a selection and a vector shape, you can use the option bar to choose whether to add a path to a selection, subtract it from a selection, keep the intersection of a path as a selection, or exclude overlapping path areas.
You can select whether the Pen tool draws a new path (using ![]() ) or a new vector shape on a shape layer (using
) or a new vector shape on a shape layer (using ![]() ). The style and fill color of a vector shape can be selected in the options bar. The best fill option is
). The style and fill color of a vector shape can be selected in the options bar. The best fill option is ![]() (i.e., no fill). It is best to make no selection for the border color and style.
(i.e., no fill). It is best to make no selection for the border color and style.
It is not possible to draw directly on a pixel layer using vector tools. If you attempt to do this, Photoshop automatically creates a new shape layer. This layer’s vector mask can, however, be dragged to other layers.
You can use the Pen tool to draw free-form and predefined shapes (Figure 7-48), that can then be adjusted using the tools described above.
We could describe various ways to use these tools, but the best way to find out how they work is to experiment yourself. Apart from the occasional vector mask, we don’t use these tools very often in the course of our photo workflow.
Note
![]() As already mentioned, layer mask effectivity can be influenced not only by opacity settings (between 0% and 100%), but also by pixel and vector mask density settings.
As already mentioned, layer mask effectivity can be influenced not only by opacity settings (between 0% and 100%), but also by pixel and vector mask density settings.
If you want to print an image or export it to another application, it is sometimes useful to view just the part of the image that is limited by a path, as in the example shown here. The vector mask masks everything outside the path. In order to use the clipping path (i.e., the area inside the path), the image must first be saved to an appropriate format, such as TIFF, PSD, EPS, or PDF (Table 4-1).
The saved image can then be printed or imported into a different application. If the application in question supports clipping paths (as does Adobe InDesign), you can set the import options to display just the portion of the image contained within the path. This technique is often preferable to constructing complex transparent layers, and it simplifies the task of wrapping type to fit the image shape.
Creating masks can be very complex. As we have seen, pixel and vector masks are largely interchangeable and an active selection automatically becomes a layer mask when a new layer is created.
Selection keystrokes: | |
Add/Expand: | |
Subtract: | |
Intersection Only: | |
Invert: | |
Deselect All: | |
Soft/Hard Edge: | |
Select All: | |
Complex selections can be made using the keystrokes listed in the table. Simply select an existing object and make the appropriate keystroke. You can also combine selections by loading a saved selection while a different selection is active. Selections can also be expanded (Figure 7-28), refined (using Select ▸ Refine Edge), or modified using a range of other tools (Figure 7-49). The Transform Selection command is often useful if you need to change the shape of a selection that you have made using a predefined shape. Many of the select commands are also available in the context menu that you can open by right-clicking in your selection (Figure 7-50).
A handy technique involves making your basic selection using one of the conventional selection tools, entering Quick Mask Mode (using ![]() ), and then refining your selection using the Brush tool. Clicking
), and then refining your selection using the Brush tool. Clicking ![]() again then exits Quick Mask Mode.
again then exits Quick Mask Mode.
We usually use black or white brushes. Clicking the ![]() button in the Tools panel snaps focus to the color picker for the foreground and background colors. Pressing the
button in the Tools panel snaps focus to the color picker for the foreground and background colors. Pressing the ![]() key activate the black/white color pair, and pressing
key activate the black/white color pair, and pressing ![]() toggles between black/white and white/black.
toggles between black/white and white/black.
Photoshop’s default settings suggest that you save selections in the current document’s alpha channel, but you can also save them to an external file that you can apply to other images using the Load Selection command.
[106] Lightroom uses the Photo ▸ Edit in ▸ Open as Layers in Photoshop command (Loading Image Files into a Stack and Aligning Layers ).
[107] This function was introduced with Photoshop CS4.
[108] Clicking ![]() increases brush size, clicking
increases brush size, clicking ![]() .decreases it.
.decreases it.
[109] If you use Gaussian Blur, make sure that the mask (not the image itself) is selected before applying the filter.
[110] Vector masks can also have soft edges (Figure 7-38).