 Adding Digital Sunshine to Your Photos
by Uwe Steinmueller, Juergen Gulbins
The Digital Photography Workflow Handbook
Adding Digital Sunshine to Your Photos
by Uwe Steinmueller, Juergen Gulbins
The Digital Photography Workflow Handbook
- The Digital Photography Workflow Handbook: From Import to Output
- Foreword
- 1. Introducing the Digital Photo Workflow
- 2. The Basic Workflow
- The Five Phases of the Workflow
- Phase 1: Shooting
- Phase 2: Image Transfer and Management
- Phase 3: Image File Conversion and Optimization
- Phase 4: Output
- Phase 5: Digital Asset Management
- The Influence of Individual Tools on the Workflow
- Increasing Efficiency
- Develop Your Own Approach to the Workflow
- 3. Color Management Know-How
- Understanding Different Color Models
- Understanding Color Management
- Mapping Color Spaces
- Creating Device Profiles
- Profiling Your Monitor
- Photoshop Color Management Settings
- Printer Profiles
- Installing and Uninstalling Profiles
- Soft-Proofing and Gamut Warning
- Color Temperature and Hue
- Complementary Colors
- Working Spaces II
- 4. Image Processing Basics
- Don’t be Afraid of Photoshop
- 8-bit or 16-bit Color Depth?
- Image Size and Resolution
- Choosing a File Format
- File Information and Logs
- Image Alignment
- Simple Corrections
- The Art of Sharpening
- Color Corrections
- Selection Tools
- Retouching and Repairing Images
- Speed Up Your Workflow with Photoshop Actions
- Photoshop’s History Panel
- Additional Information and Overviews
- 5. RAW Editing and Conversion
- Some Initial Thoughts
- Important Aspects of RAW Processing
- Non-destructive Editing
- Which Processing Steps are Performed Where?
- What to Look for When Choosing a RAW Converter
- Other Features of RAW Converters
- Graphical User Interface (GUI)
- Color Management
- RAW Browser
- Preview Image Size
- Saving and Applying Image Settings
- Selective Image Corrections
- Batch Processing
- Printing from a RAW Converter
- Integration in the Workflow
- Image Browser Integration
- Multi-Core Processing
- Arguments For and Against Auto Correction
- Other Useful Features
- Adobe Camera Raw (ACR)
- ACR Preferences
- Workflow Options
- Sample of a Real World ACR Adjustments Workflow
- Synchronizing Image Adjustments
- Optimizing Dynamic Range
- Image Optimization Using Tone Curves
- Selective Tonal Corrections
- Saving and Discarding Changes
- An Overview of the ACR Interface
- ACR Image Adjustments Panel
- Effects Tab
- ACR Presets
- Batch Conversion
- Other RAW Converters
- Even More RAW Converters
- 6. All-in-One Workflow Tools
- 7. Photoshop Layers
- Layers Panel
- Your First Layer
- Using Adjustment Layers
- Making Selective Adjustments Using Layer Masks
- Flattening and Merging Layers
- Smart Cropping
- Removing Moiré Effects
- Auto Color Correction for Better Contrast
- Blending Layers Using Layer Styles
- Dodge and Burn Using Layers
- Loading Image Files into a Stack and Aligning Layers
- Smart Objects and Smart Filters
- Organizing Layers
- Other Aspects of Working with Layers
- Getting a “Layer Feeling” without Using Layers
- Selective Adjustment Using U Point Control Points
- More Tips for Working with Layers
- 8. Advanced Photoshop Techniques
- Correcting Saturation Selectively
- Some Tricks for Improving Saturation and Contrast
- Correcting Perspective Distortion
- Correcting Lens Errors
- Correcting Color Casts in Shadows
- Using Masks to Increase Luminance
- Correcting Images Using Brush Techniques
- Advanced Sharpening Using Photoshop Layers
- Adding Digital Sunshine to Your Photos
- Brush Off Noise
- Enhancing Midtone Contrast
- Enhancing Local Contrast
- Content-Aware Fill
- Fine-Tuning After Upsizing or Downsizing Images
- 9. Multishot Techniques
- Common Steps in a Multishot Workflow
- Increase Your Angle of View Using Stitching Techniques
- Maximizing Depth of Field Using Focus Stacking
- Increasing Dynamic Range Using HDRI Techniques
- 10. Turning Color into Black-and-White
- From Color to Black-and-White
- Black-and-White Conversion Using the Channel Mixer
- Enhanced Black-and-White Conversion
- Black-and-White à la Russell Brown
- Black-and-White Conversion Using the Black & White Command
- Black-and-White Conversion Using Photoshop Plug-ins
- Black-and-White Conversion Using a RAW Editor
- Colorizing Images
- 11. Printing and Image Presentation
- Publishing Images and Image Data
- Printing Images on Paper
- Printing on Photo Paper
- Printing Using Inkjet Printers
- The Print Workflow
- Printing Your Image
- Specialty Printing Software and RIPs
- Creating Contact Sheets
- Printed Frames
- Publishing Images on the Web
- Creating Digital Slideshows
- Other Ways to Present Your Images
- 12. Useful Photoshop Plug-ins
- 13. Data Management and Backup
- Managing Your Image Library
- Data Security
- A. Resources
- Index
- About the Authors
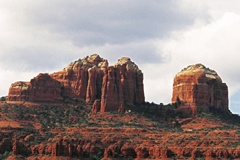
The quality of the ambient light plays a significant role in the success of a photograph. Too much sunshine can produce harsh contrast and strong shadows. Cloudy skies produce more balanced light but also lifeless-looking shadows and colder tones – problems that cannot always be circumvented by adjusting white balance settings.
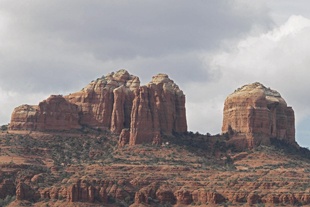
The image in Figure 8-102 would benefit from a little additional contrast and warmer colors. The following steps describe how we add a little “digital sunshine” to our image.
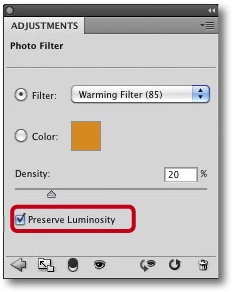
We create a Photo Filter adjustment layer to warm up the colors (Figure 8-103). Here, we check the Preserve Luminosity option.
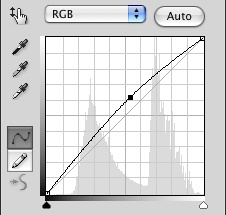
Now we add a Curves adjustment layer to the top of our stack that we then use to brighten the image (Figure 8-104).
We then use an additional Curves layer to enhance midtone contrast using a classic S-curve (Figure 8-105).
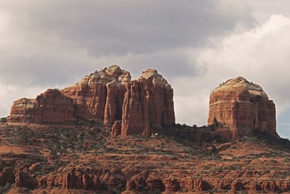
You can see the results in Figure 8-106. However, the image still lacks punch, so we use another of Katrin Eismann’s tricks to pep it up a little:
We create yet another Curves adjustment layer, this time set to Overlay blend mode. Figure 8-107 shows that applying this layer alone overdoes the effect we are looking for.
Reducing layer opacity to about 30% gives us the result you can see in Figure 8-109.

This use of multiple adjustment layers allows us to refine and readjust our corrections at any time. Double-clicking the effect icon in a panel entry automatically opens that layer’s settings dialog.
-
No Comment