
Many scenes have a dynamic range (i.e., the range of brightness between the darkest and brightest points) that is too broad to be effectively captured in a single shot. In cases like this, there are four possible solutions:
Expose for the shadows. This preserves shadow detail but produces clipped, completely white highlights (Figure 9-34).
Expose for the midtones. This can swamp shadow detail while still producing burned-out highlights (Figure 9-35).
Expose for the highlights. This preserves highlight detail, but shadows turn almost completely black and show no detail (Figure 9-36).
Shoot a sequence of images covering the different exposure values described above and use the camera’s histogram to ensure that you really do cover the entire dynamic range of your scene. You can then use specialized HDRI (High Dynamic Range Imaging) software to merge your sequence into a single image that covers the entire dynamic range (Figure 9-37). The individual source images are here referred to as LDR (or Low Dynamic Range) images.
The number of source images you need to shoot to create an effective HDR image varies according to the nature of the scene, your camera’s dynamic range, and the shooting format you use. An 8-bit JPEG image cannot cover as large a dynamic range as a 12-bit or 14-bit RAW image. Slide film generally covers a dynamic range of between six and eight EV (Exposure Values) with contrast of about 100:1. Monochrome film can portray a dynamic range of between 10 and 12 EV. Compact digital cameras can generally capture a range of about seven f-stops, while full-frame DSLRs can capture up to 11. Increasing ISO values can reduce the effective dynamic range of a camera by up to two whole stops.
High-contrast scenes that contain bright sunlight and deep shadows have a dynamic range of approximately 12 to 16 f-stops (i.e., contrast of between 4,000:1 and 16,000:1, or 212 and 214). Some scenes have even higher contrast. The human eye can generally cope with viewing scenes that have contrast of up to 100,000:1, i.e., 217 or 17 f-stops.
A simple but good introduction to HDR imaging techniques can be found at www.hdrsoft.com/resources/dri.html.
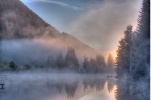
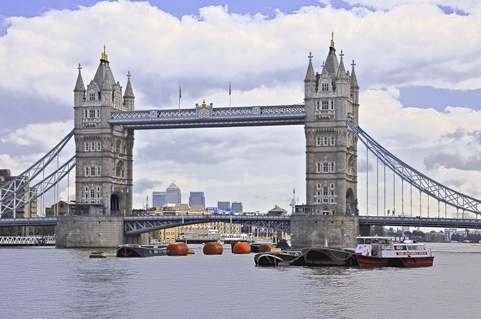
Figure 9-37. This image was created by shooting a series of three shots using different exposure values. They where then combined using Photomatix Pro.
We recommend the use of a tripod for all multishot techniques. The following are the steps involved in shooting for HDRI:
If possible, shoot in RAW mode. RAW images can capture broader dynamic range than JPEGs. HDR techniques can nevertheless be effectively applied to JPEG or TIFF images.
In order to maintain uniform depth of field, you should only vary the shutter speed, but not the aperture. Use your camera’s Av (or A) exposure mode setting. We also deactivate Auto ISO and, in most cases, we focus manually.
If you are shooting in JPEG format, you should use the same color temperature for the whole sequence. If you are shooting in RAW mode using an automatic color temperature setting, make sure you set the same color temperature value for all the images in your sequence in your RAW editor.
Meter the brightest and darkest points in your scene using spot metering mode and use the resulting values to calculate the number of exposure values you will need to shoot to cover the entire dynamic range.[133]
The maximum usable EV step between two exposures is approximately 2 or 3 f-stops. Two stops (i.e., a factor of 4) results in a greater degree of overlap between images and lower image noise, but also requires you to shoot more source images.
If you are using your camera’s automatic bracketing feature, check the maximum EV step this allows. Most Nikon DLSRs have a maximum increment of 1 EV, whereas our Canon cameras are capable of using two-stop steps.
Note
 When shooting HDR sequences, we only vary the shutter speed. We therefore always shoot in either M (manual) or Av (aperture priority) mode
You will also need to check how many individual shots your camera’s bracketing function allows you to make. Many mid-range cameras only allow for three shots in a sequence. We try to use auto-bracketing wherever possible, and if this doesn’t allow us to shoot enough source images, we set our shutter speed manually and simply continue shooting.
Moving objects can cause ghosting effects in HDR images, so try to avoid including them in the frame (or use a fast shutter speed).
Once you have shot your sequence, use the camera histogram display to check that your darkest image doesn’t include any overexposed highlights and that the shadows in the brightest image aren’t underexposed.
Note
![]() Remember that the camera’s histogram display represents a JPEG version of the image, not the RAW version.
Remember that the camera’s histogram display represents a JPEG version of the image, not the RAW version.
Always try to shoot your sequence as quickly as possible, thus avoiding changes in lighting and the general scenery. Cameras with fast burst modes, large bracketing increments, and long bracketing sequence capabilities are best for this type of work. However, with a little practice, you will be able to achieve great results using other types of cameras, too.
Although most HDR software packages support a number of RAW formats, RAW conversion is not one of their strengths. We generally use 16-bit TIFF source images unless we are using Photoshop to create our HDR images. If you shoot in JPEG format anyway, you won’t have to make this decision.
Just like when we are focus stacking, we generally use unprocessed source images and perform any necessary corrections on the merged HDR image. The only corrections we regularly make before merging are standardizing white balance and cropping.
Processing HDR images involves three stages. The first is merging a sequence of source images into a single HDR image, that in turn involves automatic alignment, rotation, or cropping of the source images. The program searches for correctly exposed image areas and ignores over- or underexposed portions of the frame. Every HDR program has its own methods for performing these steps.
The resulting image can usually no longer be stored as a 16-bit image, but rather must be stored (at least temporarily) in one of the currently popular HDR formats, such as OpenEXR, Radiance, or extended 32-bit TIFF.
Such high-color-depth images can not be effectively displayed on conventional monitors, be printed on everyday printers, or be edited using conventional image processing software.
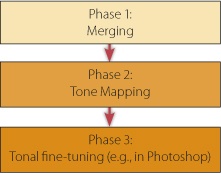
The second phase of HDR image production therefore involves reducing the image’s tonal range to a viewable (or printable) format without losing any of the improved detail. This process is called Tone Mapping, and there is no single, ideal way to tone map an HDR image. Most HDR programs offer various tone mapping methods, and the better the method, the more adjustment parameters it will have. Tone mapping is by far the most complex of the three phases, and offers you space for exercising your creativity and producing highly varied versions of the same basic image.
The third step in the process is the familiar image optimization step. It is often necessary to selectively dodge or burn specific parts of a finished HDR image, or to adjust the colors to more realistic levels.
There are a number of high-quality HDR programs available, including freeware such as FDRTools Basic [72] or the open source Qtpfsgui.[134] Most commercial programs are available for between US50 and US$100. Each solution has its own strengths and weaknesses, and most are in a state of constant development.
The most well-known program on today’s market is HDRSoft’s Photomatix [77]. The program’s particular strengths are its great basic functionality and its high-quality tone mapping. There is an example of what Photomatix can do in HDR Imaging Using Photomatix Pro. We also like Andreas Schömann’s FDRTools Advanced [72]. This is a great value shareware program and includes a tone mapping plug-in for use with Photoshop. It is the only program we know that allows you to make extensive personalized settings during the HDR production process. We also recommend HDR Photostudio [105] (and its follow-up version HDR Expose) and PhotoAcute [81], which can be used to quickly create simple HDR images using just a few adjustable settings.
Note
![]() There are more details on the subject of tone mapping in our Multishot Techniques book [18].
There are more details on the subject of tone mapping in our Multishot Techniques book [18].
Photoshop, too, includes HDR functionality since the CS2 version. Its functionality is constantly being improved and is especially effective in CS5. We nevertheless only use Photoshop for processing scenes with relatively low dynamic range.
Although Photoshop’s tone mapping functionality is not as good as that offered by Photomatix or FDRTools, the basic HDRI production module is very effective, especially when it comes to automatic alignment of source images or processing moving objects within the frame. We sometimes use Photoshop to produce a basic HDR image before saving it for tone mapping with a plug-in or a different, standalone program.
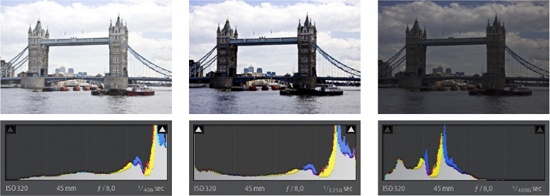
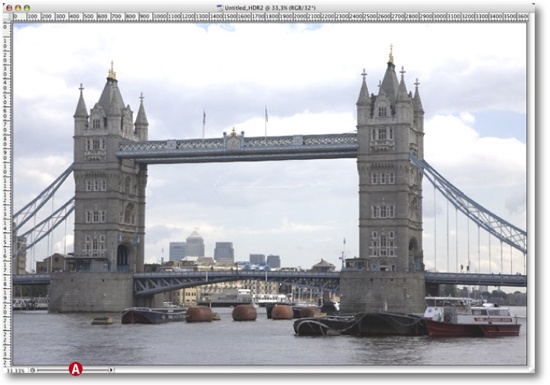
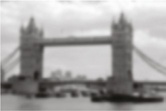
We used three source images of Tower Bridge in London for our example. They were shot using a Canon 40D and a step increment of 1.5 EV, resulting in a total dynamic range of about 12 f-stops (i.e., the camera’s own 9-stop dynamic range plus 1.5 exposure stops at each end of the range). The histograms give a general idea of the tonal range covered by each image. Make sure that the darkest image has no overexposed areas and that the brightest image shows no underexposure.
Note
![]() There are some slight differences between the dialogs and commands in CS4 and CS5, but none that are too difficult to interpret based on the information included here.
There are some slight differences between the dialogs and commands in CS4 and CS5, but none that are too difficult to interpret based on the information included here.
After selecting our source images in Lightroom, we start the Photoshop HDRI tool using the Edit in ▸ Merge to HDR in Photoshop command. (Only the Extended versions of Photoshop CS3, Cs4, and CS5 include the full range of 32-bit functionality.) In Bridge, you can achieve the same effect using the Tools ▸ Photoshop ▸ Merge to HDR command.
Figure 9-39 shows the normal dialog that is displayed if you use the Photoshop File ▸ Automate ▸ Merge to HDR command. We recommend that you always activate option A Attempt to Automatically Align Source Images. Clicking OK then starts the HDRI merging process.
Photoshop starts by loading the files, then aligns and merges them into a temporary HDR image. Additionally, it will generate a preview (Figure 9-40). This can use a lot of processing power, and may take some time even on a fast computer. In the dialog, you can use the preview list A to exclude selected images from the merge process.
The EVs which can be seen below each image thumbnail are either automatically extracted from EXIF data or estimated automatically by the program. The histogram C shows the dynamic range of the merged image.
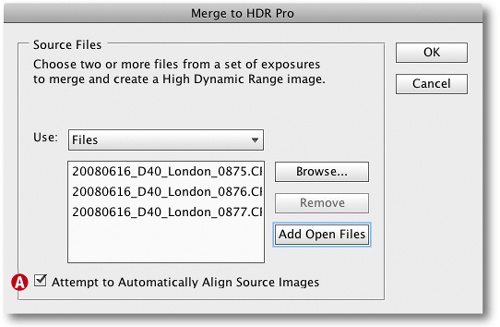
Figure 9-39. The dialog box used to select the source images for an HDR image. We recommend activating option A.
Use the slider D beneath this histogram to find an appropriate white point. In our experience, this will be further to the right than to the left end of the slider scale.
You can select the desired bit depth (8-, 16-, or 32-bit) for the resulting image using the drop-down menu B. We suggest to create a 32-bit image for your first attempt.
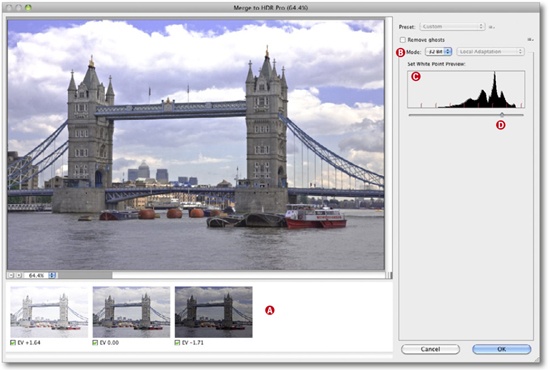
Figure 9-40. Preview of an HDR image in Photoshop CS5. The menu for selecting the bit depth of the resulting image can be seen at B.
Clicking OK starts the merging process and displays the resulting HDR image (Figure 9-41).
If you select 8-bit or 16-bit, Photoshop CS5 will show the Tone Mapping dialog as part of the “Merge to HDR Pro” window, similar to the one shown in Figure 9-47.
Don’t be irritated by the look of the preview image. The previews shown in Figure 9-40 and Figure 9-41 have a relatively normal appearance because the scene has moderate dynamic range. For images with a broader dynamic range, Photoshop has to create a temporarily tone-mapped preview image which cannot be adequately displayed on a conventional computer monitor.
You can now adjust the brightness of the image using the slider A (at the bottom left in the preview image shown in Figure 9-41). Adjusting this value does not, however, change your actual image. It is designed simply to enhance the preview image in order to help you to make good subsequent processing decisions.
Returning to our HDR dialog in Figure 9-40: if you choose the 32 Bit option for Mode, you can use a number of further enhancements in Photoshop CS3, CS4, or CS5 (although, as mentioned, most 32-bit filters and tools are only available in the Extended versions of the program). Keep in mind that the displayed image is the result of a provisional tone-mapping process, making accurate visual judgments difficult. You have to rely on the quoted tonal values and histogram displays for reliable image information.
If you select 8-bit or 16-bit instead of 32-bit, Photoshop automatically opens the tone-mapping dialog once the images are merged (see Figure 9-46/Figure 9-47). One advantage of 32-bit output is that it makes you independent of Photoshop’s own tone-mapping tool and allows you to use other plug-ins, such as Akvis Enhancer, Photomatix ToneMapper, or Andreas Schömann’s FDR Compressor. Here, we stick to the Photoshop tool for reducing our 32-bit image to a printable 16-bit or 8-bit (Web-capable) version.
Note
![]() Unfortunately, Photoshop does not display histograms for 32-bit images via Window ▸ Histogram. In order to view a 32-bit histogram, you need to create a Levels adjustment layer.
Unfortunately, Photoshop does not display histograms for 32-bit images via Window ▸ Histogram. In order to view a 32-bit histogram, you need to create a Levels adjustment layer.
The merged image looks a lot like the HDR preview image generated by the program before merging, due to the fact that your monitor cannot display the full dynamic range of the HDR image. A reproducible image exists only after the HDR image has been tone-mapped to a 16-bit or 8-bit format. Be sure to save your HDR image before tone mapping, so that you can use the HDR image to experiment with different tone mapping procedures, tools,[135] or plug-ins later.
When saving our HDR image using File ▸ Save As, we have a number of different formats at our disposal (Figure 9-42), ranging from standard Photoshop PSD to specialized 32-bit TIFF. Each of these formats has specific advantages and disadvantages. A detailed explanation would be beyond the scope of this book, but Christian Bloch’s HDRI book [11] provides comprehensive information on the subject.
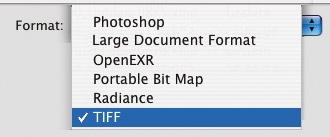
If you want to use a standalone program to tone map your image, we recommend that you first save it to OpenEXR format (with the “.exr” filename extension) or to the Radiance format (with the “.hdr” extension).
HDR images can be optimized using Photoshop, but not all of the typical Photoshop functions are available for this type of image. In Photoshop CS5, many adjustment layers and filters are not 32-bit compatible. The full repertoire of 32-bit functionality is only available in the Extended versions of Photoshop CS3, CS4, and CS5.
Image cropping and rotation is still possible, as is use of the Clone Stamp tool (e.g., for removing sensor dust specks). Although the Lens Correction filter isn’t available, several of the transformation functions used for correcting perspective distortion are.
In our example, we start by straightening the image using the ![]() tool, and then Image ▸ Image Rotation ▸ Arbitrary. We then correct the perspective distortion in the bridge’s towers using the free transform tool (Edit ▸ Free Transform). The Hue/Saturation command is also available to correct specific image areas selectively – e.g., by reducing the luminance of an otherwise flat-looking blue sky.
tool, and then Image ▸ Image Rotation ▸ Arbitrary. We then correct the perspective distortion in the bridge’s towers using the free transform tool (Edit ▸ Free Transform). The Hue/Saturation command is also available to correct specific image areas selectively – e.g., by reducing the luminance of an otherwise flat-looking blue sky.
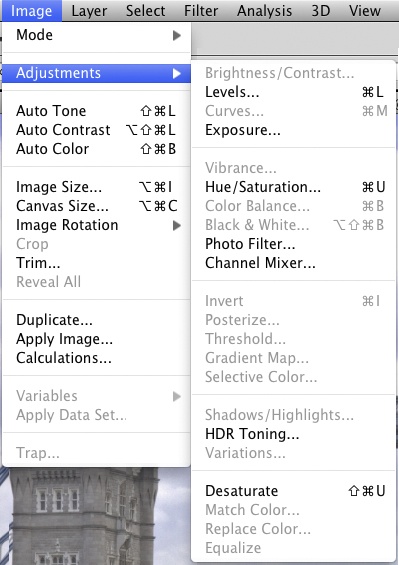
Figure 9-43 shows the range of adjustment layers that support 32-bit files. One of the most important functions is Exposure (see Photoshop Help for more information). However, if you make use of adjustment layers and want to retain the layer structure of your HDR image, you will have to save to PSD, PSB, or 32-bit TIFF, which will in turn destroy any compatibility with other HDRI programs. We therefore recommend that you merge your image into a single layer before exporting it for processing in non-Adobe programs.
However, the problem of visual inspection of the largely inadequate preview image remains. This is especially relevant in the case of corrections to color and hue. As previously mentioned, the 32-bit exposure slider in the bottom left corner of the preview window can help you gain a better overall impression of your image.
As already mentioned, the 32-bit exposure slider in the preview window (see Figure 9-44) can greatly improve the rendering of your preview image, helping you to get a better overall impression of your HDR image. The 32-bit exposure slider tool is very important to the decision-making process when correcting HDR images. But remember, the slider setting only affects the preview image, not the image file itself.
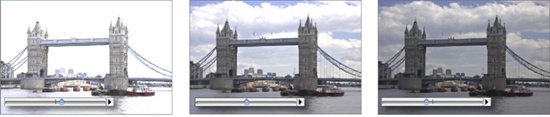
Figure 9-44. The 32-bit exposure slider in the Photoshop preview window provides a simple way to adjust the lighting in a preview image without actually changing the image file. This helps when planning exposure corrections.
It is nevertheless worth the effort to correct your images in 32-bit mode, as you will then have the largest possible reserves of quality and color depth. As a result, many of the potential negative side effects of your corrections will not be visible in the final image. Image alignment, for example, is best performed directly on HDR images (provided it hasn’t already been applied using Lightroom or Adobe Camera Raw). Adjustments made using ACR or Lightroom can be transferred to the other images in a sequence using the Synchronize command.[136]
The same is true for cropping. Cropping can reduce the amount of data in a file, which in turn can speed up processing in general.
The next important step is tone mapping. This process (illustrated in Figure 9-45) reduces the increased dynamic range of your HDR image to that of a 16- or 8-bit LDR (Low Dynamic Range) image. The resulting LDR image can be reproduced more naturally and is supported by a much larger range of processing functions and filters. Printing is currently only possible for 8-bit images, or (with some limitations) 16-bit images.
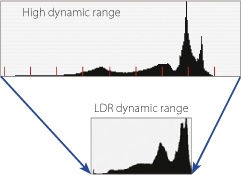
Figure 9-45. Converting from HDR to LDR reduces the dynamic range of an image to 8 or 16 bits per color channel. The details of the algorithms used to do this remain the secret of the software companies that make them.

The dialog shown in Figure 9-47, will appear when using Photoshop to convert an image from 32-bit to a 16-bit or 8-bit format. It can be accessed using Image ▸ Mode ▸ 16 Bits/Channel. Here, you can select your tone mapping method, and the results of your selection are displayed directly in the preview window. There are four tone mapping methods available in Photoshop CS3, CS4 and CS5: Exposure and Gamma, Highlight Compression, Equalize Histogram, and Local Adaptation. The functionality of the CS5 version of Local Adaptation has been greatly enhanced!
The best way to choose a method is to experiment and see which best suits your personal taste and your type of images. Not every method works equally well. The first three apply a global tone mapping which processes all pixels with the same tonal value, resulting in a new LDR image in which these pixels also have the same (possibly changed) value. You can usually achieve better results if the algorithm you use takes neighboring pixels into account. This type of method is described as localized tone mapping.
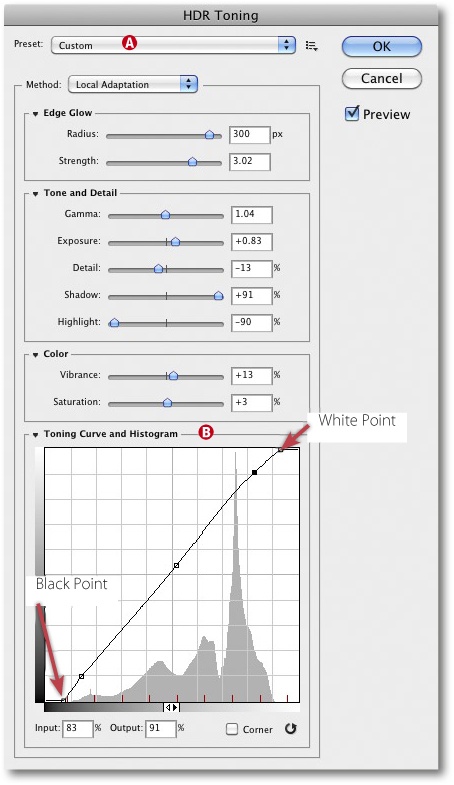
Photoshop offers the Local Adaptation tone mapping method for exactly this purpose (see Figure 9-47). This is the most versatile method. In addition to a number of sliders, you can use a gradation curve to fine-tune your adjustments. (The gradation curve that can be displayed in the other tone mapping dialogs can be viewed but not edited.) We use this method to tone map most of our images. We begin by moving the black point to the far left and the white point to the far right of the available tonal range using option B Toning Curve and Histogram.
If you click on the brightest and darkest points of the image using your mouse, Photoshop indicates the position of the equivalent luminance value on the gradation curve with a small circle icon, helping you to find suitable black and white points. However, the histogram can be misleading, especially in the highlight areas, which are sometimes hard to identify and thus easy to clip. Using the eyedropper tool together with the info window (Window ▸ Info) and the circle mark in the Local Adaptation window can often provide more accurate analysis of your image than a purely visual approach.
Once the black and white points have been set, you can start experimenting with the numerous sliders. We usually start by setting general brightness using the Exposure slider and then fine-tune the setting (if necessary) using the Gamma slider. We then brighten any dark shadows using the Shadow slider and darken highlights that are too bright using the Highlight slider.
The Detail slider adjusts microcontrast in a similar way to the ACR and Lightroom Clarity control.
During this process, Photoshop generates a brightness map which is never actually seen by the user and which works similarly to a soft-focus filter. The Radius controls the size of the area around each pixel taken into account while tone mapping; setting the value to “1” will only include the four immediately neighboring pixels.
The Strength value (called Threshold in CS4) controls the degree of blur, or, more accurately, how great the difference in tonal values between neighboring pixels should be in order for them to be grouped and equalized. In other words, the threshold value sets the maximum difference in brightness between neighboring zones. The threshold value here has nothing to do with the sharpness of the image. A higher value – strengthened by using a large radius – can cause halo effects to appear at high-contrast edges, as illustrated in Figure 9-49.
Unlike the standard gradation curve, the Local Adaptation tone mapping method does not process all pixels of a certain luminance uniformly. Instead, it couples the effect of the gradation curve with that of the luminance mask, making a certain amount of experimentation necessary to find the right levels for your particular image. As with all other complex processes, it pays to vary the slider values slowly, allowing Photoshop time to update the preview image between changes.
Finally, we fine-tune the gradation curve, as illustrated in Figure 9-50. This is a process that requires a good deal of trial and error while you search for the place on the curve where the tonal value of a specific image area lies.
Normally, Photoshop smooths the curve. You can, however, create corners in the curve by creating a new point and activating the Corner option (A, Figure 9-50). This is not an effect you would want to apply to most normal gradation curves. As in the standard Photoshop Curves dialog, a curve point can be removed by selecting it and pressing delete.

Figure 9-49. A halo effect can appear at high-contrast edges if the threshold and radius values are set too high.
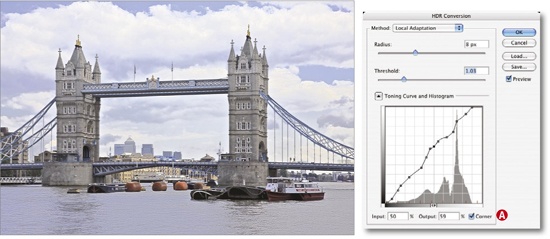
Figure 9-50. Our image after Local Adaptation tone mapping using the settings shown on the right. Unfortunately, the sky is still a little bland, so we will optimize it later in Photoshop.
Finally, we fine-tune the colors using the Vibrance control and (sometimes) the Saturation slider.
Figure 9-51 shows one of many possible versions of our processed HDR image. We used Photoshop to improve color rendering (using the Hue/Saturation command) and heightened contrast slightly before enhancing the details on the bridge structures using DOP EasyD Plus DetailResolver[137]. We protected the sky from unwanted filter effects using a layer mask.
Instead of converting an HDR image to LDR using Photoshop’s tone mapping function, you may want to use a third party filter. HDRSoft’s Tone Mapping filter [77] is a good choice. This plug-in delivered better results than Photoshop for the example shown here. Its handling is very similar to Details Enhancer in Photomatix Pro, so we decided not to describe it in detail here.
That concludes our discussion of Photoshop-based HDR techniques. Because of its superior loading and aligning functionality, we often use Photoshop to generate HDR images that we later process using either Photomatix Pro or FDRTools.
Unfortunately, many of our attempts at tone mapping using Photoshop CS3, CS4, or CS5 turned out badly, even using CS5’s new, enhanced Local Adaptation method. When you are working with Curves, you cannot see which parts of the image are clipped as the clipping view (usually controlled by pressing the ![]() key) does not work. We do hope that Adobe improves things in the next version.
key) does not work. We do hope that Adobe improves things in the next version.
Currently, we only use Photoshop to tone map HDR images with moderately large dynamic range. For all other HDR applications, we use Photomatix Pro, HDR PhotoStudio, or the great value FDRTools Advanced [72], which is available for Mac and Windows.
HDRsoft’s Photomatix Pro [77] is one of the best currently available HDRI tools. The program is available for Windows and Mac OS X (both Intel-based and PowerPC-based systems). It is powerful and fast (although not quite as fast as Photoshop) when processing complex HDRI images. As with all HDRI tools, a fast processor and plenty of RAM are an advantage when working with Photomatix Pro.
Note
![]() HDRsoft also offers the freeware download Photomatix Basic for Windows. This version can produce and tone map HDR images but is much less user-controllable than the Pro version.
HDRsoft also offers the freeware download Photomatix Basic for Windows. This version can produce and tone map HDR images but is much less user-controllable than the Pro version.
There are free plug-ins available for Lightroom and Aperture that allow you to export and import images from your image management module[138].
Photomatix Pro is a standalone program that is complemented by its sister product, the Tone Mapping Photoshop plug-in. This can be used to tone map 16- and 32-bit HDR images using Photoshop CS2, CS3, or CS4.[139] Compatible source programs include PhotoAcute, FDRTools, and Photoshop. Even if the Pro version of the program is too expensive for you, you should at least give the Photoshop plug-in and the Basic version a try.
The standalone version of Photomatix Pro 3.1 supports a range of LDR input formats including JPEG, 8-, and 16-bit TIFF files, and a number of RAW formats (including DNG). If you want to adjust white balance, remove aberrations, crop, or otherwise preprocess your RAW files, please bear in mind that Photomatix cannot interpret corrections made using Adobe Camera Raw or Adobe Lightroom (or any other RAW editor), as these changes are either embedded in the DNG file itself or reside in an XMP sidecar file. As is the case with PhotoAcute and other RAW processing software, the program can only interpret the original RAW image data. We therefore recommend that you export your images to 16-bit TIFF before processing them with Photomatix Pro.
Note
![]() There is a free plug-in available that allows you to export images directly from Lightroom 2 or 3 to Photomatix Pro.
There is a free plug-in available that allows you to export images directly from Lightroom 2 or 3 to Photomatix Pro.
Personally, we are not particularly fond of the results that Photomatix Pro’s DCRaw RAW converter delivers.
We almost always use 16-bit TIFF source files, but the decision is a matter of taste and requires experimentation. It is only occasionally advantageous to work with 8-bit JPEG files. If this is your input format, PhotoAcute is probably your best choice of software.
Photomatix Pro is augmented by a very good online help function, an online tutorial and a comprehensive online user manual, which is useful both as an introduction and a working guide to the program.
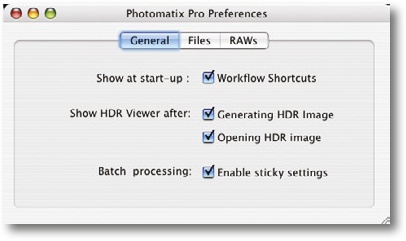
As usual, you should navigate to the program’s Preferences dialog when using it for the first time (Figure 9-52), where the available tabs and settings are self-explanatory. On the RAW tab, we recommend setting Demosaicing Quality to High if you prefer to use RAW source files rather than TIFFs or JPEGs. Here, you can also set your preferred output color space (we use either Adobe RGB or ProPhoto RGB).
When starting Photomatix Pro, the first thing you will see is a tool bar containing workflow shortcuts (Figure 9-53). Photomatix Pro offers five basic options:
Generate an HDR image from multiple source files
Tone mapping for existing HDR images
Exposure Fusion function (Photomatix Pro “Exposure Fusion” Function)
Batch processing of LDR images to HDR images and (optional) tone mapping of HDR images to LDR images
Batch processing for single files
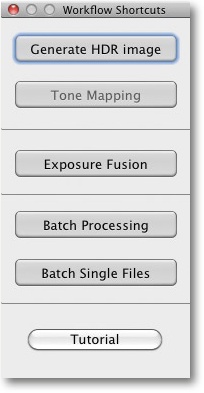
There is a Tutorial button included in the tool bar. Instead of using the tool bar dialog, you can also open images in Photomatix Pro by simply dragging them to the program’s icon, or by using the new Lightroom export plug-in to load images directly from Lightroom 2 or 3. If this option is selected in the program’s preferences, Photomatix Pro opens a new dialog window and asks which process should be applied to the freshly loaded images.
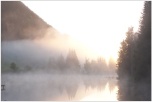
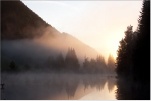
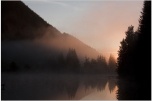
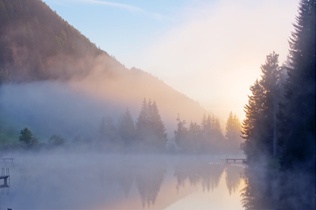
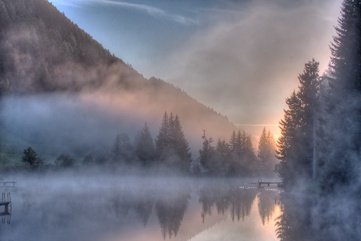
Our example uses four images of a sunrise at a mountain lake in Austria. Figure 9-54 shows the source images and their corresponding histograms. The photos were captured using a Nikon D200 and an exposure increment of one f-stop.
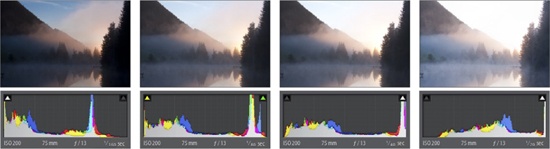
Figure 9-54. Our four 16-bit TIFF source images. The aperture was constant and the shutter speed was varied from shot to shot.
Clicking Generate HDR image in the program panel activates the image selection dialog. Our personal workflow involves selecting the images in Lightroom and exporting them to Photomatix using File ▸ Plug-in Extras ▸ Export to Photomatix.
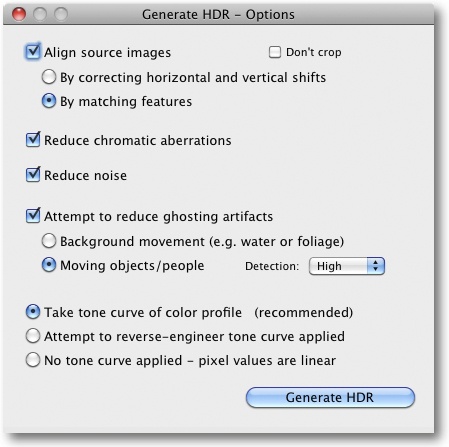
In the next dialog (Figure 9-55 and Figure 9-56), we select our image processing options, including alignment type, ghosting removal, and gradation curve.
We usually use the By matching features option for aligning our source images. The settings for avoiding ghosting artifacts should be largely self-explanatory. Grass and leaves blowing in the wind and fast-moving clouds should be thought of as background movement. If your shot includes moving cars or people, you can use menu A (Figure 9-55) to set a higher level of detection. Higher levels will lead to longer processing times and don’t always improve the results.
With regard to the tone response curve (TRC) – here called the tone curve – we recommend the default setting, which generates a curve based on the color profile stored in your image.
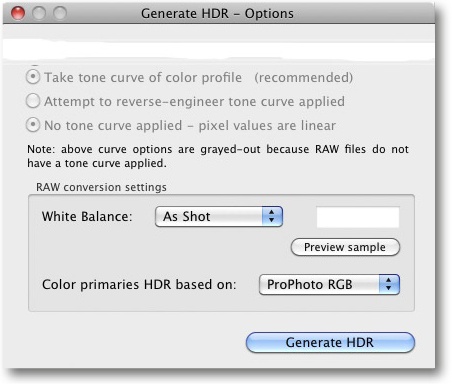
If you are using RAW source files, you can set the additional options shown in Figure 9-56. These relate mostly to white balance and color space. As most cameras select and embed the correct white balance (color temperature) setting into RAW files – at least when shooting outdoors in daylight, as was the case here – you should set the white balance to As Shot. Otherwise, you can select an appropriate color temperature from the list in the White Balance drop-down list. It is also possible to set white balance later during tone mapping – an option that gives better visual control. We usually set the ProPhoto RGB option for Color primaries because it offers the largest color space. We transform our image to a smaller color space later (after tone mapping), once we scale it for output. ProPhoto RGB is not a suitable color space for use with 8-bit images. 8-bit images (JPEGs, for example) are better processed using the Adobe RGB or sRGB color spaces.
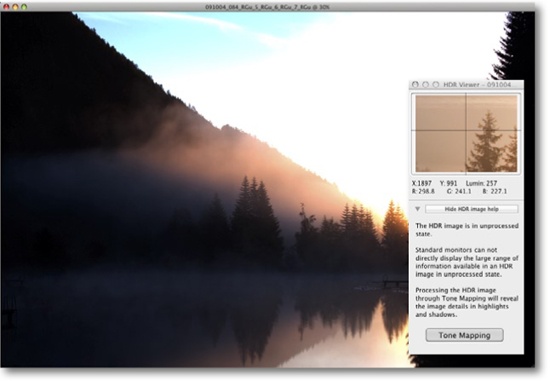
Clicking the Generate HDR button in the dialog shown in Figure 9-55 and Figure 9-56 generates an HDR image and displays it in a preview window (Figure 9-58). As with most HDR programs, the preview image is only provisionally tone mapped. The HDR Viewer window provides a better quality display, although it only displays a small detail of the entire image based on the last mapping process applied by the program (Figure 9-58). The detail at the current mouse location is shown in tone-mapped form.
We now save our new HDR image using File ▸ Save HDR as. In addition to the Radiance and OpenEXR formats, Photomatix Pro offers the 32-bit floating point TIFF output format (Figure 9-57). This is equivalent to the Photoshop 32 Bit (Float) format, but we generally use the Radiance format in order to preserve the greatest possible compatibility.

We like Photomatix Pro because of its great tone mapping functionality. Starting tone mapping either in the Workflow Shortcuts panel or in the Loupe panel produces a provisional tone-mapped version of your image with an optional magnified preview (Figure 9-62). The image already looks a lot better here. The preview size can be adjusted using menu A, and switch B toggles between the tone-mapped preview and the original HDR image. You can speed things up by limiting updates to the loupe detail using the option C rather than applying every slider movement to the entire preview image.
Again, the preview only shows provisional tone mapping, but this time the details are determined by the settings made in the mapping panel. Photomatix Pro offers two different tone mapping methods: Details Enhancer and Tone Compressor. Both have many more control options than Photoshop, making the Photomatix tone mapping process more versatile as well as more complex.
The Tone Compressor global tone mapping method is similar to Photoshop’s Highlight Compression process, but offers more settings (Figure 9-59). Here, we start by setting the black and white points. Although we can also use the current panel to adjust Color Temperature and Color Saturation, the actual compression and tonal value adjustment are controlled using the Tonal Range Compression and Contrast Adaptation sliders. The Contrast Adaptation slider adjusts the influence of the average brightness in relation to the intensity of the processed pixel. Moving the slider to the right tends to result in more pronounced colors. Moving the slider to the left tends to result in a more natural look.

These settings alone produce a better result more quickly than we can achieve with Photoshop (even using Local Adaptation). Figure 9-61 shows our initial result, which could nevertheless do with some further optimization.
But, we are still viewing a preview. The actual image can be different in a number of respects. In order to view the actual results using either Photomatix Pro or Photoshop, it is necessary to convert our image to LDR (Low Dynamic Range). Start the conversion from HDR to LDR by clicking the Process button in the tone mapping panel (Figure 9-59).
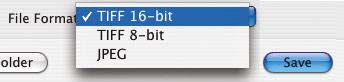
You can then save your image using File ▸ Save as (Figure 9-60). We always use TIFF 16-bit as our LDR export format.
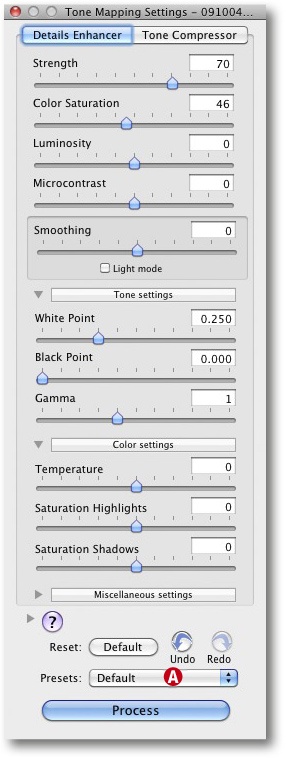
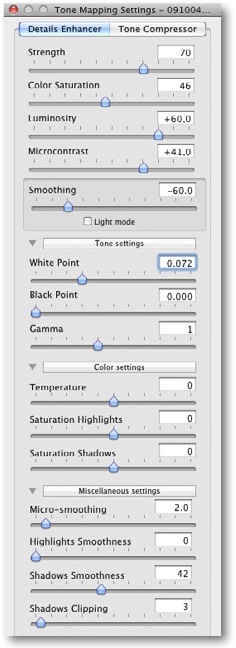
The real strength of Photomatix Pro lies in the Details Enhancer tone mapping option. This tone mapping method often gives a typical HDRI “grunge” look for many images, an example of which can be seen in the preview window in Figure 9-62.[140] The illustration next to it shows the Details Enhancer tone mapping control panel. The Details Enhancer method applies a localized tone mapping similar to Photoshop’s Local Adaptation, also recognizable from the similarities between the controls offered by both processes.
We start by setting Strength to a moderate, mid-range value. The default value (70) is often a good starting point, but your results will be more natural-looking if you use values of 50 or less. We then need to make our basic settings for the black and white points, which we can fine-tune later if necessary – the higher the values we set, the more highlight and shadow detail will be clipped. A good working gamma value is 1.0. Higher values lead to higher- contrast images, while lower values produce duller results – which is not always a bad thing. Here too, you need to be patient while waiting for your preview image to refresh. It is all too easy to overcorrect your image if you try to work too fast. Be patient!
Note
![]() It’s much easier to increase contrast later using Photoshop. Artificially decreasing contrast is virtually impossible.
It’s much easier to increase contrast later using Photoshop. Artificially decreasing contrast is virtually impossible.
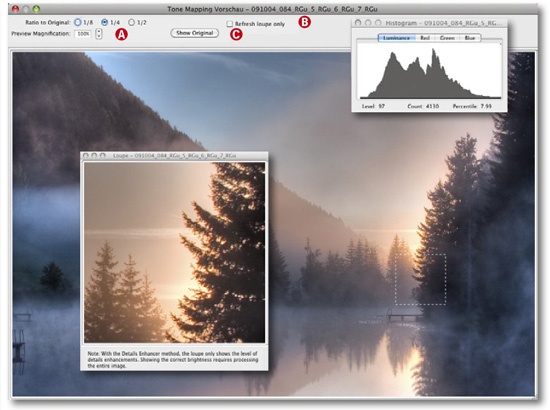
Figure 9-62. The preview of our first Details Enhancer tone mapping, showing the activated HDR Preview window. The look of the preview image results from using a high “Strength” value.
We have found that the following method is a good way to get used to the effects of the various sliders: working from top to bottom, set the slider to its extreme left-hand position and wait for the program to update the preview. Then set it to its extreme right-hand position, followed by a central setting. Now, continue to work with increasingly small slider movements to left or right until you find the value that appears best to you. There is no “perfect” setting, and you will always encounter situations in which small readjustments are necessary. Often, you will have to go back to a slider to do some more fine-tuning.
We use the Color settings tab to select a suitable color temperature (Figure 9-63) before we adjust shadow and highlight saturation. Slight increases liven up an image, but overadjusting saturation can quickly produce an artificial look.
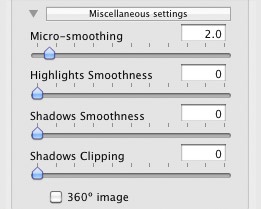
Now we adjust micro-smoothing in the Miscellaneous settings panel (Figure 9-64). Micro-smoothing is similar to microcontrast. You can find more information on the subject of microcontrast (also known as “local contrast”) in Enhancing Local Contrast. A higher value for Micro-smoothing can help to liven up an image and make further contrast adjustment at post-processing unnecessary. Adjustments to microcontrast in Photomatix are applied to the entire image, whereas Photoshop allows you to apply them selectively using layer masks.
If you are using high Strength values, you may also need to increase the level of Micro-smoothing to keep the microcontrast effect under control.
We now move on to the Shadows Clipping setting. If shadow detail is less important to the overall look of your image, you can select a high value to produce a high-contrast image with dark shadows. The best settings for your image depend on the subject itself and your personal taste. Our example uses a value of 2 in order to retain the shadow details.
Increasing the Highlights Smoothness and Shadows Smoothness values can help avoid shadow and highlight clipping by adjusting the range of highlights or shadows that contrast enhancements are applied to. Moving the loupe over the corresponding sections of the image can help to determine the best values.
We can now go back to the main settings and once again adjust the Strength setting. The best value to use here is also largely a matter of taste. Many published HDR images are vilified for their exaggerated and sometimes unnatural look – a criticism that also applies to some of the images in this book. However, if you set a moderate Strength value (50 or less), you should be able to avoid the more pronounced effects that HDR processes can produce.
Another disadvantage of higher Strength values is increased image noise. We therefore recommend that you keep your Strength values low and that you shoot at low ISO speeds whenever possible. The Reduce noise option (available since version 3.1 – see Figure 9-55) does exactly what it says.
We now move on to the color saturation, contrast smoothing, and brightness settings, followed by a final gamma value adjustment.
We have described all these adjustments simply and sequentially, although in reality, many of them have reciprocal effects. You simply have to practice to find out which controls have which effects and how they fit in with your personal processing style.
Once you find a combination of settings that works well and might be suitable for other images, you can save it using the Presets drop-down menu (Figure 9-63). This will enable you to reuse the same values when processing similar images and save a good deal of time, even if the resulting image still requires a little fine-tuning.
Keep an eye on the histogram and check the individual color channels before producing your final image, as color clipping is not always visible in the simple luminance histogram display (Figure 9-65).
As before, the actual tone mapping is activated by clicking Process in the tone mapping control panel. The results are then displayed in the preview window and can differ significantly from the preview image.
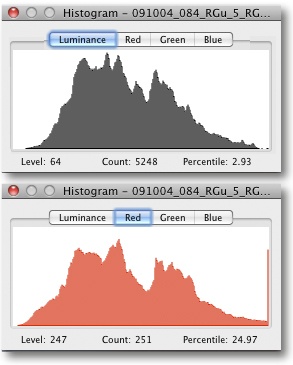
Figure 9-65. Here, highlight clipping in the red channel is not visible in the combined luminance histogram.
The second tone-mapped interpretation of our HDR image is shown in Figure 9-67. This image has already been fine-tuned and slightly sharpened in Photoshop. The emphasis here is definitely on the word “interpretation”, because the program’s numerous settings give you a very high level of flexibility in your work. The real indicator of a good result ought to be what you saw or wanted to see while shooting. It is often necessary to process various versions of the same subject. For instance the dark sky and almost oppressive mood in this image is not suitable for every type of image.
Photomatix also includes an Exposure Fusion function. This function merges images from a sequence without explicitly producing an HDR image. The results are more like a simple LDR image. Photomatix Pro 3.2 offers various methods for producing these temporary tone-mapped HDR images (Figure 9-72).
We use this process for scenes with slightly increased dynamic range that we can cover using just two or three source images.
You should use the same basic criteria for shooting other HDR source images when shooting images for this function. We usually use a small bracketing increment, or, if we are only aiming to reduce image noise, no bracketing at all. If this is the case, we use the Average tone mapping method.
Version 3.2 of Photomatix Pro offers five different choices for Exposure Fusion. In this example, we use Highlights & Shadows – Adjust (Figure 9-72).
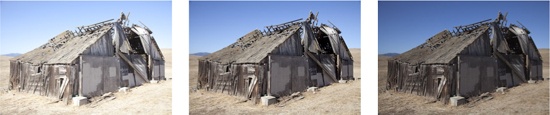
Figure 9-68. Our three Exposure Fusion source images of an old shed. These were shot using one f-stop intervals.
Figure 9-68 shows our three source images of an old shed. While the first shot still contains some detail in the shadows, the last image still shows some highlight detail.
You can activate Exposure Fusion either directly in the Workflow Shortcuts panel (Figure 9-69) or after dragging your source images to the Photomatix icon (Figure 9-71).
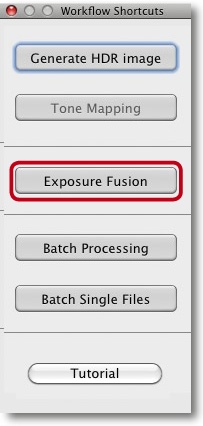
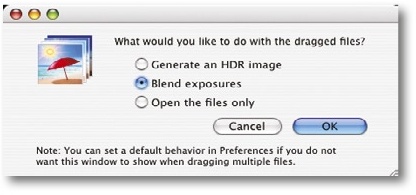
Figure 9-70. When you drag files to the Photomatix icon, the program will ask which process you want to apply.
As with the HDR image creation process, the program will ask how the source images should be aligned (Figure 9-71). Even if you are working with a tripod, you should let the program align your images. In most cases (since version 3), we use the By matching features option.
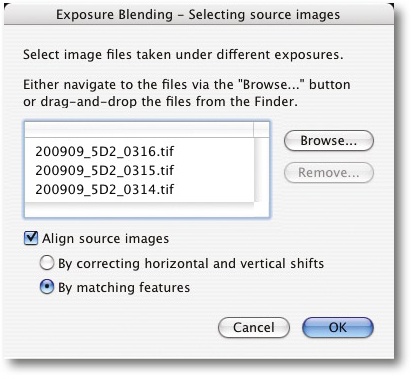
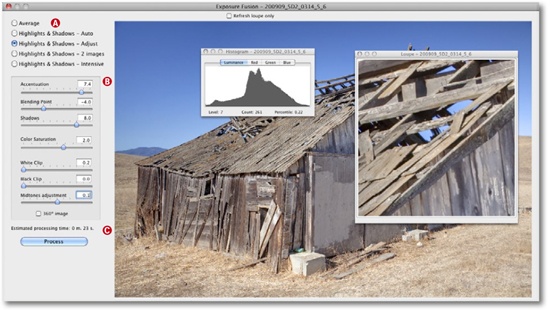
Figure 9-72. The Exposure Fusion dialog offers five different blending methods, some of which have individual control parameters.
Photomatix Pro will load the files and temporarily blend them for preview in the dialog box shown in Figure 9-72. You can then select your blending method from the options offered in section A.
The primary purpose of the Average method is to reduce noise. It is most useful for image sequences with largely similar exposure settings, or with small bracketing increments, or with high ISO speed settings. Here, we are only interested in the resulting low-noise LDR image. We don’t generally use the Highlights & Shadows – Auto method, because it doesn’t allow any manual control.
Our two favorite methods are Highlights & Shadows – Adjust and Highlights & Shadows – Intensive. We nevertheless recommend that you experiment with the other methods too.
Processing time can vary substantially – from a couple of seconds to nearly an hour, even using the same source files. The actual time required depends on the number of images being processed, their size, the selected blending method, and how fast your computer is. Photomatix Pro estimates the remaining processing time and displays it in the program window (Figure 9-72).
While the Photomatix Pro HDR function generates its HDR images from the various tonal value areas in the source images, the Exposure Blending function scans the source files to determine the source of every single pixel in the resulting image.
We already know most of the sliders/functions shown in Figure 9-72 from Details Enhancer. Blending Point defines the level of brightness at which pixels are taken from either the previous or the next source image. Initially, we set White Clip and Black Clip to zero and fine-tune later. The Shadows slider determines how dark the shadows appear – higher values produce lighter shadows.
The Loupe view showed serious aberrations in our sample image, so we stopped the process, corrected the edge artifacts in Lightroom, and started again. We arrived at the values shown in Figure 9-72 after some experimentation and clicked Process.
After about 30 seconds of processing time, the program produced an LDR image that we then saved in 16-bit TIFF format using File ▸ Save as[141]. If the source images are 8-bit (JPEGs, for example), the resulting image will also be in 8-bit format.
Figure 9-73 shows our resulting image that is slightly cropped along the bottom. This version shows better detail definition in the dark beams of the roof without losing highlight detail.
We increased local contrast using DOP_EasyD_Plus_Detail Resolver and sharpened it slightly using Unsharp Mask after scaling to an appropriate print size. Our local contrast adjustment meant that we needed less general sharpening, allowing us to reduce the Radius setting from the usual 1.0 pixels to around 0.7 pixels.
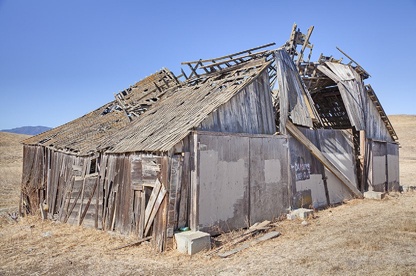
Figure 9-73. Our final image, created using “Highlights & Shadows – Adjust”. The image is slightly cropped.
When you return from an extensive shoot with lots of new HDR material, you may find the prospect of processing each sequence individually time-consuming and daunting. You will nevertheless want to get an overall impression of the sequences which warrant more work – which is where batch processing can be really useful. Using a batch process, you can run all of your image sequences through the processor using standard settings and inspect the results. You can then easily select your best images for manual processing.
Note
![]() The Photomatix online manual contains a comprehensive description of batch processing, which is why we have kept things simple here.
The Photomatix online manual contains a comprehensive description of batch processing, which is why we have kept things simple here.
Photomatix has a useful, built-in batch processing function. The function does, however, rely on your source images being sorted according to specific criteria to work effectively. There are two ways ensure this:
If all of your sequences contain the same number of images, you can save them in a single folder and set Photomatix Pro to batch process a particular number of images per sequence.
You save each sequence in its own subfolder, all of which are then placed in a main folder.
If you shoot very different sequences, it can be an advantage to create several folder structures in order to keep your HDR and Exposure Blending sequences separate. You also need to decide whether your results should be saved in the same folder as the source images, or to their own, separate folder.
If you shoot RAW images but want your source files to be in a preprocessed TIFF format, you first need to process your images using a RAW converter. The exact process differs from converter to converter, so refer to your software manual for details.
Once you’ve organized your source material, you can start batch processing either by clicking the Batch Processing workflow shortcut button or by navigating to the Automate ▸ Batch Processing menu item. The dialog shown in Figure 9-74 is now displayed. The available batch processing settings are as follows:
Process type allows you can select multiple processes which then generate multiple results.
The HDR option allows you to specify tone mapping methods (Details Enhancer or Tone Compressor), as well as optional fusion processes. If you activate multiple methods, the program generates multiple processed images.
Select lets you choose which images should be processed and how the images in a series are organized.
There are two choices for aligning your source images. By matching features is the best choice in most cases.

Select the location of your source images and the options for subfolder processing.
Destination identifies the location and output format for your results. You can also specify whether or not the intermediate HDR files should be deleted once processing is complete. As most of the important corrections take place at the tone mapping stage, it is advisable to keep the HDR images until you are satisfied with the final results.
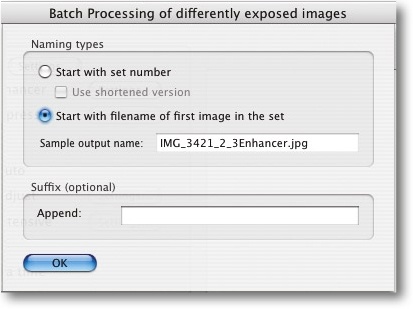
Finally, you can use the dialog F to set a naming convention for your output image files. Photomatix Pro automatically attaches the letters “HDR” to HDR file names and appends “Compressor” or “Enhancer” to LDR file names, depending on which tone mapping method is applied. The exposure blending process also names output files “Average”, “Auto”, “Adjust_Fusion”, or “Intensive”, according to the method applied. In our example, the settings shown in Figure 9-75 produce a satisfactory naming scheme which allows us to easily refer back to our source images, regardless of where they are located.
You can define your HDR or tone mapping process more precisely using the Settings buttons (Figure 9-74). These are the same settings that we already know from conventional HDR or tone mapping processes using Photomatix Pro, and you can use previously saved Preset configurations, too.
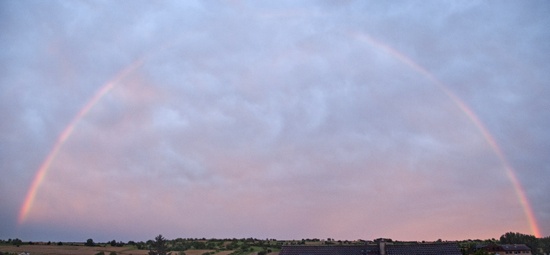
Figure 9-76. This image of a rainbow is a panorama made from two HDRI images, each of which consists of two separate source images.
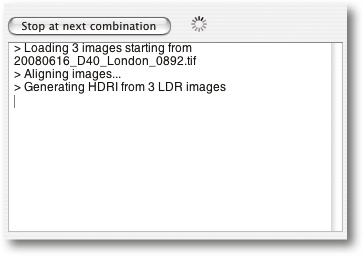
Click Start to begin batch processing. Batch processes are run separately from the rest of the program, which means you can perform other, non-batch Photomatix operations while your batch process is in progress. The progress of the individual steps is detailed in the window shown in Figure 9-77.
Finally – or as soon as the first results are ready – you can view your finished LDR images and optimize tone mapping in the appropriate HDR images if necessary. This is easier to do if you save your HDR and LDR images in their own folder, separate from your source images.
Large batch processes can take time but usually run without problems. We often use the Photomatix Pro batch process to make a “first draft” of our HDR images before further processing them using other HDRI tools.
A simplified batch processing function for single files can be found in the Automate menu under Single File Conversion. This process tone maps single HDR images located in a specific source folder and saves them as LDR images in a target folder. Here, too, you can specify the type of tone mapping to apply and the output format.
[133] Halving the shutter speed is equivalent to reducing exposure by one whole f-stop (or 1 EV).
[134] Qtpfsgui is available for Linux, Windows, and Mac OS X at: http://qtpfsgui.sourceforge.net/
[135] I.e., other standalone HDRI or tone mapping programs
[136] We use ACR or Lightroom to perform this correction on the source image with medium exposure values. We then apply the same correction to the other source images using the Synchronize command.
[137] As explained in Enhancing Local Contrast
[138] RAW images are here saved to 16-bit TIFF format and any corrections made are resampled into the image data.
[139] A Photoshop CS5-compatible version should be available soon – quite possibly by the time this book is printed.
[140] If you want to avoid the grunge look, use moderate Strength values. Values below 50 usually result in normal looking images.
[141] ![]() (Mac:
(Mac: ![]() ) is faster.
) is faster.