
Print dialogs differ from application to application and printer driver dialogs differ from operating system to operating system, and from manufacturer to manufacturer. In spite of all these differences, most print software is manufactured according to the same basic pattern, and you won’t have to look far to find the appropriate settings. The following sections will explain the basic settings schematically before we go into detail using specific examples. We will base our examples on high-end or similar printers.[163]
We assume that your printer is correctly set up and connected to your computer, and that you have checked your ink and paper reserves (and, if necessary, your print heads). The actual printing process then consists of three main steps:
Page Setup. You may have to repeat this step in your application and your printer driver. (Sometimes, additional settings on the printer itself are required.)
Make print settings in your application dialog (Photoshop, Lightroom etc.)
Set up the printer driver using its own dialog.
The individual steps here are as follows:
Start the Page Setup dialog (using File ▸ Page Setup or
 in Photoshop). Photoshop CS3 (and later) allows you to make your page setup settings directly in the print dialog:
A.1
Select your printer (if it’s not the default machine).
A.2
Select the paper source, orientation, and size.
In Photoshop (or whatever other application you are using), set:
B.1
Scaling and positioning options
B.2
Color handling (we usually let the application manage colors)
B.2
The appropriate ICC profile (if your application is managing color mapping), the rendering intent (usually either Relative Colorimetric or Perceptive), and the Black Point Compensation option
B.3
Click Print to open the printer driver dialog.
Note
 In Photoshop, the settings described here are found in the Color Management option in the upper drop-down menu (Figure 11-13).
In the printer driver dialog, check that the page setup, orientation, and other settings match those you made in the application’s Page Setup dialog. Other settings to make (or at least verify) are:[164]
C.1
Select the correct paper/media type, and, if available, the appropriate paper source and/or paper feed.
C2.
Select the appropriate print quality and/or DPI settings. This may include ink configuration settings.
C.3
If necessary, select the Advanced dialog mode.
C.4
Check your other print options (such as disabling high speed or bidirectional printing).
C.5
Select color management handling. If your application handles color management (as recommended), disable color management in the print driver.
Finally, click Print to start printing.
Note
![]() The printer dialog changed in appearance between Photoshop CS1, CS2 and CS3. Photoshop CS4 introduced yet another new layout but preserved the same set of options. Again, in CS5, the dialog changed a bit. However, the basic principles remain the same throughout.
The printer dialog changed in appearance between Photoshop CS1, CS2 and CS3. Photoshop CS4 introduced yet another new layout but preserved the same set of options. Again, in CS5, the dialog changed a bit. However, the basic principles remain the same throughout.
The ability to save print settings presets (either in your application/plug-in or in the printer driver) is extremely useful, but we recommend that you double-check your preset settings before printing. Changing a single parameter can change other settings, too.
Application print dialogs differ not only from operating system to operating system, but also from version to version. Things can also look different if you use a print plug-in instead of following the traditional application dialog/driver dialog route. However, the basic parameters remain the same, whichever method you use.
Print parameters often overlap, and you might, for instance, have to set your paper size once in the application dialog and again in the printer driver. If you are lucky, the application setting will automatically synchronize with the printer driver, but don’t count on it! Always check that your settings match. Some printers even refuse to print if these settings don’t match, or require you to make separate settings on the printer itself.
Some Epson and Canon printing applications, and Tecco’s Tecco:Print program, are designed to simplify the print process but tend to hide or automate settings that are important when making high-end prints. These programs can be helpful for beginners but make life more difficult for experienced users.
Make your settings carefully and save them as presets. Delete flawed presets, limit your choice to a few proven sets, and use short, descriptive names to keep your collection simple. Preset names that are too long are not always completely visible in menu lists.
Note
![]() The Pro 3800, and 3880 function in a very similar way to the R2400, and R2880 printers and to the 4800, 4880, 7600, 7800, 7880, 9800, 9880, and 11880 Pro models.
The Pro 3800, and 3880 function in a very similar way to the R2400, and R2880 printers and to the 4800, 4880, 7600, 7800, 7880, 9800, 9880, and 11880 Pro models.
The following guide is based on an Epson Stylus Pro 3800 used with a Windows computer. The basic settings are the same for most Epson printers and even printers made by some other manufacturers. The Pro 3800 is still a great high-end printer, even if it is a little old. It uses eight inks per print and a choice of Photo Black for glossy and semi-gloss papers or Matte Black for matte papers and canvas. Switching black cartridges uses a little ink to clean the print nozzles, so we recommend switching as little as possible.
The Photoshop print dialog includes the same settings in Windows and Mac OS X, so we only describe it once. With a little planning, you can use the settings we make here in other print color management-compatible programs, too. Such programs include Apple Aperture, Adobe Lightroom, Bibble, and a number of other RAW editors that have their own print functionality, such as Nikon Capture NX or Canon DPP. Most RAW editors include only basic print functionality and do not offer color management support, which is critical to a successful photo printing workflow.
Photoshop CS3 Print with Preview option is replaced by the File ▸ Print command (or the ![]() keystroke) which opens the print dialog similar to the CS5 dialog shown in Figure 11-13. Again, check your Printer and Page Setup settings. The dialog allows you to select your printer directly in menu A and also to switch between Landscape and Portrait mode (C). The Position and Scale Print Size settings do exactly what they say.
keystroke) which opens the print dialog similar to the CS5 dialog shown in Figure 11-13. Again, check your Printer and Page Setup settings. The dialog allows you to select your printer directly in menu A and also to switch between Landscape and Portrait mode (C). The Position and Scale Print Size settings do exactly what they say.
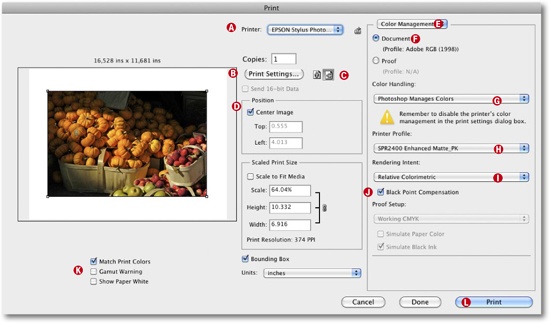
Select your printer before you do anything else.
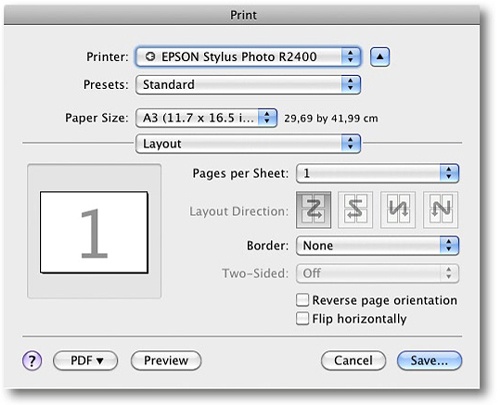
Now click Print Settings (previously called Page Setup) to set up your page layout. Mac OS X will open the dialog shown in Figure 11-14 where you can select paper size and layout.
In Photoshop CS5, this button opens the printer driver dialog, where you then make all your driver settings as described in Printing Under Windows with the Epson R3880. Take care when making these settings, as clicking the Print button sends your settings directly to the printer without further confirmation and without showing the printer driver dialog once more!
With your paper size correctly set, change page orientation if necessary.
Now position your image on the page and scale it if necessary. You can select and shift your image using your mouse, or scale it by dragging the corner handles in the image thumbnail.
Select Color Management in menu E.
Now you can concentrate on making your color management settings.
The Document option shows your document’s working color space (here, it is Adobe RGB (1998)). Use Proof only if you intend to make a simulated proof print for another device or print method (e.g., CMYK offset) using your inkjet printer.
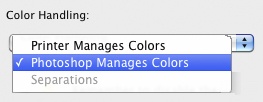
Color Handling offers three or four options (Figure 11-15). We usually use Photoshop Manages Colors (called Let Photoshop Determine Colors in Photoshop CS2). This allows Photoshop to control the mapping of color values from your image to your printer. Situations in which we would use other settings include:
Black-and-white printing. In the absence of a custom black-and-white profile, we use the Printer Manages Colors option. If, however, we do have a black-and-white profile, we use it together with the Photoshop Manages Colors option.
Printing color targets to generate printer profiles. Here, we need to set Color Handling to No Color Management.[165]
The Separations and No Color Management options are taboo when you are making fine art prints.
In Printer Profile select the profile that most closely matches your combination of printer, print media, ink set, and driver settings (i.e., your Quality or DPI settings in the printer driver). As we have already mentioned, great profiles produce great prints, and many printers are delivered with adequate generic profiles to get you started.
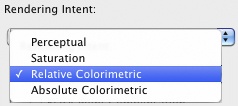
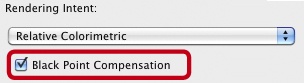
There are two relevant Rendering Intent options for printing photos:
Perceptual: Use when your image has a lot of “out of gamut” colors (Mapping Color Spaces). For example, this might be the case if you are printing a high-color image on matte paper.
Relative Colorimetric: Use this intent when the colors in your image fit completely into the gamut of your printer’s color space. Photoshop checks the fit for you if you activate gamut warning (
 ).
).Figure 11-16. Only two of Photoshop’s four rendering intents are relevant in the photo printing workflow.
No single rendering intent is suitable for all images. You will need to experiment to find out which one suits your personal style or a specific image. We use the Relative Colorimetric rendering intent most often.
Unless your profile provider instructs you otherwise, keep the Black Point Compensation option active. Hahnemuehle and Tecco recommend deactivating the option for use with their own profiles. The option is only available with the Relative Colorimetric rendering intent.
Photoshop CS4 introduced the Gamut Warning option to help with color conversion. If the option is activated, Photoshop marks image areas whose colors cannot be correctly converted for printing (Soft-Proofing and Gamut Warning). Gamut warning can be activated in earlier versions of Photoshop by exiting the print dialog and pressing
. If you use this option, make sure that the proof conditions are correctly set for your printer and the profile you are using (Soft-Proofing and Gamut Warning.)
You are now done with the print dialog settings, and you can click the Print button to display the printer driver dialog. In Photoshop CS5, the printer driver dialog is no longer displayed, and your settings are sent directly to the printer. This means that you now have to make any driver settings before you make your print dialog settings using the Print Settings button B. Photoshop now remembers the driver settings for each image so that they are automatically correct. This new method takes a little getting used to for experienced Photoshop users.
The Epson R3880 is currently (spring 2010) the best value 17-inch, high-end printer on the market, producing great color and monochrome prints. The descriptions in the following sections can be applied to virtually all high-end Epson printers, including the R2400, R2880, and Pro 4800/4880, 7800/7880, 9800/9880, and 11880 models.

We assume that you are making a color print using Photoshop, where you already have installed and selected an appropriate color profile. Deactivate color management (Figure 11-18) in the printer driver dialog. You might have to click the Print Settings button to switch from the simplified dialog to the advanced version that includes the Main tab. The next step involves setting (or deactivating) color conversion in the printer driver. This, in turn, involves selecting the Off (No Color Adjustment) option in the Custom menu (A).
You then need to set (or at least check) the following settings:
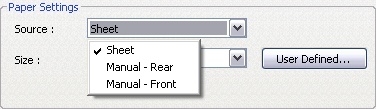
Paper Settings •. Start by selecting the paper source. If you use roll paper (not possible with the Epson Pro 3880), you have to select it here.
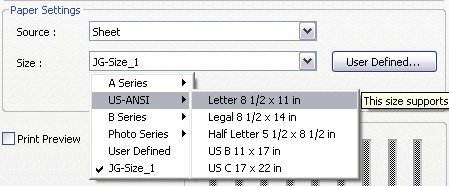
Size •. This menu includes the international preset and user-defined paper formats that are compatible with the current printer (Figure 11-20).
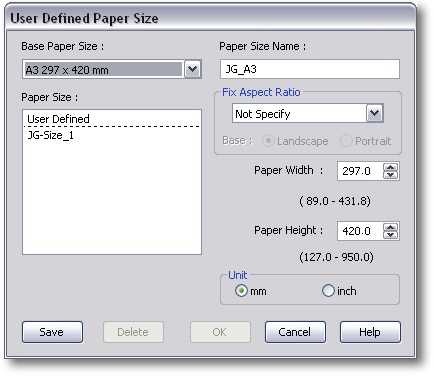
Clicking the User Defined button opens a dialog in which you can define custom paper formats (Figure 11-21). These are then displayed in the User Defined menu.
Media •. This is also a two-tier menu, sorted according to the classes shown in Figure 11-22. If you are using Epson paper, select exactly that paper in the list. Epson printers with only one black cartridge list only the papers that work with the installed black ink (Photo Black or Matte Black). If you are using third-party paper, select the Epson paper that is most similar to the one you are using. Many third-party paper manufacturers list similar papers on their packaging.
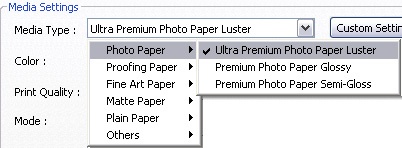
Figure 11-22. Select either the exact paper you are using or the paper that is most similar to your third-party paper.
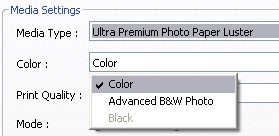
Color •. Here you define whether you will print in color or black-and-white (Figure 11-23). Our example shows the Color option selected. If we are printing in black-and-white, we always select Advanced B&W Photo, never Black (we explain why in Black-and-White Printing).
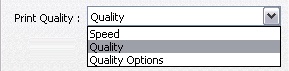
Print Quality •. The available quality settings depend on the selected media, and settings that are unsuitable are either not included in the menu or are grayed out. The Photo RPM and Max. Quality settings usually produce the best results, but also take longer to print and use more ink. Try the Quality option first (Figure 11-24) to see if it produces adequate results with your chosen paper.
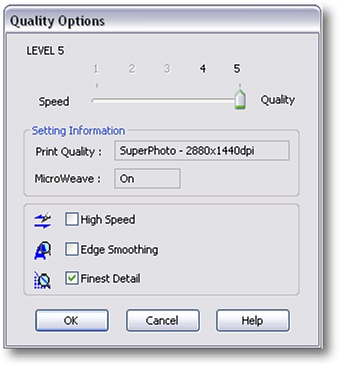
Quality Options •. (Figure 11-25). Set the Level slider to high quality (4 or 5). This window also displays the dpi values associated with the selected quality setting. Activate the MicroWeave and Finest Detail options, and uncheck Edge Smoothing and High Speed if you are using fine art paper.
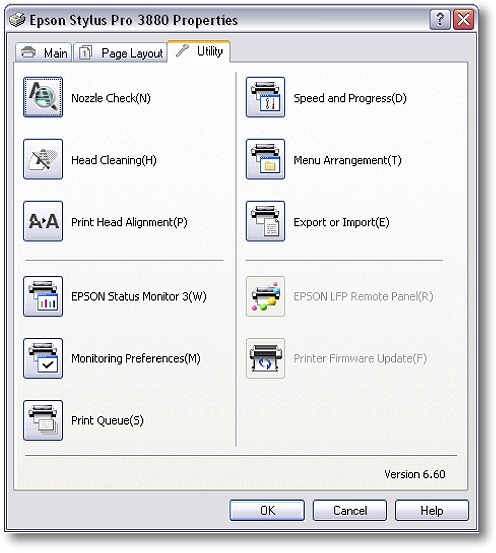
Ink levels are displayed in the Main tab and detailed information is also included in the printer’s own display (if your printer has one). Clicking EPSON Status Monitor on the Utility tab (Figure 11-26) provides additional ink status data. This tab includes various other utilities, such as Head Cleaning and Nozzle Check. The number and type of available functions depend on your exact printer model.
The generic color profiles delivered with the R3880 are slightly clumsily named ([116]) but are of high quality and work very well. Epson printers are carefully calibrated and linearized during production. Check the Epson website regularly for updated profiles or profiles for new paper types. Most quality paper manufacturers also produce profiles and detailed printing instructions for the Pro 3880 (see Inks and Inkjet Papers onward).
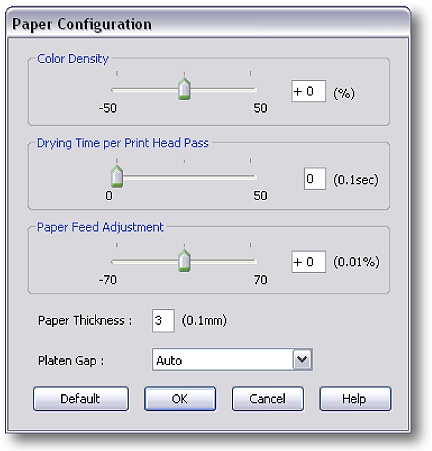
Figure 11-27. Most of the Epson 3880’s paper feed problems can be fixed by changing the settings in this window.
For papers without specific instructions, you will have to experiment with the Paper Thickness and Platen Gap settings in the Paper Configuration menu (Figure 11-27) of the driver’s Main tab. For less absorbent papers, reduce Color Density and increase Drying Time. If you find ink smears on the edges of your paper, try increasing the Platen Gap (the distance between the print head and the paper). The right combination of Paper Feed Adjustment, Paper Thickness, and Platen Gap settings can cure most of the Pro 3880’s potential paper feed problems.
You can then save your settings as a preset by clicking the Save button in the Main tab (Figure 11-18).
Now click OK to start printing.
Your Photoshop print settings for making color prints under Mac Os X will be the same as those described Photoshop CS5 Print Dialog. You only have to use a different profile if you use a different paper or printer.
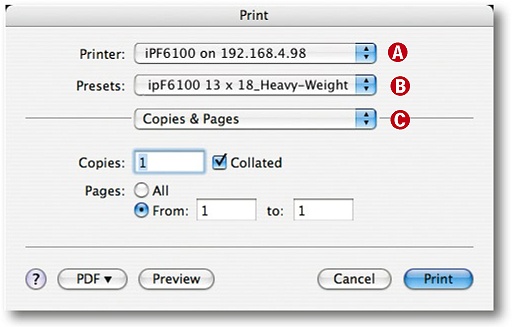
The Mac driver dialog is similar to the Windows version, but the tabs and menus are organized differently and sometimes quite well hidden! The basic print dialog is shown in Figure 11-28.
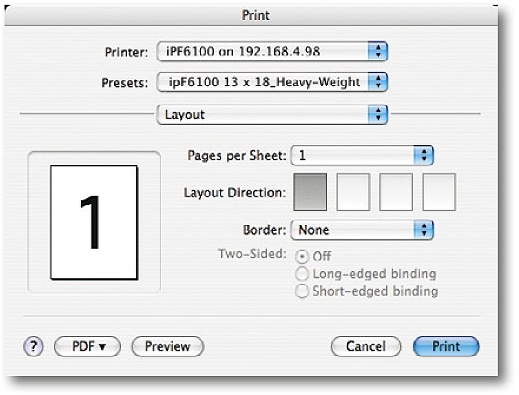
Select your printer in menu A – here, a Canon iPF6100.
The Presets menu includes some built-in presets and any others you might have saved.
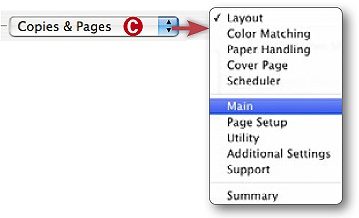
Menu C includes various printer setting dialogs. Here, the Copies & Pages, Layout, Scheduler, Color Sync, and Summary submenus are the same for all printers, while others (such as Print Settings, Extension Settings, and Paper Configuration) are manufacturer- or printer-specific. Take time to find your way around when using these menus for the first time with a new printer (Figure 11-29). The following section explain some of the various menus and settings:
Copies & Pages •. Selects the pages to be printed and the number of copies of each (Figure 11-28). You will usually only print single copies of art prints (more if you are printing on roll paper). In recent versions of Mac OS X (10.5 and later), Copies & Pages is part of the printer driver dialog.
Layout •. Lets you specify the number of images you wish to print on each sheet (Figure 11-30) – a feature that plays no role in art printing. You can set up index prints or multiple image prints in Photoshop or other applications anyway. The items included in this dialog change from printer to printer.
Scheduler •. Here, you can specify when a print job starts. You will usually want to start your art prints immediately (the default setting) so you can watch what is going on.
Paper Handling •. Here, you can perform moderate scaling, but we recommend that you perform any large-scale enlargement or reduction at the image preparation stage (Upsizing Images) or using an RIP. If you want to print a multi-page portfolio but your printer has no duplex facility, first print all the Odd-numbered pages, then reinsert the printed paper stack and print Evennumbered pages with the Reverse option checked.
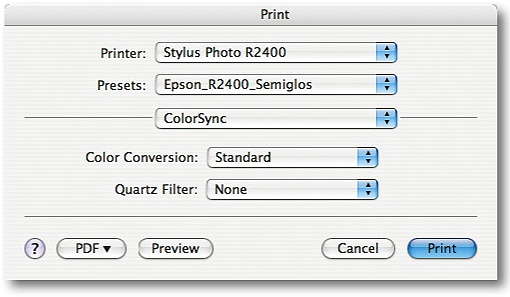
ColorSync •. Here is where you can make settings for the Mac OS X color management system (Figure 11-31). There is an option for applying the built-in Mac Quartz filters, but we don’t recommend that you use these when printing directly from Photoshop.
ColorSync settings (Applications ▸ Utilities ▸ ColorSync Utility) are useful when printing from an application that is not color managed. The module maps colors from the image color space to the printer color space and is also where you select your printer profile. See Mac OS X Help for more information.
Cover Page •. This option allows you to print a cover page – an option that is less relevant for art prints, due to the prohibitive costs involved.
This tab contains the most important settings for making art prints and is called Print Settings, Options, or (in the case of the Canon iPF6100) Main. The dialog is printer-and manufacturer-specific, and is similar in look and feel to Windows printer driver dialogs. Figure 11-32 shows the dialog for our Canon iPF6100 printer.
Here too, we follow our standard setup pattern, starting by selecting the print media type. For this model (and other Canon printers) the media type selected in the driver dialog must match the type selected in the printer’s menu; otherwise the machine will refuse to print.
Clicking the Get Information button provides information about the currently loaded paper type, paper size, and selected feed.
Color ▸ Set... leads to the very important Color Settings dialog (Figure 11-33).
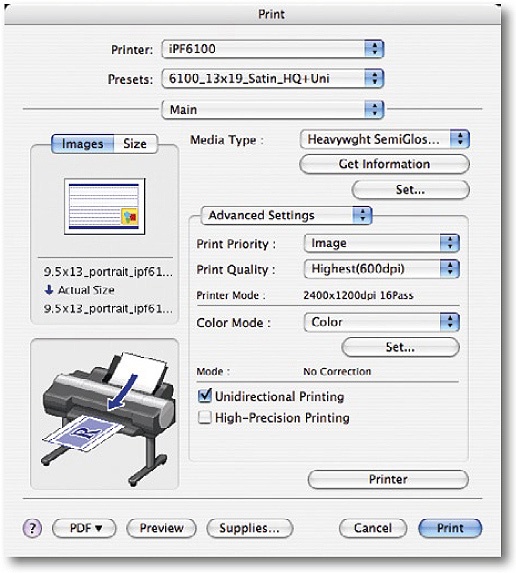

We always use the Application Manages Colors option in Photoshop for all our color prints, implying that all printer-based color corrections should be switched off in the printer driver (Figure 11-33). We would prefer to see this control located in the driver dialog’s Main tab or in the Color Settings section, rather than in its current hidden location. Using driver presets can help you avoid having to regularly navigate to this menu.
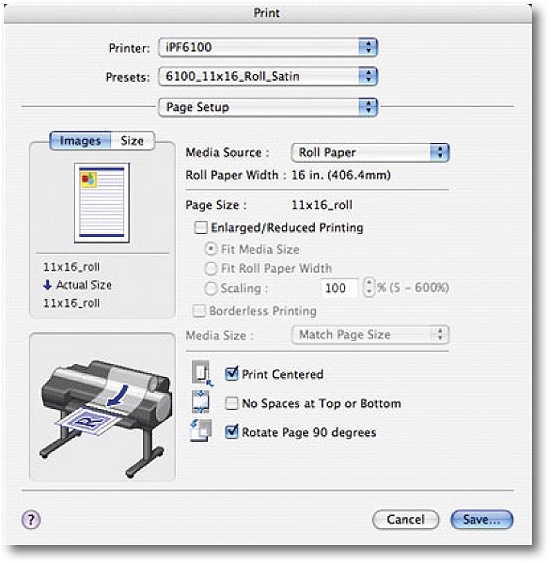
The Page Setup tab (Figure 11-34) includes the following settings:
Media Source
Paper Size
Print Scaling
Print Centered
Rotate Page 90 degrees (for some printers)
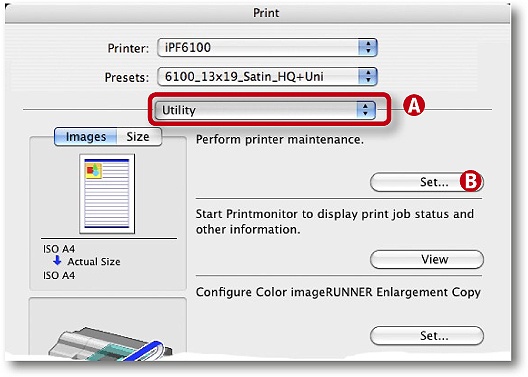
The printer’s driver includes a range of additional tools and functions in the Utility menu (Figure 11-35). The Set button B in the Perform printer maintenance section opens the dialog shown in Figure 11-36.
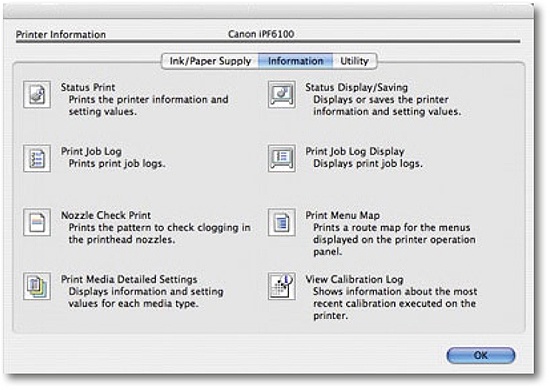
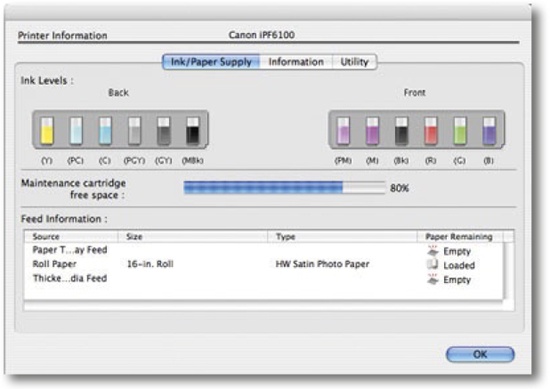
You can also call up the Ink/Paper Supply information (Figure 11-37) from menu A and the Printer calibration state information (Figure 11-38). So, it’s worth getting to know all the informations which can be called up from menu A of Figure 11-35.
Summary •. A useful overview. Details of each section can be displayed by clicking the ▸ button.
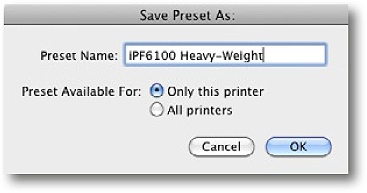
Once you have found the best settings for a specific print job, you can save them as a preset in the Presets dialog in the Save As menu. Use a descriptive name that describes the paper and other parameters you are using. Once saved, your preset will be included in the Presets drop-down menu.
You can now click the Print button to start printing.
We always leave color conversion to Photoshop when we are printing in color, but there are various strategies available to us when we are printing in black-and-white:
Leave color conversion to the printer. This is only practicable if the printer has a dedicated black-and-white mode (most current high-end printers do). This mode usually produces good quality monochrome prints with rich blacks.
Use a trusted color profile and print as previously described. A color profile with reliable characteristics and a neutral gray axis is required.
Use dedicated black-and-white profiles. You can either generate your own profiles using a printer profile kit, or use the method we describe in our Fine Art Printing book ([16]), although you will need access to a spectrophotometer. One advantage of dedicated black-and-white profiles is that they allow you to soft-proof your print in Photoshop – a feature that is not generally available if you use method B above.
We usually use method A, which we will now describe in full using an HP Designjet Z3100 or Z3200. The general method is similar for all high-end printers that have a dedicated black-and-white mode.
The following are some equipment options for producing first-class monochrome prints:
Epson 2200, 4000, 7600, or 9600 printer used with an ImagePrint or QuadTone RIP
Epson R2400, 2880, 3800/3880, 4800/4880, 7800/7880, 7900, 9800/9880, 9900 or 11880 in standard configuration
HP Photosmart Pro B9180,[166] B8850, Z3100, or Z3200
Canon iPF6100, iPF6300, iPF8100, iPF8300, or iPF9100
Custom third-party ink sets or homemade diluted inks with third-party RIPs (such as StudioPrint or QuadToneRIP). We know photographers who use as many as seven inks.
Both the HP Z3100 and its successor, the Z3200, are excellent machines for making black-and-white prints. Like the Epson printers mentioned earlier, both printers use three (or even four) black and gray inks. Photo Black and Matte Black can be installed simultaneously, and with some media the driver makes use of both inks. Additionally, both printers have an optional gloss optimizer, which allows you to reduce the difference in gloss between areas that are heavily inked and those where little or no ink is used.

For printing in black-and-white mode, we use the Photoshop settings shown in Figure 11-40. Assuming the image has already been converted to black-and-white (but is still in RGB color mode), we select Printer Manages Colors in the Photoshop print dialog.
We then select the media type, size, orientation, and all the other media and quality settings mentioned previously.
We activate the Color tab to make our specific settings for black-and-white mode (Figure 11-41). Here, we activate option A Print in Gray scale and select option B Printer manages colors. In menu C, we select the color profile of our source image (although the driver only offers a choice of Adobe RGB (1998) or sRGB) and finally, we activate Advanced color adjustment D.
We click Settings E to open the color adjustments dialog (Figure 11-42). This dialog allows you to fine-tune the tint of your black-and-white print and even allows the use of different tints for highlights, midtones, and shadows. If you intend to use different tints, activate option A. This dialog also includes a gamma slider (here labelled Lightness).

Figure 11-41. We recommend these settings if you want to use the HP Z3200’s printer driver in black-and-white mode.
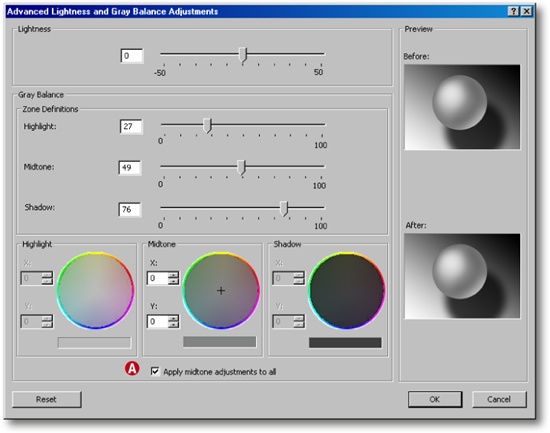
Figure 11-42. This is the dialog for fine-tuning the tint and gamma settings for your black-and-white prints. You can even select different tints for the highlight and shadow areas of your print.
We then click OK to return to the main dialog and save our black-and-white print settings as a preset.
These settings also work – with minor variations – for the HP B9180 and B8850 printers. These models both produce good black-and-white prints, especially when used in conjunction with HP Premium Satin paper.
As mentioned under point 6 in the image preparation section in Upsizing Images, one of the final steps in the image preparation workflow involves setting black and white points that take the visual characteristics of your printer and paper into account. It is too easy to lose shadow and highlight detail in prints if they use the entire range of 8-bit tonal values (from 0 to 255).
Experienced photo printers use a range of values between about 16 and 248, but a generic range can cause an unnecessary loss of tonality and contrast. The ideal solution involves finding the precise black and white points for your combination of printer + paper + ink + color profile + print settings and limiting the tonal range of your image accordingly.
This adjustment involves first finding the black and white points for your setup and then adjusting the tonal range of your image to suit. The next two sections explain in detail how this is done.
Using a printer profile selected in Photoshop, print a test ramp using the default printer settings (you can find a free test chart at [10]). Let the print dry thoroughly and check which black and white values you can differentiate from the solid black patch and the previous patch using a bright light source (D50 or daylight). Write down the appropriate value and do the same for the white or almost white patches.
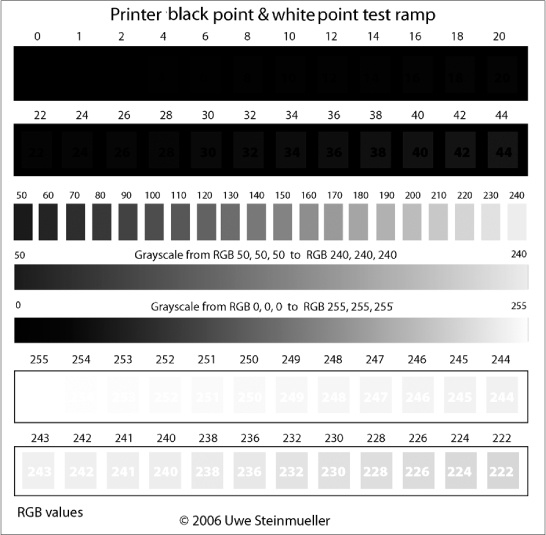
Undifferentiated black tonal values can be as low 20 or 30, and white values can reach 245. A quality high-end printer will produce tones in a much tighter range (about 10–20 for black and 250–253 for white). Remember to repeat this test for each type of paper you use.
When preparing your image for printing (Figure 11-44) use Photoshop Levels to restrict the tonal values in your image to between those values determined from your print-out of Figure 11-43.
Use the image version you want to print to make the test. It might at first seem that this restriction reduces an image’s tonality, but as you can see in the test ramp, all pixels beyond the black point will be printed using the darkest black the printer can produce and will not be distinguishable from black anyway. All pixel values that are lighter than the white point will not be distinguishable from the white of the paper.
In some cases, you might want to lower the black point manually to avoid reproducing noise or overdifferentiated shadow textures.
If your image has a lot of white areas at its borders and is intended for print publication, it can help to increase the white point slightly so that the whites in your image turn slightly gray. This way they can be more easily differentiated from the white of the paper.
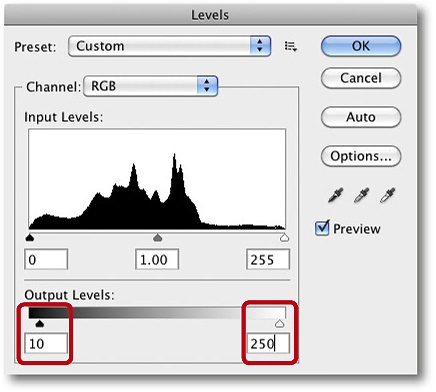
Figure 11-44. Set your tonal values within the range limited by your printer’s black and white points.
For images intended for offset printing (i.e., most books and magazines), we recommend using a black point around 20 a white point around 250 (for coated papers). The lower the paper quality, the more you have to limit your tonal range in order to preserve detail – regardless of how the image looks on a monitor.
Limiting tonality is only necessary if the tonal range of your image exceeds that of your printer! If your image has sufficient highlight and shadow tone leeway, you won’t need to make this type of adjustment.
[163] Such as the Epson Photo Stylus R800, R1800, and R1900, or the Canon PIXMA Pro9000
[164] Check these parameters even if you are using a print preset.
[165] The No Color Management option is no longer available in Photoshop CS5.
[166] The HP B9180 and B8850 printers use only two black/gray inks and are therefore not the best choice for high-quality black-and-white printing. They do, however, yield good results when used with HP Premium Satin photo paper.