
Adjustment layers are the main reason we use Photoshop Layers so much during our workflow. An adjustment layer doesn’t add a new image to a stack, but instead allows you to perform corrections on the layers beneath it. Adjustments are only performed virtually (i.e., they are not resampled into the image data) until the entire layer stack is flattened to a single layer or printed.
Many (but not all) of the tools available in the Image ▸ Adjustments menu are available as adjustment layers. Adjustments applied as layers can be fine-tuned not only using each tool’s own sliders, but also using layer opacity settings and layer masks. Layer masks are used to limit the effects of an adjustment to the non-masked image areas.
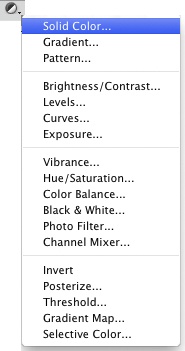
A new adjustment layer is created either using Layer ▸ New Adjustment Layer ▸... or the ![]() menu at the bottom of the Layers panel. There are many types of adjustment layers to choose from (although we don’t strictly class the first three types in Figure 7-8 as such). The adjustment types marked in red in the illustration are the most important in our workflow. Once you develop your own processing style, you will want to include other adjustment types in your repertoire.
menu at the bottom of the Layers panel. There are many types of adjustment layers to choose from (although we don’t strictly class the first three types in Figure 7-8 as such). The adjustment types marked in red in the illustration are the most important in our workflow. Once you develop your own processing style, you will want to include other adjustment types in your repertoire.
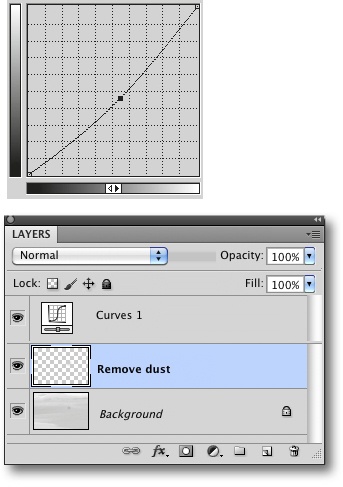
We will use the Curves adjustment layer illustrated on the right to darken our sample image. Our Layers panel will then look like the one shown in Figure 7-9. (If the layer entry is too small, or if you have selected the None thumbnail option in the panel options menu, the layer entry will display the generic ![]() icon.)
icon.)
If, for example, you make Curves adjustments directly using the Curves tool, any adjustments will be applied directly and irreversibly to the image pixels. If, however, you are using a Curves adjustment layer, clicking the ![]() or
or ![]() icons in the Layers panel starts the Curves dialog as a layer component, making any adjustments you apply virtual and non-destructive.
icons in the Layers panel starts the Curves dialog as a layer component, making any adjustments you apply virtual and non-destructive.
Adjustment layers apply virtual effects that can be refined later. This way, the Layers panel also provides you with a detailed history of the corrections you have made. Additionally, adjustment layers can be dragged (and thereby applied) to other open images.
An adjustment layer uses very little disk space, as only the correction parameters (and not the actual pixels) are saved. In order to ensure that images remain compatible with other applications, Photoshop automatically creates an additional layer that contains a flattened, single-layer version of the image. This doubles the disk space the image requires, although any additional adjustment layers will only slightly further increase the file’s size. You can prevent this (otherwise invisible) layer from being created if you set the Maximize PSD and PSB File Compatibility option under Preferences ▸ File Handling to Never. We don’t recommend doing this, as it reduces an image’s compatibility with other applications (such as Lightroom). Selecting this option does, however, reduce the disk space used by the image file. Disk space requirements also grow if you use layer masks, as described in Making Selective Adjustments Using Layer Masks. However, layer masks consist of 8-bit grayscale values, and therefore use less disk space than RGB or CMYK pixel layers.
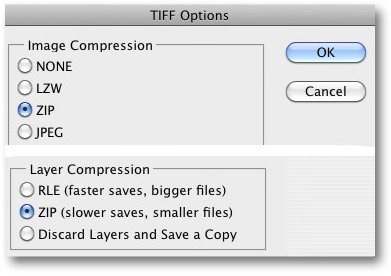
You can also save disk space by compressing the layers in an image. Since CSi, Photoshop allows you to compress layer data using either RLE or ZIP. ZIP usually produces smaller files but requires more processing power and takes longer.
Once you get the hang of working with adjustment layers, you won’t want to work without them.
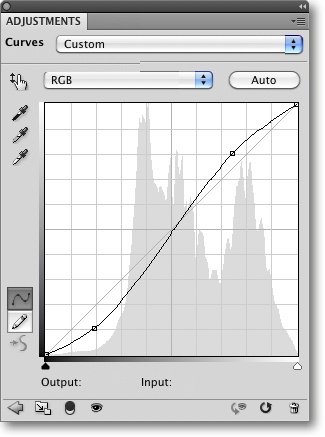
As of CS4, Photoshop is capable of nonmodal, layer-based processing. Earlier program versions required you to explicitly close adjustment dialogs (by clicking OK) before you could activate or edit another layer. Now, you can leave multiple dialogs open. Dialogs no longer have their own OK button, but can nevertheless be closed to save space on the desktop (Figure 7-11). You can then switch to another dialog simply by clicking on the appropriate layer in the Layers panel. This functionality makes working with multiple layers a lot simpler.
The dialogs you see if you make an adjustment using an adjustment layer are slightly more compact than those displayed if you make an adjustment via the Image ▸ Adjustments menu, but they still contain all the same functionality.
Other buttons in adjustment dialogs include: ![]() resets all parameters to their default values,
resets all parameters to their default values, ![]() displays the original (uncorrected) image, and
displays the original (uncorrected) image, and ![]() toggles between showing and hiding the effects of your manipulations. Clicking
toggles between showing and hiding the effects of your manipulations. Clicking ![]() limits the effect of the active layer to the layer directly beneath it. This setting is indicated in the Layers panel by the presence of an arrow
limits the effect of the active layer to the layer directly beneath it. This setting is indicated in the Layers panel by the presence of an arrow ![]() next to the layer icon (Figure 7-12). This function is only relevant if the next layer doesn’t completely cover the layers beneath it, so we don’t end up using it very often in the course of our workflow.
next to the layer icon (Figure 7-12). This function is only relevant if the next layer doesn’t completely cover the layers beneath it, so we don’t end up using it very often in the course of our workflow.

The ![]() button in Figure 7-11 switches between large and compact dialog displays. Further (sometimes adjustment-specific) functions are included in the menu at B, which you can display by clicking the
button in Figure 7-11 switches between large and compact dialog displays. Further (sometimes adjustment-specific) functions are included in the menu at B, which you can display by clicking the ![]() symbol at top right.
symbol at top right.
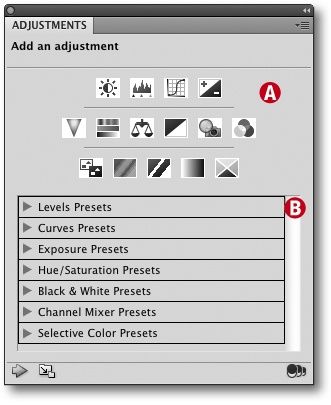
The ![]() button opens a new panel (Figure 7-13) containing a range of icons (A) for creating new adjustment layers and a list of adjustment layer presets (B). Each preset contains a drop-down menu of variants. For example, the Curves presets menu contains various predefined curves for producing different levels of midtone contrast.
button opens a new panel (Figure 7-13) containing a range of icons (A) for creating new adjustment layers and a list of adjustment layer presets (B). Each preset contains a drop-down menu of variants. For example, the Curves presets menu contains various predefined curves for producing different levels of midtone contrast.
Clicking an adjustment layer icon creates a new layer with default values and clicking a preset creates another layer with adjustable preset values. This allows you to quickly set up and fine-tune your adjustments using the appropriate dialog settings.
You can also create a new adjustment layer by clicking ![]() at the bottom of the Layers panel or by using the Layer ▸ New Adjustment Layer command. You can then load presets using the adjustment layer menu (Figure 7-11).
at the bottom of the Layers panel or by using the Layer ▸ New Adjustment Layer command. You can then load presets using the adjustment layer menu (Figure 7-11).
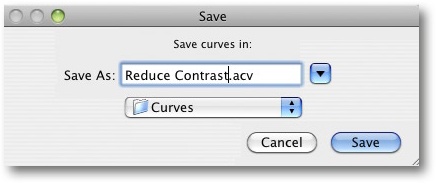
You can save your current setting as a custom preset using the Save Current Preset... command in the panel menu ![]() .
.
Your new preset will now appear in the preset menu A in the adjustments panel (Figure 7-11), as well as in the preset menu B in the appropriate adjustment layer dialog (Figure 7-13) and the preset menu for the Image ▸ Adjustments command.
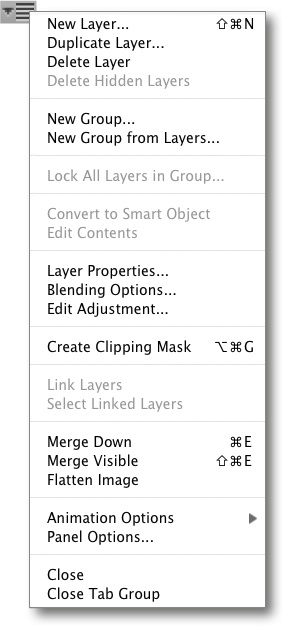
The Save dialog (Figure 7-14) suggests standard locations for saving presets, but you can also select your own location. This means you can save your presets in a location that won’t be deleted if you reinstall the software. If you use this option, you have to enter the location manually in the Photoshop Preferences dialog. The adjustment layer ![]() menu (Figure 7-15) also contains the Load xxx Presets command for loading previously saved presets (only if a adjustment layer is selected).
menu (Figure 7-15) also contains the Load xxx Presets command for loading previously saved presets (only if a adjustment layer is selected).