
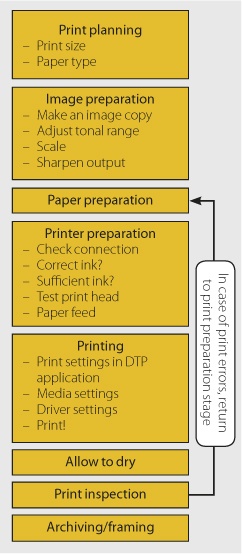
Test prints are quick and easy to make, whereas multiple high-end (possibly large-format) prints require careful planning and their own sub-workflow in order to ensure success. Figure 11-8 illustrates this complex phase of the overall workflow. Once you learn the individual steps, the print workflow will become second nature to you. The following sections address the steps involved.
This may sound odd at first, but it makes sense once you understand the principles involved. The first question involves the intended purpose of the finished print, as this dictates the size and format of the paper. This part of the decision process also involves deciding how to position the print on the chosen paper (i.e., horizontally or vertically, and with larger or smaller borders). Consider too whether title, signature, and numbering are part of the print process, or whether this information can be added manually later.
Prints that are intended for handing around (pictures of a party, for example) require paper with a robust coating. The subject of an image can also influence your choice of paper – a portrait looks better on matte or semi-matte paper, whereas a detailed architectural print of an industrial building looks better on glossy paper.
If you are printing on a high-end Epson machine, you will have to manually select and install the ink cartridges with photo black (for glossy paper) and matte black (for matte papers). Here, it helps to sort your print jobs so that you don’t have to continually swap out ink cartridges. Avoiding unnecessary cartridge swaps also saves ink.
We have already addressed the basic principles of image optimization in the previous chapters. The same techniques can also be used to optimize your images specifically for printing:
Make a copy of your image file. This is especially important if the image needs to be scaled for printing.
Flatten all image layers to the background in the image copy. This results in a much smaller image file.
Scale your image to the print format. This step is only necessary if your print format is significantly larger or smaller than the original image. You can leave mild scaling to the printer driver or your print software. When we are downsizing images in Photoshop, we use the Bicubic Sharper interpolation method. We use Bicubic Smoother for upsizing.
If we are not using print software or plug-ins that support 16-bit printing, we reduce 16-bit images to 8-bit color depth. Printing 16-bit images takes longer but usually produces softer, more realistic color transitions.[162]
Sharpen for output, depending on the output medium you are using. Matte and semi-matte papers require stronger sharpening, as they tend to produce slight ink bleed and visually reduce sharpening effects.
Usually, layer masks are not necessary for applying output sharpening, although we do sometimes use them to protect critical image areas.
The final step (usually only applicable to high-end art prints) involves adjusting the tonal range to suit the paper you are using and, if required, the paper’s prescribed color profile. For monochrome prints, you might also have to adjust the tonal range to suit any preset printer settings. The selected color profile and the Black Point Compensation print option (Figure 11-13) should deal with these factors automatically, but unfortunately, they are not always up to the job.
We describe tonal range and black point/white point adjustment in detail in our book on fine art printing [16]. You can also find more information on the subject in Finding a Printer’s Black and White Point.
If your image is not sufficiently large for your intended print size, you have to enlarge (or upsize) it. The following sections describe the methods we use for this critical process:
Photoshop Bicubic Smoother Interpolation • Introduced with Photoshop CS1, this method is designed specifically for image enlargement. If you shoot in RAW format and use Adobe Camera Raw (or another RAW editor), you should scale your images during RAW conversion. You can find an article on image upsizing and our free Photoshop upsizing action DOP Upsizing at the URL listed in the margin.
Reducing (downsizing) images is a less critical process and can be performed using Photoshop’s Bicubic Sharper interpolation method.
Upsizing article: www.outbackphoto.com/workflow/wf_60/essay.html
Genuine Fractals • This an expensive but proven tool that we use a lot for large-scale image upsizing. The tool produces natural-looking (if slightly unsharp) results.
Note
![]() If you need to apply heavy scaling, please read our notes in Fine-Tuning After Upsizing or Downsizing Images,.
If you need to apply heavy scaling, please read our notes in Fine-Tuning After Upsizing or Downsizing Images,.
Note
![]() There is a great article on image upsizing by Jack Flesher at [73].
There is a great article on image upsizing by Jack Flesher at [73].
People often ask us to name our favorite upsizing method. Photoshop’s Bicubic Smoother is fine for smaller enlargements, and Genuine Fractals is our current favorite for larger print sizes. The subject of scaling is, however, hotly debated, and the only way to find the best method for your own images is to experiment. Further information on scaling can be found at: www.outbackphoto.com/contest/contest_20/essay.html.
Always store your paper in a protective sleeve and brush off dust using a soft brush before printing. Paper dust can stick to your printer rollers and print heads and also take on color during printing – only to fall off later, leaving ugly white specks on your finished print. Matte art papers are especially prone to this problem. Always brush off rag papers – glossy and baryta papers seldom require brushing before printing.
![Always handle fine art paper with cotton gloves and brush off dust using a wide, soft brush before printing. (Image courtesy of Monochrom [132])](http://imgdetail.ebookreading.net/design/8/9781933952710/9781933952710__the-digital-photography__9781933952710__httpatomoreillycomsourcerockynookimages752138.png.jpg)
Figure 11-9. Always handle fine art paper with cotton gloves and brush off dust using a wide, soft brush before printing. (Image courtesy of Monochrom [132])
Allow your paper to adjust to room temperature and moisture before going ahead with printing.
Some fine art papers are extremely sensitive to fingerprints, so always wear cotton gloves when you are handling this type of paper. Try to avoid skin contact with the printable (and printed) surface of the paper.
Allow your printer to initialize and ensure that the connection to your computer is secure. If you are using an inkjet printer, always check the ink nozzles by running a test print on cheap paper before starting a print run. This can save time, ink, paper, and aggravation. It can be necessary to run several nozzle cleaning cycles before you start printing.

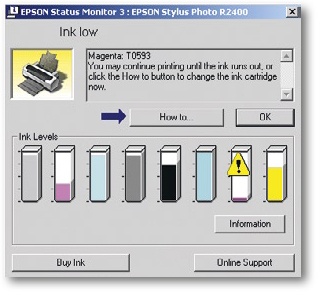
Check that you have sufficient ink before starting a print job. Stopping during a print due to a single empty ink cartridge is annoying and usually produces color inconsistencies in the finished print.
Under Windows, most Epson printers have an ink check function under the ![]() button on the
button on the ![]() tab in the printer driver dialog. The same function can be found under the Configuration button
tab in the printer driver dialog. The same function can be found under the Configuration button ![]() in the printer service utility
in the printer service utility ![]() in the Mac OS X dock.
in the Mac OS X dock.
Place your prepared paper in the paper feed so that it fits snugly but not too tightly. If you are printing on especially thick paper, it sometimes helps to gently push the paper into the feed when printing starts.
We discuss the print settings themselves in Printing Your Image.
Fresh prints are sensitive and should be laid flat in a dust-free environment while they dry. Print colors change during the drying process. Always handle your prints by their edges or borders. The appropriate drying time depends on the ink and paper used, but you can generally inspect an image after about 10 minutes. If you want to frame or pack your print, wait longer. Prints for framing under glass should dry for at least 24 hours first and need to be protected from dust and dirt.
You can now inspect your print, keeping an eye on the following points:
Is the overall brightness and color range OK?
Is the print sufficiently sharp? If not, check whether the original image is unsharp and whether you have applied sufficient sharpening.
Are there any unwanted specks in the print? If yes, are they due to image errors or to dust that crept into the print process?
If your print is too dark, it is often because your monitor is either wrongly calibrated or not calibrated at all, or that it is set up too brightly. Most monitors’ default settings are too bright. Our calibrated and profiled monitors are generally set to between 20 and 30 percent of maximum brightness. Errors can also be caused by incorrect print settings, such as:
Wrong paper or printer profile
Multiple color conversions (in the print application and the printer driver)
No explicit paper/media selected
Unsuitable print quality setting for the paper being used
Clogged ink nozzles
Incompatibilities between the selected paper and ink types
Depending on the results of your investigations, you will either have to re-calibrate your monitor, reoptimize your image, or take a fresh look at your print settings.
It is often useful (and cheaper) to make a small test print before starting to print a large-format art print. You can use a similar but cheaper paper for your test if you are confident that you are familiar with your printer’s characteristics. You can also save money if you print just one strip of your image and use the same piece of test paper multiple times until you are happy with your results.
Record the photographer’s name, the date, the file name, and the successful print settings (paper, print settings, printer etc.) on the back of your print using a soft pencil.
Inspect your prints using a standardized D50 light source and again under the light they will be exhibited under. Display light has a significant effect on the appearance and perception of color.
Only archive or frame your prints once they are sufficiently dry. Even when the paper itself appears to be dry, it will still give off moisture and the inks will still give off solvents. It is always better to wait too long (rather than not long enough), especially if you intend to archive your print in a protective sleeve or display it behind glass or plexiglass.
Store high-end prints flat in a dark, dry, acid-free environment. There are suitable boxes and albums available from specialty art stores.
We won’t go into detail on frames and mats (also called passepartouts) here. For more information, see our book Fine Art Printing for Photographers [16]. There are virtually endless possibilities for framing, determined by the purpose of the image and the personal taste (and the budget) of the photographer and/or the customer.
![Store your prints in closed archive boxes made of P.A.T. (Photographic Activity Test) certified buffered materials. (Image courtesy of Monochrom [71])](http://imgdetail.ebookreading.net/design/8/9781933952710/9781933952710__the-digital-photography__9781933952710__httpatomoreillycomsourcerockynookimages752152.png.jpg)
Figure 11-12. Store your prints in closed archive boxes made of P.A.T. (Photographic Activity Test) certified buffered materials. (Image courtesy of Monochrom [71])