
In this chapter, we will cover the following recipes:
- Exec macros to repeat simple commands
- Building a Global macro to create a custom graph layout
- Obtaining input from the session window with a Global macro
- Creating a Local macro
- Local macros with subcommands, submacros, and control statements
Minitab does have a macro language that can be used to automate simple tasks or run more sophisticated functions. Here, we will explore the three different types of macro in Minitab. The recipes follow a set of commands that are used to create a panel of charts. In each recipe, we will build on the previous example until we get to the final, complicated, but sophisticated, Local macro. This will show you the differences between the macro types and why you may want to use one type over another.
The macro language in Minitab shares a lot of similarities with Fortran, and here Minitab shows its pedigree. The first version was written in Fortran at Penn State University in 1972!
Minitab also has an Application Programming Interface (API) that can be programmed to use Visual Basic and other languages. Anyone looking to use the API will find Minitab type libraries and references that they can use as part of the installation of Minitab. Programming the API, though, goes beyond the scope of this book.
What is the difference between the macro types?
Exec macros are just the command language in a text file. When Minitab reads this command language, it will run the steps in order. You cannot use any control statements, such as the IF statements or DO loops within an Exec. Execs, though, can be quite useful as a very quick way of repeating the same steps on new data. They work directly in the worksheet in Minitab. They use the *.MTB file extension.
Global macros are one step more advanced than Execs. They allow for the use of control statements. Like Exec files, they work directly from the worksheet in Minitab. Both Execs and Global macros will refer to columns in the worksheet either by column number, such as C10, or by a column name. Those columns must exist in the worksheet in the same format for the macros to run properly. They use the *.MAC file extension.
Local macros, when called, are told which columns, constants, or matrices to use, and they take this information into the macro. We have to specify the data types for columns and constants within these macros as we use them. Local macros are more typical of a programming language. They are more flexible to use, as by calling the macro, we identify which data to use from the worksheet. They can work on any worksheet and are not limited to using the same column, either by name or number. The *.MAC file extension is used for Local macros as well.
Furthermore, we can call macros from within other macros. These can be held in the same macro file or can call external macro files. In calling other macros, we have to be aware of which macro types can call other macro types. The following table can be used to see how macros can call other macros:
|
EXEC |
GLOBAL |
LOCAL | |
|---|---|---|---|
|
EXEC |
X |
X |
X |
|
GLOBAL |
X |
X | |
|
LOCAL |
X |
The rows show you the macro that is running, and the columns show you the macro being called.
The history folder in Minitab is an invaluable help in writing macros. Most of the commands that we use in the menus have text commands associated with them; as we run the commands in the Stat or Graph menus, this text is stored in the history folder.
We could, however, type the text commands directly into Minitab to create charts or studies without the use of the menus. For instance, the PLOT C1*C2 command will create a scatterplot of column 1 and column 2.
These commands can be entered either into the session window or the command-line editor. To enter commands in the session window, we need to enable the use of the command language. To achieve this, select the session window, go to the Editor menu, and select Enable Commands. This should switch on a MTB > command prompt in the session window. Commands can be entered after this prompt and you can then click on enter to run them. The command language for the session window is disabled by default, but we can change this within options and the section for the session window.
The command-line editor can be accessed from the Edit menu or by pressing Ctrl + L. The benefit of the command-line editor is that it remembers the previous commands that were used. We can also type several lines into the command-line editor and run them in one step by clicking on Submit Commands. This can be useful to test small sections of code.
Macros can be written in any text editor. Notepad is used here as it is freely available and offers a simple interface. The macros must be saved correctly though, and when using Save As… in Notepad, it will add a *.TXT file extension to every file unless we specify that the file type should be save as All files.
Notepad does not allow users to highlight syntax. To see the structure of the macro, spaces are used, which helps follow code, subcommands, and sections for If and Do loops. Other text editors will allow us to color the code.
When writing a macro, it is possible to use Minitab to generate as much of the syntax as possible. By running the command from the menus, we can go to the history folder and take the code from there.
The help files within Minitab also contain a great resource for most of the commands that we can use in macros. From the main help screen, we should select macros from the references section. Then, from the top of the Using Macros help page, select the See also link. The Alphabetical command list option is a great location to read up on most of Minitab's commands.
To run Exec files, navigate to File | Other Files | Run an Exec…; or, we could enter the Execute command with the path and the file name to run the Exec. This is shown as follows:
Execute "C:Users...MacrosReport.mtb" 1.
Macros are run by entering a % symbol in front of the path and filename, as shown in the following command:
%"C:Users...Macrosmontecarlo.mac"
This can be simplified by specifying the folder where macros are saved in Options…. Under the Tools menu, select Options…. The Macro location: section can be used to point to macros.
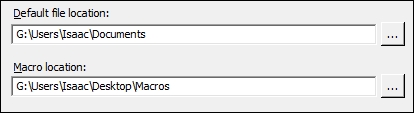
Macros saved in the macro location folder only need to be referred to with % and the filename. The recipes here will assume that we have set the macro location and that our macros are saved within this location.
Many times, a macro will fail to run because of a small syntax error. Typically, a missing ; symbol or the incorrect use of " instead of ' can cause all sorts of problems. To help with debugging, the following commands prove invaluable:
PLUG: This command is used to tell a macro to run and ignore errors in the code that would cause it to not run. It will run through the macro until it hits a problem.NOPLUG: This command turnsPLUGoff.ECHO: This command is used to print each line into the session window while it is run.NOECHO: This command turnsEchooff.NOTE: This command is written after a note is printed in the session window. UsingNOTEand a number, for instance, can tell where you have reached in the macro.#: This is used to enter notes into the macro. Anything written after#will not be read.