
Local macros help create more general functions than Global macros or Execs. Rather than running from column references in the worksheet, we send data to a Local macro. This is run internally. On running a Local macro, we identify the data to be sent into the macro. We also need to declare the data type of variables used within the macro.
Here, we will convert the GSession macro from the previous recipe into a Local macro. This will allow us to tell the macro to use a column instead of looking for a specific column name or reference.
At this step, we will also simplify the function by removing the commands for the one sample t-test and one variance test.
Open the Macro data.MTW worksheet by using an open worksheet in the file menu. Then open the Gsession.mac file, which was created in Notepad in the previous recipe. Or, open the provided catch-up file.
The following commands will convert the Global macro from the previous recipe into a Local macro.
- Go to the
GSession.macfile. To prepare the file for our changes, save it asLLayout.macin the macro directory. - In Notepad, remove the
Gfrom the start ofGMACRO. - On the second line, change the name of the macro to
LLAYOUT Col Spec. - Delete the commands associated with reading the data from the session window and replace these with the
MColumn Col GroupandMConstant Specdeclarations. The initial lines of the macro tillLayoutshould look as follows: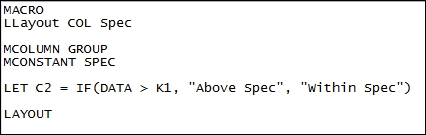
- Replace all references of
Dataor'Data'withCol. - Replace all references of
K1withSpec. - Replace any references of
C2withGroup. - Delete the commands for the
OnetOne Sample t-test, and theOneVarianceOne Variance test. - Check if the macro looks similar to the following screenshot:
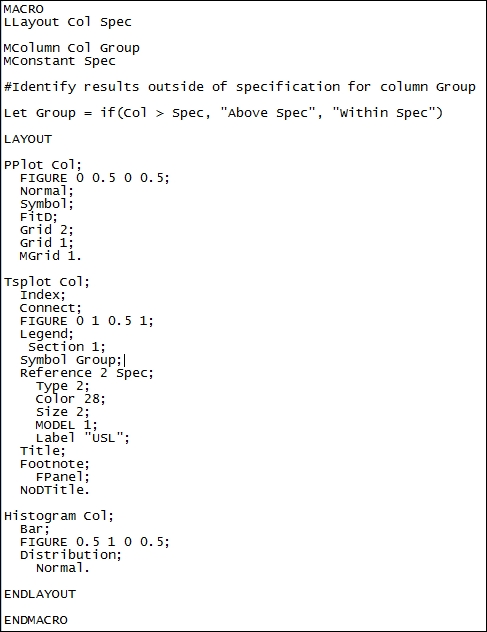
- Save the macro and then go back to Minitab.
- Press Ctrl + L to call up the command-line editor.
- Enter
%LLayout c1 12.5into the command-line editor and click on Submit Commands to run the macro.
The variables on the name line of the macro define how many items we need to specify when we run the macro; or rather, what information is passed to the macro. The Col command is the first value to be passed to the macro and Spec, the second.
Any variable used in the macro has to be declared. The MColumn command declares columns; MConstant is used for Spec to declare a constant. There are also MFree and MMatrix. The MFree command will allow the variable to be defined when the macro is invoked and is dependent on the variable type passed to the macro.
Variables can have any name as long as they do not clash with any of the commands in Minitab.
Here, we have a macro that creates a panel of charts for any column that we send to the macro:
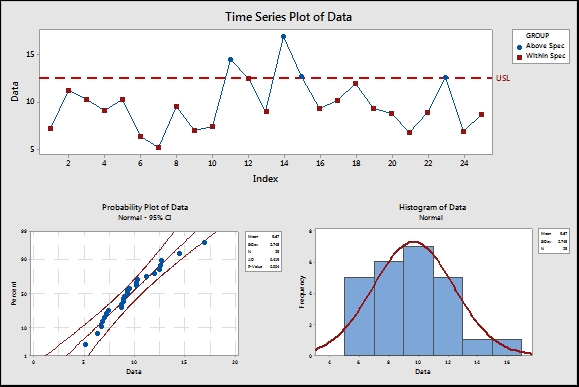
We can improve on this macro by allowing any number of columns to be used and making specifications optional.
The one sample t-test and one variance test were removed from the macro to simplify the example. If we wanted to keep the two tests, we could pass variables for the hypothesized mean and variance into the macro. When calling the macro, we would specify the data column, the specification, the mean, and the variance.
Another option to handle a lot of extra variables is to use subcommands on the macro name. Means and variances could be supplied as an optional command. If they are not used, the tests are not run; if they are supplied, then we would run the two tests. See the next recipe for an example of subcommands on the macro name.