
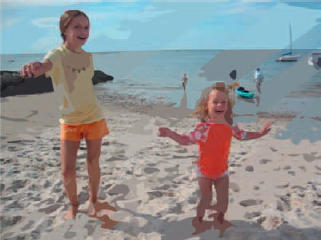
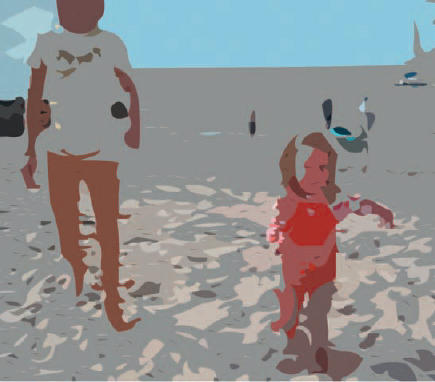
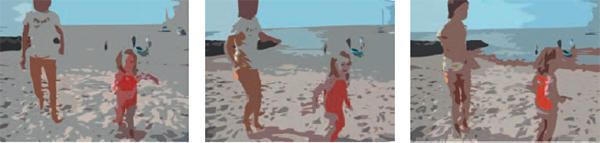
LET’S SAY YOU’RE WORKING on a project and decide to give some video an artsy rotoscoped effect. A great way to achieve this in Flash is with the Trace Bitmap command. Trace Bitmap converts bitmap images into vector graphics that can be edited using Flash’s drawing tools. Using a video program such as After Effects or QuickTime, you can export the footage as a sequence of images and import them into Flash, ready to be traced.
But the Trace Bitmap command only works for one image at a time. That means to trace a series of images, you must tediously apply the effect to each and every image. Luckily, this is just the type of task JSFL excels at automating.

1 First, you need to apply the Trace Bitmap effect to one image. Import the image sequence from the CD by selecting File > Import > Import to Stage and navigate to *image_sequence001.png*. Select image_sequence001.png and click Open. A menu will pop up asking if you want to import all of the images in the sequence. Click “Yes”.
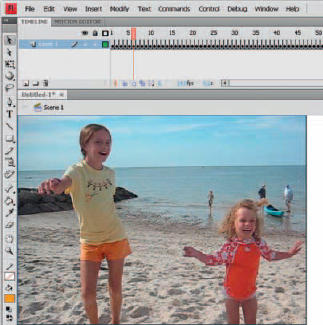
2 Each imported image will be placed in its own keyframe on the main timeline. You can play your movie to see the “video” play as a sequence of frames.
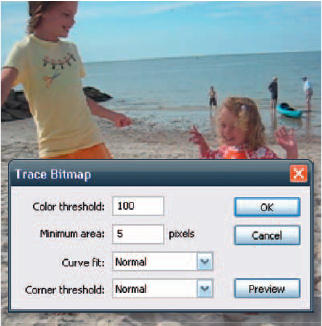
3 Select the image in frame 1. Go to Modify > Bitmap > Trace Bitmap. In the Minimum Area box, type “5”. This makes Flash re-evaluate what color to use for every 5 pixels instead of every 8, which produces a more realistic looking trace. Don’t click “OK” just yet.
4 The Trace Bitmap panel also allows you to preview your current settings before committing to them. Change any of the setting values and click on “Preview” to see how they will affect your image. When you’re happy with the results, click “OK”. Depending on the complexity of the image, Flash will pause briefly while it converts the image into a series of vector shapes.
5 Next, right-click on the History panel and select View > JavaScript in Panel. The History panel will update itself, displaying the JavaScript for the commands you just executed.
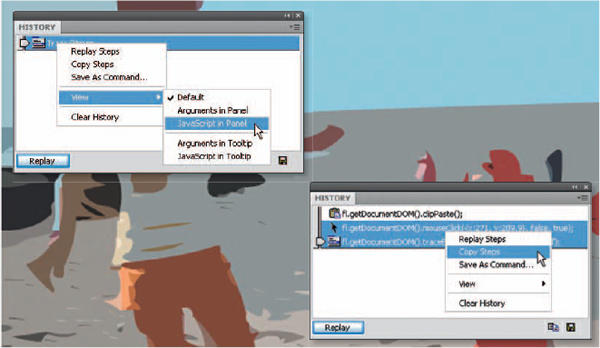
6 Don’t worry if the first set of numbers is a bit different than yours. They correspond to the exact coordinates on the screen that you clicked on to select the image. Copy these steps by selecting them, right-clicking and selecting Copy Steps.

Hot Tip
Be careful about your Trace Bitmap settings. The more complex your images are, the more vector information may be generated during the trace function. This can quickly lead to a very processor-intensive Flash movie, especially if you plan to animate these images. It is also common for the resulting trace to create a larger file size than the imported bitmap alone would. Resize your images as small (width and height) as you can and your sequences as short as possible before importing into Flash.
![]()
HOW DO I KNOW about all this JSFL stuff? Maybe you are thinking I have all of the JSFL methods and arguments meticulously memorized? Not exactly (although that would be convenient and pretty impressive at the next Flash conference I attend).
The secret is, I clicked on the word mouseClick and the word traceBitmap and hit F1 (Flash Help docs). Flash’s Help panel popped up and instantly took me to the entries I selected for these methods. Whenever you get stuck or confused, your first stop should be the Help docs.
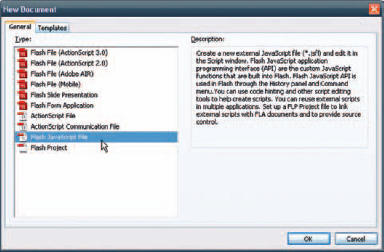
7 Go to File > New and select Flash JavaScript File. If you are not running Flash CS3 Professional, you’ll notice there is no option to create a new Flash JavaScript File. Don’t worry, just open up a text editing program like Notepad and carry on. JSFL in the end is just a text file, so it doesn’t matter how you create it. Paste the code that you copied from the History panel.
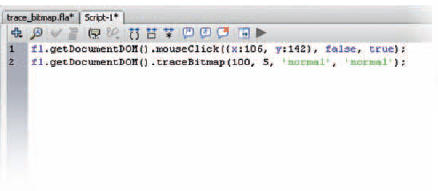
8 Let me explain a bit of the gibberish that you’re looking at. The flat the beginning of both lines refers to, you guessed it, Flash itself. The getDocumentDOM() method tells Flash that we wish to work with the currently active Flash document. Both mouseClick and traceBitmap are pretty self-explanatory; the former is the method that describes a single mouse click, and the latter is the method which actually turns the image into a bunch of vectors. The stuff inside the parentheses is the arguments that are passed to these methods. So the first line tells Flash to execute a mouse click at x:117 and y:160 within the active document (the false and true after the coordinates have to do with whether the Shift key is down). The second line tells Flash to execute a bitmap trace with the parameters you set when you went to Modify > Bitmap > Trace Bitmap. The threshold, or number of colors in the tracing, is set to 200, the minimum area is set to 5, and the curve fit and the corner thresholds are both set to normal. The ; at the end of both lines tells Flash that the line of code is over. Think of it as a period in a sentence.

9 Let’s shorten the code we have so far to something a bit more manageable. We’ll do this by creating a variable. Add the code to the beginning of the existing code.
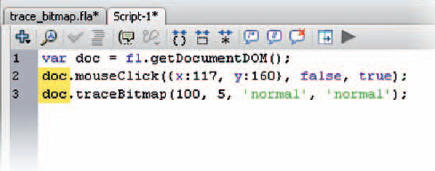
10 Now go down to the next two lines of code and replace each fl.getDocumentDOM(); with the more elegant doc. So now you should have something like this.
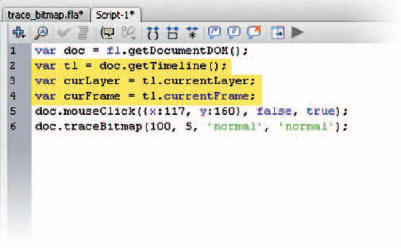
11 While we’re at it, let’s define a few more variables. The first new variable, tl, is another abbreviation. It refers to the document’s timeline. The curLayer variable refers to the currently selected layer (which it gets from the currentLayer method), and the curFrame variable refers to the current frame we’re on (which, again, it gets from the currentFrame method).
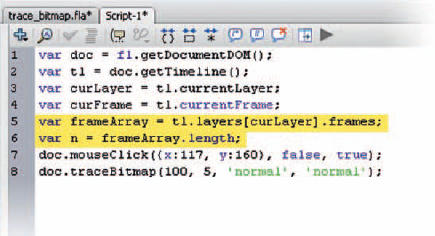
12 You now have variables that know what frame the user is on. Now let’s find out how many frames are in that layer. In line 5, the frames property at the very end of that line returns an array, which gets stored in the frameArray variable. An array is basically a list of items. In this case, it’s a list of frame objects. Arrays have a length property that tells you how many items are in the array; that’s what’s getting stored in the n variable from the expression frameArray.length; in line 6. (If an array represented a year, it would have a length of 12, for each month.)

Hot Tip
Variables can generally be named whatever you like, but there are a few rules: no spaces in the names, no punctuation except for _ or $, and don’t start the name with a number.
![]()
13 Now we have a variable that knows how many frames are in our selected layer. Why is this important? When you imported the image sequence, Flash put each one on its own frame. We want to use the Trace Bitmap command on each one, so the script has to know how many there are so it can tell how many times it should run the command.
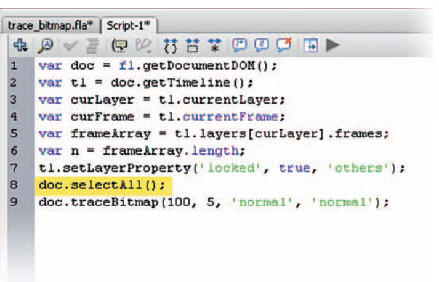
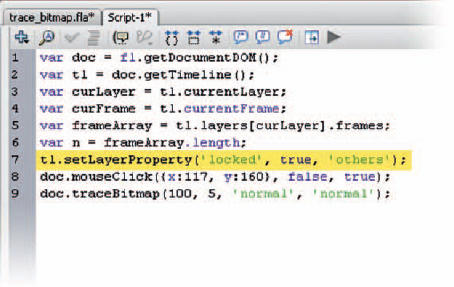
14 Next, add a command to lock every layer other than the one you’re using. Why are you doing this? Because you need a better way of selecting the image we are going to trace. What if you have an image that doesn’t end up in the area you clicked when you first ran the Trace Bitmap command? The script will fail. So instead of simulating a mouse click, you’re going to lock all the other layers and then perform the selectAll method. The selectAll method does the same thing as using ![]()
![]()
![]()
![]()
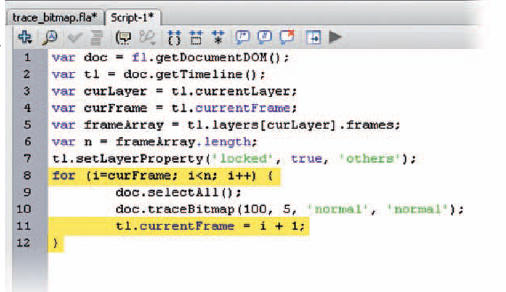
15 All that’s left is finding a way to make Flash run the traceBitmap method for every frame. Luckily, that’s pretty easy to do with a for loop. A for loop is a type of control flow statement. A control flow statement is basically a way to change the normal flow of a program, one line after the other. For loops are ideal for going through lists of data, or an array of frames. The important parts of a for loop are within the parentheses. The first part, i = 0, declares that the variable i is initially set to 0. The second part, i < 10, is the condition. This means that the code contained within the brackets will only be executed if this condition is met. In this case, the condition is that i is less than 10. The third part, i++, tells the script what to do after each iteration, or turn. Each time the condition is met, the contained code is executed, and afterwards this statement is executed. Each time the code is executed, the value of i will be increased by 1. As complex as it looks, it’s pretty simple in function. So the loop starts out at the currently selected frame, and as long as the current frame is less than n (that is, less than the length of the layer), the code within the brackets will be executed and the image will be traced. Finally, tl.currentFrame = i + 1; sets the current frame to the value of i (already the current frame) plus 1, which puts us on the next frame.
16 You’re done! All you have to do is save the command with a descriptive name, such as Rotoscope.jsfl, in the Commands folder on your local drive. See the Interlude at the end of this chapter for the folder paths for your operating system. Once you have the command saved, you can import an image sequence into a new document and go to Commands > Rotoscope. Now that all this legwork is done, whenever you want to get this hand-drawn effect, all you have to do is import the images and run the Rotoscope command. And it only took 12 lines of code!
This is just scratching the surface of what is possible with JSFL. As you can see in the following pages, some amazing additions to the program have been created by normal Flash users like yourself. If you’re intrigued, I highly recommend the book Extending Flash MX 2004 by Keith Peters and Todd Yard. While the book is a bit old, JSFL hasn’t changed much in the last few incarnations of Flash, and the instruction is still very valid. And, of course, there’s always the Internet. Do a search for JSFL, hunker down in your computer chair, and make some kick butt extensions!
Hot Tip
Programmers often start for loops with 0 rather than 1 because arrays happen to start counting at 0. By matching these starting numbers, the for loop easily keeps pace. Frames, however, start at 1, which explains the arithmetic in line 11.
![]()
Easy Palette
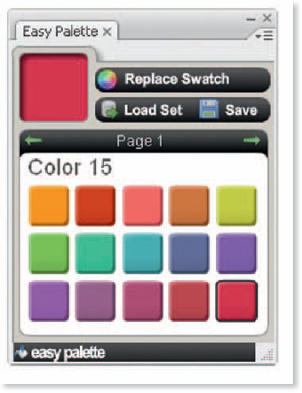
Easy Palette is a color management system developed by Dave Logan that gives you a friendlier and more useful way to manage custom palettes. Easy Palette will allow you to name colors to speed identification (useful for groups that are working on the same project), save and load custom palettes (useful for easily applying color schemes across various documents, or to have specific palettes for each character in your animation), and quickly navigate through saved colors.
This extension is available on the source CD along with several more extensions provided by many kind and generous designers and developers around the world. Check out the Interlude at the end of this chapter for more information.