

LET IT SNOW, LET IT SNOW, LET IT SNOW. Creating constantly falling snow is fun. Like the rain example, snow can be animated several different ways. The easiest way is to motion tween a snowflake symbol along a Motion Guide path. Other methods include using ActionScript-generated snow but don’t ask me to show how that is done because I admittedly do not know how to write scripts on that level. Let’s stick with my “analog” method of animating in Flash shall we?
The more snow you create, the more processor intensive your animation becomes. Proceed with caution and test your animation frequently to make sure the constant looping snowfall doesn’t cause unexpected playback issues. There’s nothing worse than creating a cool animation only to find it skips and chugs during playback.
I highly recommend Chris Jackson’s book Flash + After Effects (Focal Press) because he teaches you how to create snow in Adobe After Effects that is easily imported into Flash. His book contains a ton of other cool examples that you will find very useful on a day-to-day basis.

1 Start with a snowflake design using the Line tool. It’s hard to make a mistake here since there’s no real way to create an incorrect snowflake pattern. Make one “arm” of the snowflake; convert it to a symbol or as an Object Drawing. Copy it using ![]()
![]()
![]()
![]() and paste it in place using
and paste it in place using ![]()
![]()
![]()
![]()
![]()
![]() , then rotate it 45 degrees. Repeat until you have pasted enough to complete the pattern.
, then rotate it 45 degrees. Repeat until you have pasted enough to complete the pattern.
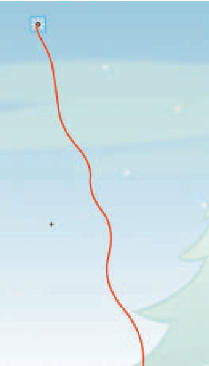
2 Convert your snowflake to a Graphic symbol and then convert the Graphic symbol to a Movie Clip symbol. Double-click the Movie Clip and edit it by inserting a Motion Guide layer. Draw a curvy stroke for the guide and motion tween your snowflake along the path (traveling downwards of course).
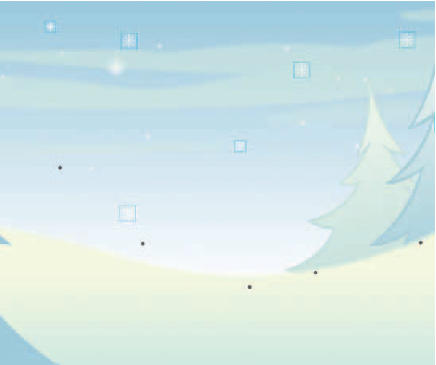
3 You now have a Movie Clip containing an animation of a snowflake tweened along a motion guide. Next, in your Library panel, create a new Movie Clip and insert several new layers. Drag an instance of your snowflake Movie Clip into each layer. Position each snowflake Movie Clip randomly throughout your scene. For each layer, select and drag the keyframe in frame 1 to a different frame number so they each start playing at different times. Make sure each snowflake animation begins outside of the viewable area of the stage.
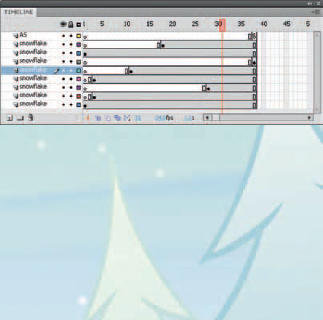
4 Here’s what your Movie Clip’s timeline should look like (give or take some frames or layers). Notice the stop(); action in the last frame of the top layer. This prevents this Movie Clip from looping. Since all instances of the snowflake Movie Clip are present, they will loop by default.
5 On the main timeline, place an instance of your Movie Clip containing your snowflake Movie Clips onto the stage in its own layer. You can place multiple instances of this Movie Clip around your stage as many times as you like. But be aware that the more instances of the snowflake animations you have present on the stage, the more processor intensive your movie will be. If maintaining a high frame rate is your priority, you may want to experiment by using a simple oval shape for your snowflake graphic. Remember, fewer vector points means better playback.


Hot Tip
The length of the motion tween in your guided snowflake can help make the difference between a soft snowfall or a blizzard. Experiment with the number of frames in your tween to get the best results for your particular animation. To animate a blizzard you would need to shorten the length of the motion tween and populate the scene with an abundance of snowflake instances. You could even try making the Motion Guide path one big “S” turn to suggest a strong wind that is changing direction.
![]()