

FLASH IS MUCH more than a tool for designing cartoon characters. Its full array of vector drawing tools is suitable for many styles of illustration. Here we will go step by step creating a realistic flower illustration. Flowers are always appealing to draw and at the same time challenging due to the subtle variations of color they often contain.
The main tools to be used for this example are the Pen tool and Gradients. The Pen tool has been greatly improved in Flash CS4 and if you are familiar with Illustrator’s Pen tool, you will notice some similarities. Flash has adopted the core functionality of Illustrator’s Pen tool including identical shortcut keys and hot key modifiers – not to mention identical pen cursors as well. Integration is bliss.
One particularly cool Pen tool trick is to hold down the spacebar to redirect the current point while drawing. Another nice feature in CS4 is that the auto-fill when completing an enclosed shape with the Pen tool has been removed for consistency reasons.
The more you experiment with the new Pen tool the more I think you’ll like it. In fact, I think it’s better than Illustrator’s Pen tool.

1 The first step is to outline the basic shape of the flower’s petal with a stroke color that is high in contrast to the original image. Be as precise as you want, but I recommend using the original image as a guide, simplifying where needed along the way.

2 The Pen tool ![]() is perfect for this task simply because it is quick and easy to manually trace the contour of the petal by clicking and dragging along the contour of the image.
is perfect for this task simply because it is quick and easy to manually trace the contour of the petal by clicking and dragging along the contour of the image.

3 To close the path, position the Pen tool over the first anchor point. A small circle appears next to the Pen tool pointer when positioned correctly. Click or drag to close the path.

4 Use the Subselection tool ![]() to refine your path if you desire. To adjust the shape of the curve on either side of an anchor point, drag the anchor point, or drag the tangent handle. You can also move an anchor point by dragging it with the Subselection tool.
to refine your path if you desire. To adjust the shape of the curve on either side of an anchor point, drag the anchor point, or drag the tangent handle. You can also move an anchor point by dragging it with the Subselection tool.
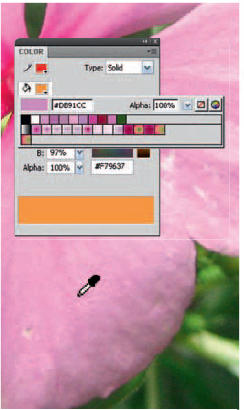
5 Next we need to mix some radial gradients. Flash’s color picker can grab colors from anywhere on your screen if you click on any of the color swatches found in the Color Mixer, Properties panel or the toolbox and drag to the area containing your desired color.
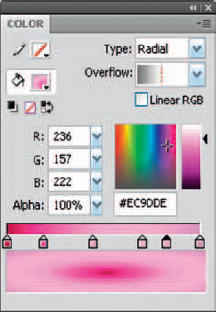
6 The initial gradient will provide the overall hue and tonal range of the flower petal. Flash lets you apply up to 15 color transitions to a gradient.

7 Fill your shape with your radial gradient and then use the Fill Transform tool ![]() to edit its size, position and rotation. You can delete the stroke at this stage as it is no longer needed.
to edit its size, position and rotation. You can delete the stroke at this stage as it is no longer needed.

8 Copy ![]() and Paste in Place
and Paste in Place ![]() this shape to a new layer as you will be layering several gradients on top of each other to create a realistic effect. The following gradients contain varied amounts of alpha to create subtle transitions in color.
this shape to a new layer as you will be layering several gradients on top of each other to create a realistic effect. The following gradients contain varied amounts of alpha to create subtle transitions in color.

9 Fill the duplicated shape with your new gradient and use the Fill Transform tool to create the suggestion of subtle undulations within the shape. Repeat the process of copying and pasting in place this shape to new layers for each new gradient.

10 You can manipulate each new gradient using the Free Transform tool to create soft shadows and highlights. In almost all cases, you will only use partial gradients to create subtle transitions of light and shadow.

Hot Tip
If you prefer avoiding multiple layers, turn on Object Drawing mode ![]() to avoid having overlapping objects “cut-in” to each other.
to avoid having overlapping objects “cut-in” to each other.
![]()

11 It’s always convincing to position soft shadows where the edge of the shape contains an imperfection. The combination of gradient colors and irregular contours makes for a very convincing imperfection.

12 This is the end result of using several variations of layered radial gradients, producing beautiful undulations of color.

13 Repeat the same procedure for each petal of the flower image. To keep your main timeline layers to a minimum, convert each layer to a group or an object drawing and convert each petal to a symbol.
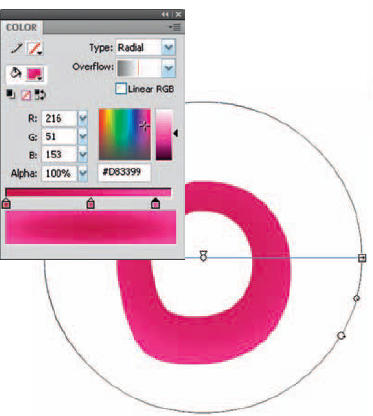
14 The center of the flower, technically named the stigma, was created with a donut-shaped fill containing a radial gradient.
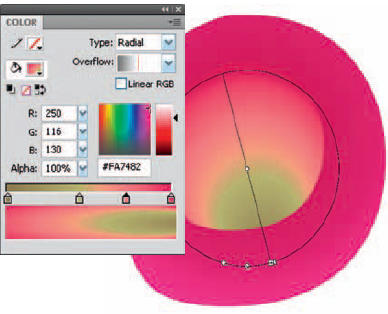
15 To achieve the effect of depth in the center of the stigma, drag the little white arrow in the radial gradient’s center to move the focal point towards the edge.

16 Here’s what the flower image looks like once all the petals and stigma have been illustrated. But you don’t have to stop here. Let’s have some fun with Flash’s filters. Convert the entire flower to a Movie Clip symbol.

17 From the Filters panel, add a Drop Shadow. Set the blur, alpha and distance to your desired amount. You may want to also add a Blur filter to soften the overall image of the flower.

18 Duplicate the instance of the flower movie clip. Scale and rotate them to create an appealing floral arrangement. It’s almost hard to imagine this style of illustration can be made entirely in Flash, right?
Hot Tip
For a soft hazy effect, paste your flower into a Movie Clip symbol and then apply a subtle Blur filter. Best part about nesting it in a symbol is having the ability to easily duplicate it several times, and apply various color effects and filters to create an arrangement of flowers in very little time.
![]()