
TWEENING IS A GREAT WAY to add quick and simple animation to your Flash movie. But what if you could push the tweening method to its limits and give more realism to your character? What if you could harness its simplicity and make it work in ways not too many other Flash users have thought of? What if you have learned everything there is to know about tweening, go back to the first 10% of that knowledge, and take a left turn? Where would that take you?
In this example, I’m going to reveal a truly killer Flash animation technique that will actually create a 3D optical illusion that has fooled even the most discerning eye. The cool thing is you never leave the Flash environment and remain in the 2D realm. You are now in a dimensional limbo. If it’s still 2D but looks like 3D, then what exactly is it? Welcome to what is commonly referred to as “2.5D animation”.

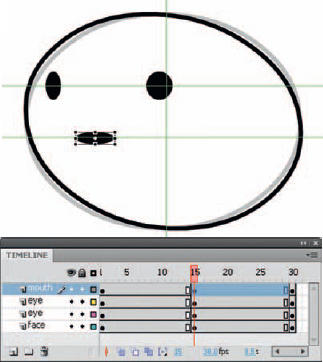
1 Let’s start with a few basic shapes that resemble eyes and a mouth on a face. You can add some horizontal and vertical guides to help keep these objects aligned with each other. Before you start editing these shapes, insert keyframes a few frames down the timeline across all layers. You will see why this is useful later.

2 Insert keyframes across all layers between the first and last frames of your timeline. Start with the head symbol by skewing it with the Free Transform tool. Since you will be creating the illusion of the head turning to the left, skew this shape by clicking and dragging just outside the bounding box in this direction.

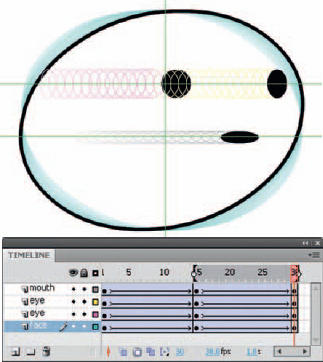
3 Next, select the left eye symbol and position it close to the left edge of the head shape. Use the Free Transform tool to reduce its width slightly, creating the illusion of the eye moving away from us around the surface of the head.

4 Move the other eye over as well but scale it slightly wider as it gets closer to the middle of the head. This is where, if it were truly mapped to the surface of a three-dimensional sphere, it would be at its widest – the point where it is closest to us.
5 Next, move the mouth over in the same direction and scale its width slightly smaller like you did for the first eye. You might want to push the mouth closer to the left edge to provide more space between the mouth and the right eye. This will help make it feel as if the mouth is truly wrapping around the head like the left eye is starting to do.

6 Now all you have to do is apply motion tweens to all the layers. Drag across all layers to select them and apply a motion tween from the context menu or Properties panel. Remember when you added keyframes to the final frame in step 1? Now all you need to do is apply motion tweens to the latter half of your timeline to return the head to its original position.
7 Repeat the same procedure but in the opposite direction to make the head appear to turn to the right. Experiment by making the head move from left to right by removing the keyframes in the middle of the timeline.

Hot Tip
Don’t be afraid to push the limits of this technique. I see my students attempt this style of animation and all too often they hardly move the features across the face enough to make the illusion convincing. Play back your animation frequently to test the overall effect. You can always add or remove frames if the animation is too slow or too fast. Add a little easing to make it look even more realistic.
![]()