

Contributed by Ben Palczynski
www.hiylea.com
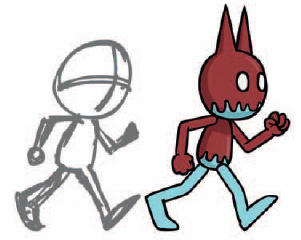
THIS IS AN EXAMPLE of a traditional walk cycle animation where each frame is drawn completely by hand. What makes this particular animation “advanced” is that it requires not only drawing skills, but a sense of rhythm and timing. Ben makes it look easy, but with some dedication and practice, you can achieve great results.
One of the most well known and highly praised resources for character animation is The Animator’s Survival Kit (Richard Williams). Williams explains everything you could ever want to know about all kinds of walk cycles and it’s a reference no animator should be without. It’s one of those books that should be next to your workspace at all times.

1 Pick a starting point to draw. The initial step as the front foot contacts the ground will do. It helps to use a horizontal guide to help keep things aligned and level.

2 Now draw the halfway position where the standing leg is straight and central. Turn on the Onionskin tool to use the previous drawing as your reference for scale and alignment.


3 Continue drawing the key main poses using the Onionskin tool to reference your previous keyframes.

4 Now do the poses in between these positions. The more keyframes and poses you add, the smoother and slower your animation will be. Experiment with frame rate and number of keyframes for your walk cycle.

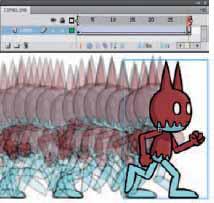
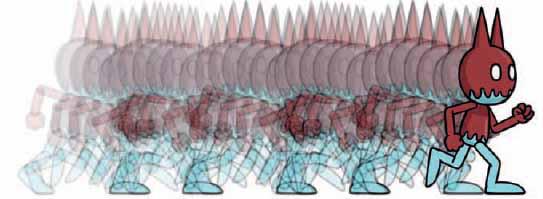
5 Turn onionskinning on over the whole animation so you can look for the arcs of motion to check that things are generally lined up. If something is jittering in your animation this can help you spot where it is.

6 Next, center the drawings so you can create a nested loop. Combine any layers you have for each frame, turn on Edit Multiple Frames and span all keyframes using the Frame Indicator brackets. Use the Align panel to center them all.

7 Place these keyframes in a symbol if they aren’t already. Draw your character or drag pre-made body parts from the Library into a new layer above your walk cycle. Align each body part according to each sketch for each keyframe.
8 Drag this nested walk cycle to a new layer on the main timeline and motion tween it across the stage.

9 The head “turn” uses the same “globe” technique as shown in Chapter 3 (Masking).

10 To prevent your character’s feet from slipping along the surface as it walks across the stage, set the symbol to graphic and playback to loop. Turn on the Onionskin tool and make sure that the feet overlap fully when they’re placed on the ground. The advantage of having the walk cycle nested in a single symbol is the ability to scale the walk cycle quickly and easily. You can also flip the walk cycle horizontally to make the character walk in either direction.


Hot Tip
When animating a walk cycle, it’s sometimes a good idea to start off by animating the character literally walking across the screen – one image positioned after another like the thumbnails along the top and bottom of these pages. This might help you fine-tune the overall mechanics and the rhythm of your walk cycle.
![]()