
Contributed by Kirk Millett

BACKGROUNDS ARE CHARACTERS too. They can often take on personalities all their own and be brought to life just as much as a character (with eyes, a mouth, arms, legs, etc...) can. Backgrounds are also a classic way of complementing a character’s actions within its environment. Remember Fred Flintstone’s marathon runs through his own living room? Even though we’d see the same lamp and hanging picture pass by over and over, we remained focused on the action and story. An effective background loop will allow your viewers to do the same. The illusion is created by repeatedly tweening background art across the stage. The art has matching left and right edges so multiple copies can be seamlessly stitched together. A greater sense of depth can be achieved when individual background elements are placed on separate layers and moved at different speeds.

1 The key to a seamless looping background is creating graphics that can be joined together seamlessly. The rock formation art is only slightly wider than the stage. By duplicating it and aligning its left edge with the right edge of the original, you can double its width.
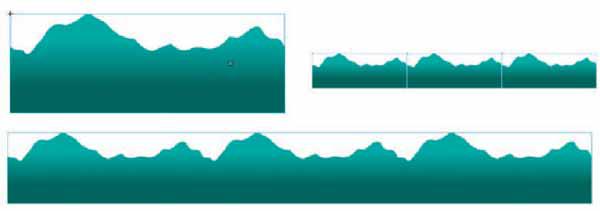
2 Join and group multiple art copies on each layer. The back layer should have shorter art and use more duplication than the foreground layer. This will allow the back layer to move more slowly than the foreground layer, even though their tweens will use the same amount of frames. This is commonly referred to as a “2.5D” effect since it creates the illusion of a third dimension (Z-axis), but you never leave Flash’s two-dimensional environment. That third dimension simply doesn’t exist except in the viewer’s mind as they watch the foreground and background elements move across the screen at different rates.

3 Position your objects on stage so they are aligned along the left edge of the stage. Right-click over them and select Create Motion Tween. Flash will create motion spans for you in each object’s respective layers. The duration of each tween needs to be consistent, ending on the same frame number to allow the animation to loop seamlessly. Drag the right edge of each span to the right to accommodate the overall length of the timeline. This particular animation is 162 frames long. The trick here is the ability to “tile” your background graphics so they seamlessly align with each other when positioned horizontally.

4 Place the frame indicator in the last frame of your timeline. Position the background graphic so that it aligns perfectly with the instance in the first keyframe. It’s good practise to check the alignment of these graphics by testing your movie several times.

5 Adding a foreground element can add a convincing sense of depth to the overall scene. Because the plant is closer to us in relation to the other elements, it moves at a higher speed.

6 The central character or object can also have movement. The squash and stretch motion of the jellyfish clip completes the illusion of motion across a seemingly never-ending underwater terrain. Here I have taken this illusion even further by duplicating the jellyfish and animating them in the opposite direction of the scrolling background. This suggests even faster movement and suggests the jellyfish may be racing each other.

Hot Tip
Draw your background art, then drag a copy off to the right by holding down the ![]()
![]()
![]()
![]() keys. Modify the right edge of the original art to match the left edge of the copy. Delete the copy. Your remaining art now has matching edges and can be seamlessly tiled.
keys. Modify the right edge of the original art to match the left edge of the copy. Delete the copy. Your remaining art now has matching edges and can be seamlessly tiled.