
THROUGH YEARS OF ANIMATING in Flash, I have developed what I think is an even better and faster way to lip sync a character. A few years ago I was working in a full production environment with teams of animators producing several series for television and the Web. Most of these episodes were 22 minutes in length with several characters and plenty of dialog. Lip syncing quickly became the most dreaded of tasks. Using the Swap Symbols method is certainly a useful approach, but when you have 22 minutes of lip syncing to do and only two days to finish it, finding a faster method becomes a production necessity.
The Swap Symbols method requires a minimum of four mouse clicks for each swap.
1.Select the symbol instance.
2.Click the “Swap” button.
3.Select the new symbol.
4.Click “OK”.
Over the course of thousands of frames and symbol swaps, those clicks can add up to an enormous number. Shaving off just one click per mouth shape can, over time, save valuable production costs (not to mention an animator’s sanity).
This is where “nesting” really shows its strength and versatility. By nesting all your individual mouths into a single symbol, you can control the instance of this symbol with the Properties panel. This method eliminates the need to swap symbols and also saves time.
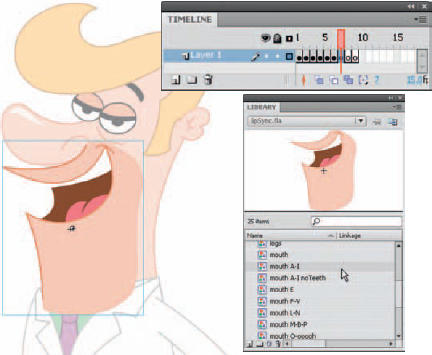
1 The first step is to place all your mouth shapes into a Graphic symbol. I recommend editing an existing symbol on the stage to help you align your additional mouths to the character on the main timeline. Double-click the mouth symbol on the stage to enter Edit Mode. Create a blank keyframe for each additional mouth. If your mouths already exist as symbols, open your Library ![]()
![]()
![]()
![]() and drag each mouth to its own keyframe. Use the Onionskin tool to help align each one.
and drag each mouth to its own keyframe. Use the Onionskin tool to help align each one.
2 Back on the main timeline, open the Properties panel and select your “mouth” symbol containing all of your mouth shapes. As a Graphic symbol, the Properties panel will allow you options to control the instance.

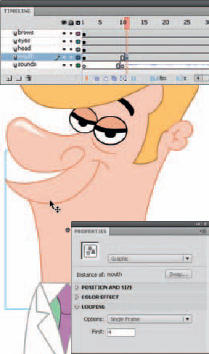
3 Add a keyframe to the mouth layer, select the mouth instance and in the Properties panel select Single Frame. In the Frame input box, type in the frame number that corresponds to the mouth shape needed.

4 Scrub the timeline (drag the playhead back and forth) to hear the next sound. Repeat the same process by adding keyframes, and typing in the corresponding frame number for the mouth shape needed.
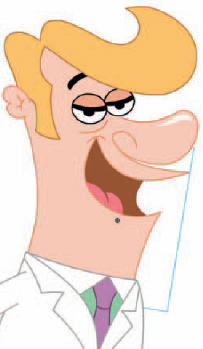
5 The convenience of nesting is obvious when you transform (rotate, scale, flip horizontally or vertically, etc.) your character; all nested assets are transformed as well.

6 Often you may need a custom mouth animation – for example, a mouth that whistles. Right-click over your mouth and select Duplicate Symbol. Give it a descriptive name.

7 Remove the unneeded symbols by selecting them and choosing “Remove Frames” from the right-click context menu. Keep the symbol that closely represents a “whistle” shape.

8 Animate the whistling mouth as a short loop. Here I used the Envelope tool to distort my original mouth shape after breaking it apart.
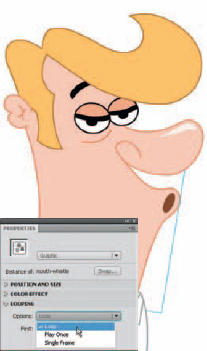
9 On the main timeline, add a keyframe and select the “whistle” symbol containing your new animation. In the Properties panel select “Loop” from the drop-down menu.

Hot Tip
When designing your character, it’s important to conceptualize how the character’s features may work. Some mouths are designed so that they are independent of the jaw and nose, while other mouths are an integral part of these features. So ultimately your mouth may be drastically different in terms of design, yet follow these basic standards.
![]()