Workflow Actions
Now that we know how workflow can be triggered, let's look at what we can do with the workflow. Here we are referring to the workflow actions that can be configured in Workflow Manager. These are
Create Activity
Create Note
Send email
Update Object
Change Status
Assign Object
Post URL
Run subprocess
Stop
Create Activity
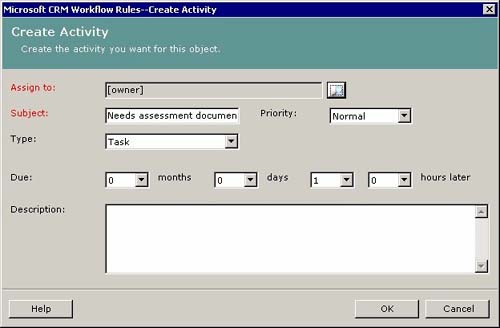
This action creates Task, Phone Call, Fax, or Letter Activities. Creation of email is broken out under a separate action. Creation of an Appointment is not supported. Figure 12.4 shows a task activity being configured.
Figure 12.4. Creating a Task Activity from workflow.
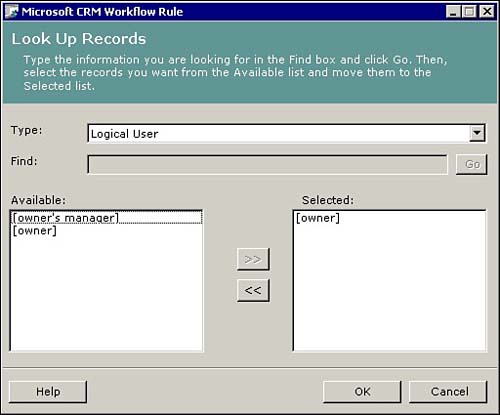
The activity that is created can be assigned to either a user or a logical user. The term “user” here refers to a specific user. The term “logical user” represents either the user who is the owner of the active object or that user's manager as defined in their Microsoft CRM user setup. Figure 12.5 shows the user/logical user assignment selection box.
Figure 12.5. Assigning an Activity to a logical user.
The due date on the Activity is set at the number of units (months, days, hour/minutes) past the time of creation of the Activity.
Create Note
The Create Note action creates a Note object and attaches it to the active object. You can provide a subject, enter notes, and attach a file to the Note. Figure 12.6 shows the note creation screen.
Figure 12.6. Creating a Note object through workflow.
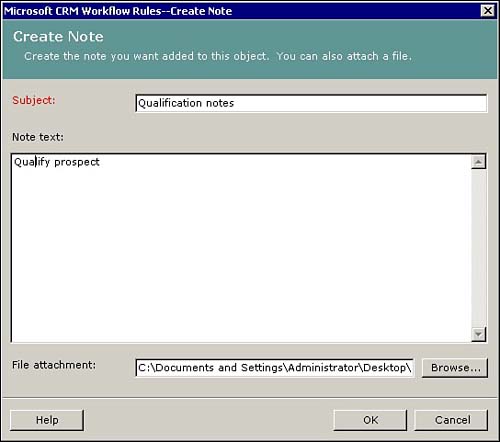
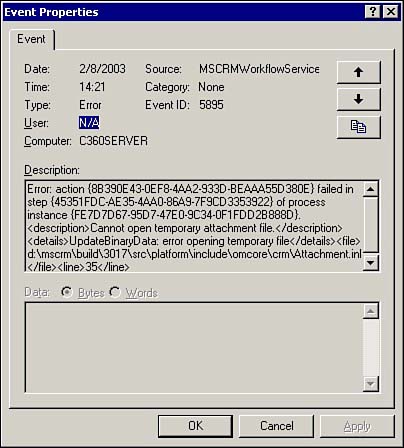
Files can be attached to both Notes and emails created using workflow. Just as with any attachment, the file is included in the database when the object is created. However, when setting up the workflow and selecting the file to attach, you are simply specifying a link to the document. If the document is later moved or deleted, the rule still functions and creates the Note, but the file will not be attached to it. The Microsoft CRM workflow service logs an error in the Application Log of the Windows Event viewer. Figure 12.7 shows the error that is logged when the workflow service cannot find a file attachment.
Figure 12.7. Errors in workflow are written to the Application Log of the Windows Event Viewer.
Send Email
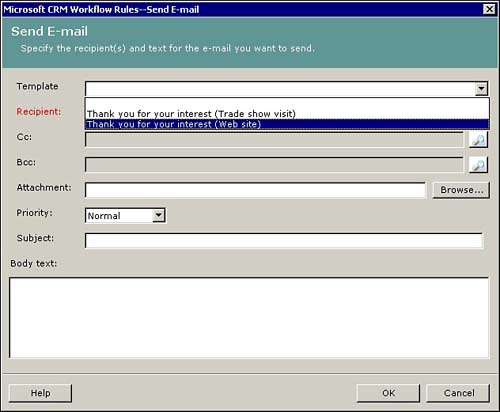
The send email functionality from within workflow has tremendous possibilities. The emails you send can either be generated from templates or can be configured directly. Figure 12.8 shows an email being configured to use an email template.
Figure 12.8. Selecting an email template for a workflow created email.
If you choose to configure the email directly, you are relatively limited in how you can configure it. You can specify the To, CC, and BCC recipients as users, logical users, teams, contacts, or accounts. You can also add an attachment, a subject, and body text, as well as give the email a priority. You cannot embed information about the active record this way.
If you want to include fields from the active record or its related records in your email, you need to configure an email template and associate it with the send email workflow step. This option is powerful because it provides access to all the data related to the active object and that object's related objects.
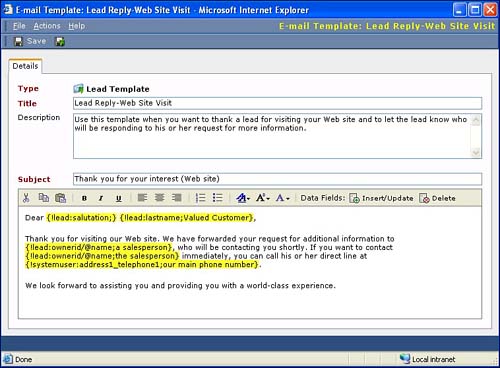
For example, let's say you've configured your Web site to call the Microsoft CRM API (Application Programming Interface) to insert a Lead record when someone submits their contact information on your Contact Us page. Let's also assume that you've configured that Lead insert to set the Lead Source field to the value Web to show that this lead came from your Web site. You can now create a workflow rule to run on the Create event of the Lead object to send an email generated from a Lead email template. By having the Lead source, you can ensure that this email is sent only when the Lead record has a specific source. Figure 12.9 shows an example of a “Web to Lead” email template.
Figure 12.9. An email template to follow up with a Web lead.
Update Object
The Update Object action provides the capability to change the value of many of the fields on the active object record. The exception to this rule is that date fields are not listed among the fields that can be updated. Figure 12.10 shows the update object screen.
Figure 12.10. Updating a picklist field in Workflow Manager.
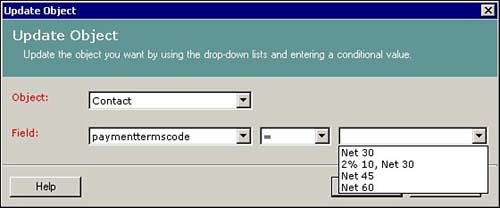
The update capability has some nice features you might not expect. For example, when updating string or memo fields, you can either change the value of the field entirely using the = operator or use the += operator to append (or concatenate) another value to the end of whatever existing value is found in the string or memo field. Table 12.2 lists the options by field type.
| Field Type | Options |
|---|---|
| String | = |
| += | |
| Integer | = |
| += | |
| -= | |
| *= | |
| Float | = |
| += | |
| -= | |
| *= | |
| Currency | = |
| += | |
| -= | |
| *= | |
| Date/time | Not available for update |
| Boolean | = |
| Picklist | = |
| Memo | = |
| += |
Definitions of the operators in Table 12.2 are listed in Table 12.3.
In addition to allowing update of fields on the active object, the Update Object action also enables the update of fields on related objects. Table 12.4 lists the related objects that can be updated.
Change Status
Earlier in this chapter we discussed the concept of object Status and listed the available statuses by object. Figure 12.11 shows the change status screen.
Figure 12.11. Changing an object's status through workflow.
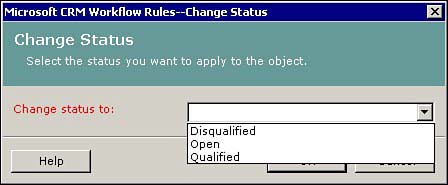
Using the Change Status workflow action we can change the status of an object programmatically.
Assign Object
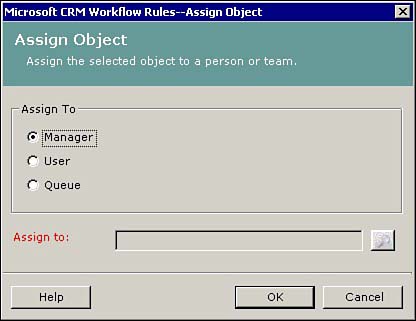
Workflow can be used to assign objects to a User, Manager, or Queue depending on the object type. The term Manager refers to the manager of the user to whom the object is assigned before the workflow rule reassigns it. Figure 12.12 shows the assign object screen.
Figure 12.12. Assigning an object through workflow.
One thing to consider when creating workflow that assigns an object is that it is also possible to create workflow that is triggered by the assignment of an object. Because of this, it is possible to create a looping workflow process that can quickly lead to a system crash. Consider the following text from the Workflow Manager online help file:
“Important: Workflow rules can be triggered by events such as creation of an object, assignment of an object, and status change of an object. Because rules can trigger other rules and processes, it is important to avoid creating unintentional workflow loops. A workflow loop can cause a fast-acting, infinite loop, driving up SQL Server usage of the CPU, filling the workflow system with unwanted workflow processes, and repeatedly performing the actions in the rule on the Microsoft CRM object. Creating a rule based on a change status event, for example, can cause a loop if the rule includes a change status action without a limiting initial condition.”
The final line in this text refers to a “limiting initial condition.” Later we will review how to create if… then conditions to check for specific conditions before invoking workflow actions.
Post URL
Perhaps the most interesting of the workflow actions, Post URL enables you to take values of the active object and post them to a URL (Universal Resource Locator), which can then take the values and do just about anything with them.
A lot of possibilities exist with this. Here are some examples:
Register Lead: Post to a URL of a partner firm to provide them with details of a new Lead entered by someone on your marketing staff.
Submit Order: Post to a URL of your product fulfillment vendor to provide them with details of a new order that one of your sales people has moved to the Submit status.
Submit Mailing request: Post to a URL of your literature fulfillment vendor to ask them to send a product brochure to one of your Leads.
Obviously, there are endless possibilities with the Post URL action. Let's take a look at the setup of our Submit Order example.
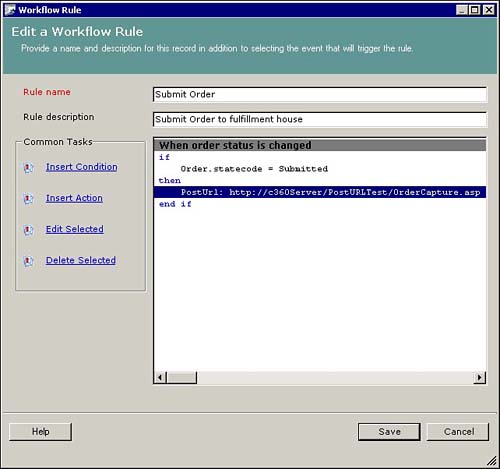
Figure 12.13 shows our rule configuration. Notice the inclusion of an If… Then construct here to check the status of the Order. We'll be reviewing conditional logic shortly.
Figure 12.13. Workflow rule to submit order details to a URL.
We must select the fields and the URL to which we want to post. This is illustrated in Figure 12.14. The URL to which we are posting will expect to receive the exact field names as they are listed in this dialog box.
Figure 12.14. Configuring the URL and determining the fields to post.
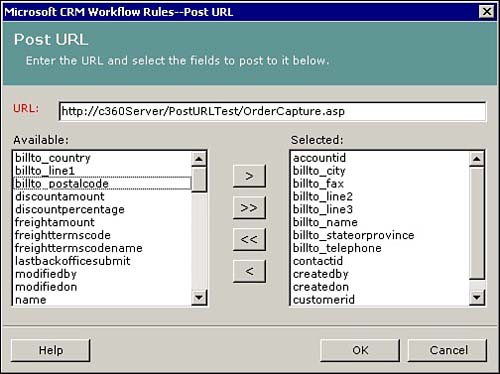
When the rule is activated, each time an Order is updated to the Submit status the selected data points are posted to the selected URL, and the receiving system can do whatever it wants with the data. The biggest limitation with this is that there is no mechanism provided to return any sort of result, message, or validation from the receiving system.
As we saw earlier with our workflow rule that could not find its file attachment, any workflow errors are written to the Application Log in the Windows Event Viewer. In addition, errors in workflow are also written to the Log of the Microsoft CRM Workflow Monitor.
Figure 12.15 displays a Workflow Monitor error we received by attempting to post to a URL that does not exist. We'll go into more depth on Workflow Monitors shortly.
Figure 12.15. Viewing an error in the Microsoft CRM Workflow Monitor.

Run Subprocess
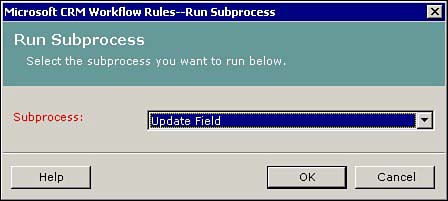
The Run Subprocess action gives you the flexibility to break your workflow into reusable components by object. This action enables you to run any other manual workflow process that exists for the same object. Figure 12.16 shows the run subprocess screen.
Figure 12.16. Selecting a manual workflow process to run using the Run Subprocess action.
Imagine there are certain actions you want to take when a Lead is inserted with a Source of Web (in other words, a Web Hit), and other actions you want to take only when the Lead is a non-Web hit. In effect, what you have is a series of steps that can be followed in any order upon Lead creation, based on the Source of the Lead. Your steps might be
1. | Assign Lead (Web hits only) |
2. | Send email from template (Web hits only) |
3. | Notify Lead Owner's manager (not necessary with Web hits) |
4. | Notify Lead Owner (not necessary with Web hits) |
5. | Post to your fulfillment vendor's URL to have a brochure mailed (always) |
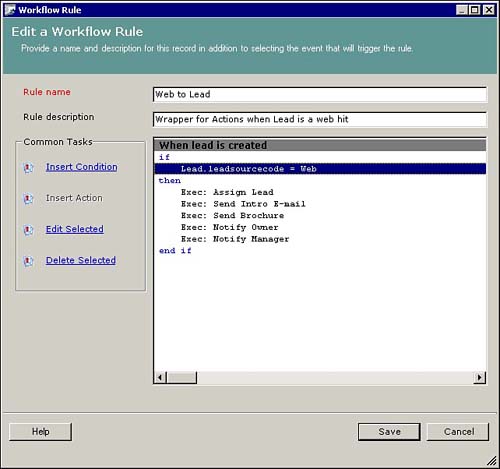
The way to enable this process is to create two “wrapper” workflow rules (one for Web hits and one for manual record inserts) that use the Run Subprocess action to call other manual workflow rules. The wrapper rules will be triggered from the Lead's Create event. Workflow rules to be called by the Run Subprocess action have to be Manual trigger actions. Figure 12.17 illustrates the combination of rules necessary for this workflow.
Figure 12.17. Creating wrapper rules and manual rules to break workflow into reusable components.
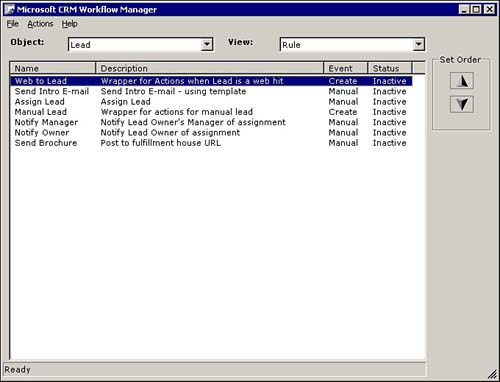
After you have the workflow rules created, you can simply insert them into the wrapper rules in the order in which you want them to execute. Figure 12.18 shows several manual rules that are set to fire when a Lead is inserted from the Web.
Figure 12.18. Using the Run Subprocess action to execute manual workflow rules.
Stop
The Stop action lives up to its name. It stops the workflow when it is reached. However, as you might expect, it's a little more involved than this.
Stop typically is used with conditional logic. For example, if a condition is met, take an action or stop the processing. When you use the Stop action, you are presented with four different ways to control what is stopped. They are
Complete (Stop)
Abort (Abort)
Complete and stop processing other rules (Stop and no further processing)
Abort and stop processing other rules (Abort and no further processing)
Figure 12.19 shows the four available options for stopping workflow.
Figure 12.19. Selecting how you want to Stop a workflow process.
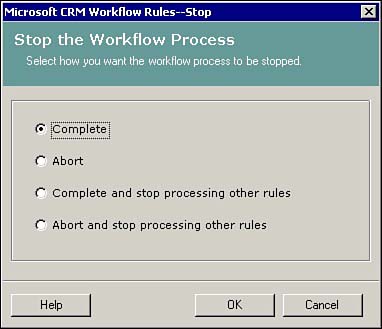
Choosing the Complete or Abort options stops the processing in the current rule, but lets other subsequent rules continue to process. Choosing either of the last two options causes the current rule, and all subsequent rules, to stop processing. You can use the sort arrows in Workflow manager to sort rules so that you can control which rules execute and which ones don't, based on how you implement the Stop action.
The difference between the first two options (Complete and Abort) is in how the rule is logged in the Workflow Monitor. If the Complete option is selected, the rule instance is logged as Finished. If the Abort option is selected, the rule instance is logged as Aborted. This same difference is applicable to the second two options (Complete and stop processing other rules and Abort and stop processing other rules). You'll want to use the Abort options in place of the Complete options if it is important to be able to identify which rule instances were not fully executed.