Use Case Corner—Automating Business Processes Through the Microsoft CRM Workflow Monitor
Business Workflow is best categorized as the coordination, automation, and execution of business processes. Within the context of Microsoft CRM, business workflow can be thought of as the glue that binds information between system users, departments, and business units.
This Use Case Corner demonstrates the implementation of business workflow rules using the Microsoft CRM Workflow Manager. This application is available to organizations that have purchased at least one Professional license of Microsoft CRM, and is installed on the Microsoft CRM Server.
For sake of example, let's say that you want to turn your call center into a profit center using the Microsoft CRM Workflow Monitor.
A customer places a call into the customer-service department with performance problems. While troubleshooting the call, the customer-service agent recognizes that this product has been in service for some time and has become obsolete. Although the customer-service representative helps this customer fix her existing problem, the new corporate-wide CRM objective has asked that service representatives pass upgrade sales leads to the sales team in an effort to sell the company's latest products.
To implement this workflow, we start by creating a simple data-flow diagram to understand and define the process. Figure 12.35 is a sample of how this scenario might be represented in graphical format.
Figure 12.35. A simple graphical depiction of our business workflow.
Now that we have defined and documented the desired rule, we can create our workflow using the Microsoft CRM Workflow Manager.
To Create the Sample Workflow Rule, You Can Follow These Steps
1. | On the Microsoft CRM Application Server, the default application path can be found at START > Programs > Microsoft CRM > Workflow Manager |
2. | |
3. | Upon Successful Login, the Workflow Manager screen appears. |
4. | Select Case from the Object drop-down list box. |
5. | |
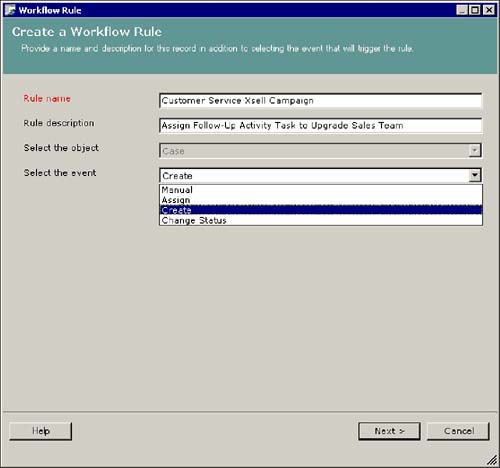
6. | This opens the new rule creation screen, shown in Figure 12.36. Figure 12.36. Creating the cross sell workflow rule in Workflow Manager.
|
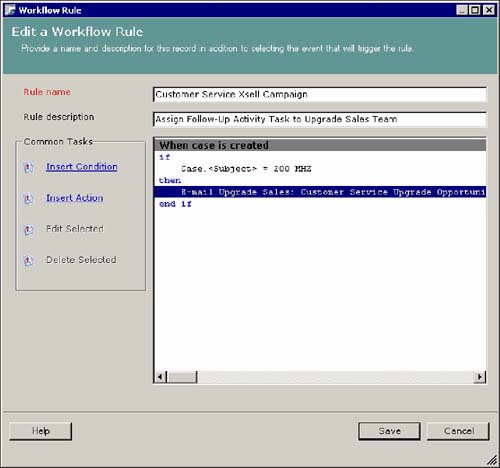
7. | Provide the Rule a Name, Description, and Select the Event that causes this workflow rule to fire. |
8. | Select the Create Event and Click NEXT to continue the creation of our rule. |
9. | The next screen in our rule creation wizard is where we provide the details of our rule. |
10. | |
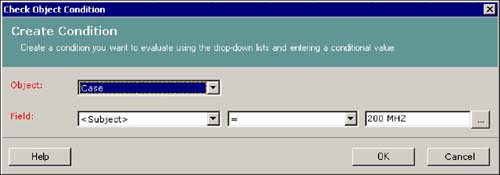
11. | Highlight the <<add conditions here >> section of the branching logic with your mouse, click Insert Condition, and then click Check Object Conditions. This opens the Check Object Conditions window. Refer to Figure 12.37. Figure 12.37. Evaluating the Cases' Subject.
|
12. | Select the field to create the condition on, and then select the value using the ellipsis […] icon. For this example, we will select the field <Subject> with a value of 200 MHZ and click OK. |
13. | Highlight Insert Actions and click Insert Action from the Common Tasks section. |
14. | |
15. | Click OK to complete the editing of this action. |
16. | Our Workflow rule with Conditions and Actions should now appear as shown in Figure 12.38: Figure 12.38. Using If... Then logic to define our rule.
|
17. | Click Save to save the newly configured workflow rule. You are taken back to the main screen. |
18. | To use our newly created rule, the rule must be Activated within the workflow engine. Select our rule, open the Actions menu, and click Activate. |
19. | Our rule is now configured, activated, and ready to test. |
To test this workflow rule, implement the steps shown in the following case-creation process:
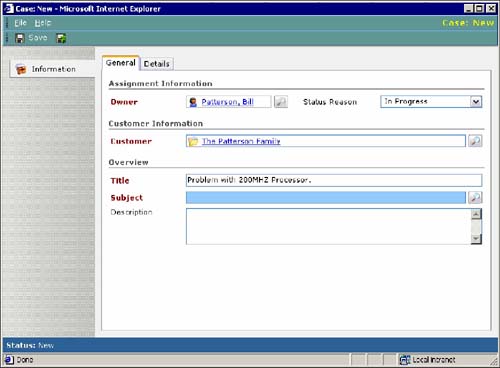
1. | Create a new Case within our Customer Service Module. Make sure you enter information in all the fields that are marked Business Required with red labels. See Figure 12.39. Figure 12.39. Creation of a new Case in Microsoft CRM
|
2. | Next, we'll select the Case Subject. Make sure you select the Subject(s) used within our workflow rule. In this scenario, we'll select the 200 MHZ subject value. |
3. | By saving this case, the Create event of this object is triggered. The Workflow Manager checks the Case object's conditions to see if they match those specified in our rule, and then process the actions that we have configured. In this situation, an email is sent to MSCRM users who are members of the Upgrade Sales team. |
As demonstrated in the Customer Service workflow, the Workflow Manager enables organizations to take advantage of quick and easy implementation of business logic without having to write complex code. In addition, as businesses change over time, workflow rules can be created, updated, and deleted to match your future business initiatives.
This Use Case Corner was contributed by Bill Patterson. Bill is a Microsoft Certified CRM Professional and Microsoft Certified Solution Developer. He is a Senior CRM Implementation Consultant with Solonis, Inc. (a Microsoft Gold Partner in Collaborative Solutions) and a leader in CRM Implementation in financial services and professional sports. For questions, comments, and so on you can contact him at [email protected].