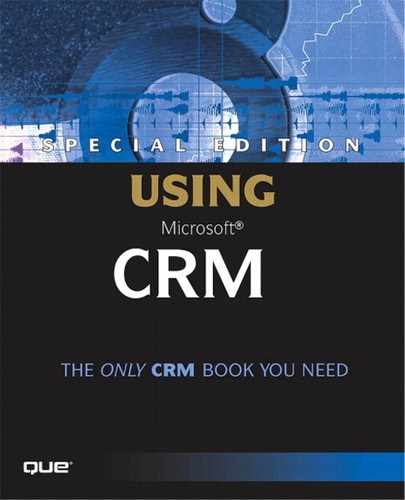
Typical Microsoft CRM Configuration
With CRMSO, the most typical configuration is one where email is delivered to your Exchange Mailbox and you potentially have an offline folder file set up to work with email, appointments, and so on, when you are not connected to the network. You can also have a personal folder file set up to store important messages when you reach your allotted mailbox space limit. Furthermore, at some point you will probably set up an archive file to move off older messages that are worth keeping.
The previous scenario is illustrated in Figure 8.5, which shows the relationship between the Exchange server, CRM server, user's computer, and user's Personal Digital Assistant (PDA).
Figure 8.5. Typical Email/CRM/PDA configuration with user having mail delivered to their Exchange Mailbox.
CRMSO interacts only with your Exchange mailbox and creates copies of some of the CRM objects. Table 8.2 illustrates the mapping of CRM objects to Outlook/Exchange Objects. Note that only Contacts, Tasks, Emails, and Appointments are synchronized between Exchange/Outlook and CRM.
Now we're ready to discuss where CRM objects are stored relative to Outlook/Exchange objects.
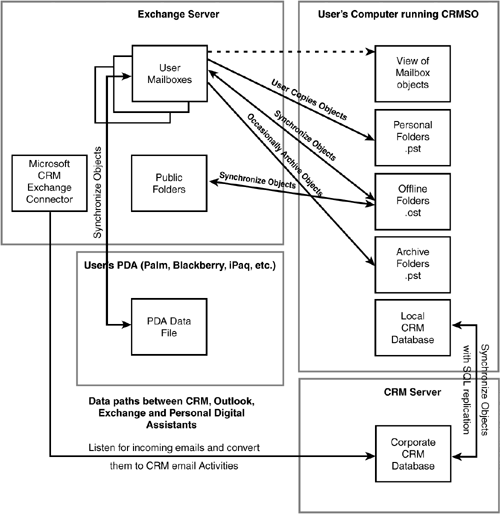
If you are using CRMSO and want to create a Contact record that you don't want to show up in the corporate CRM database, use the normal Outlook Contact create button you are accustomed to using. You might want to keep a Contact record from showing up in the database, for example, if you were keeping family Contact records that you wouldn't need in your corporate CRM database. Figure 8.6 shows the standard Outlook contact form.
Figure 8.6. Using the standard Contact button to create an Outlook Contact record that will not become a CRM Contact record.
This same principle applies to Outlook Appointments, Tasks, and Emails. If these objects are created using the standard Outlook buttons, they are not added to the CRM database. This enables you to decide what you want in CRM, and what you want only in your Exchange mailbox.
When using CRMSO, if you use the CRM toolbar to create a CRM email, CRM Contact, CRM Appointment, or CRM Task, these objects appear in both your Exchange Mailbox as well as CRM. Figure 8.7 shows these buttons.
Figure 8.7. Use the CRM toolbar to create objects that will be available in your Mailbox as well as CRM.
![]()
Likewise, when using CRMSO, Contacts, Tasks, and Appointments that you create in CRM are added both to CRM and Outlook/Exchange.
TIPIf you use the Web interface to create a Contact, Task, or Appointment object that object will not be added to your Exchange mailbox. This means that any files or devices (for example, your Offline Folders, Palm Pilot, iPaq, or Blackberry) that synch up with the Mailbox will not receive a copy of this record. In other words, if you rely heavily on the mailbox or the folders and/or devices that synch to it, make it a habit to exclusively enter data through the CRMSO interface using the CRM toolbar. |
Table 8.3 provides more detail about the creation of Contacts and where Contacts are seen depending on how they have been created. This information is especially important for users who use PDA devices that synchronize information from their Outlook Contacts folder.
| Contact creation method | In CRM? | In Outlook? |
|---|---|---|
| CRM Web client, New Contact button | Yes | No |
| CRMSO client, CRM Contact folder, New Contact button | Yes | Yes |
| CRMSO client, standard Outlook new Contact button | No | Yes |
| CRMSO client, CRM Contact button on CRM toolbar | Yes | Yes |
| CRM Web client import tool | Yes | No |
| CRMSO client import tool | Yes | Yes |
In the cases where both a CRM Contact and an Outlook Contact have been created the two records will automatically stay in synch with each other. However, if one of the two records is deleted, the other record will not be deleted.
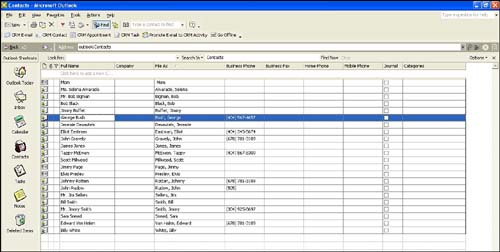
TIPTable 8.3 shows how the method of creation of Contacts impacts where the user can see those Contacts. This is good to know when importing data. For example, if you use the import tool on the Microsoft CRM Web client to import Contacts, the Contacts you import will not show up in your Outlook mailbox Contacts folder. If you want the Contacts to show up in your Outlook mailbox Contacts folder (for synch to your PDA), use the import function in the CRMSO client. Also, if you want to see which Contacts in your Outlook Contacts folder are also CRM Contacts, use the Phone list view and look at the record icons. CRM Contacts will have a CRM Contact icon, which is shown in Figure 8.8. Figure 8.8. Using the Outlook phone list view to see which Outlook Contacts are also CRM Contacts.
|
Promoting Emails to CRM Activities
If you refer again to Figure 8.7 you'll notice that there is a button labeled Promote Email to CRM Activity. To understand what this does, let's take another look at the User Options screen. You can get to the User Options screen under the Tools menu. Figure 8.9 shows the Activities option of the User Options screen.
Figure 8.9. Setting the user's email options.
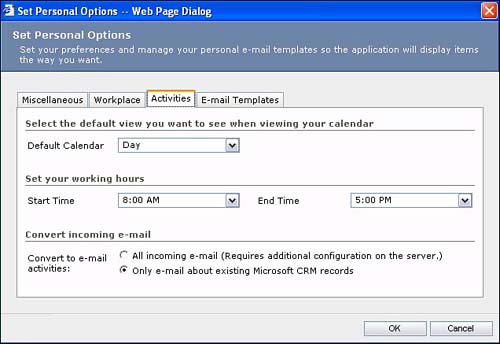
The Microsoft CRM Exchange Connector, a separate server application that is included with Microsoft CRM, monitors incoming email messages to find messages that are related to CRM objects. As it finds these messages, the connector adds them to the appropriate CRM record as Activities. The User Option lets the user decide whether they want all incoming messages with matching email addresses to be added to the CRM record or only those messages that originated from CRM records.
TIPChapter 5, “Setting up Microsoft CRM,” talked about the CRMEmailEnabled setting with respect to Active Directory. It is this setting that must be configured to have all incoming email added to CRM for a user. Refer to Chapter 5 for information on configuring this. |
When an email is sent from Microsoft CRM, it is tagged with a unique identifier, a GUID (Global Unique Identifier). This GUID, which is currently stored in the email's subject field, represents the Regarding property on the CRM object from which the email was sent. The guid is placed in a Regarding property on the email. When the recipient of the message replies to the message, the GUID stays with the message. The Exchange Connector scans incoming email, looking for these GUIDs and attaching GUID-carrying messages to their corresponding CRM objects. If the user chooses the option where all incoming email is converted to CRM Activities, incoming emails without CRM GUID's are matched to email addresses (if they exist) in the CRM database and converted accordingly. When no matching email address is found, the email Activity is created, but the sender's email address is marked as unresolved, leaving the user to resolve it.
NOTEThe GUID, which is placed in the email subject line, must not be removed or modified if the email thread is to be tracked in Microsoft CRM. Please refer to Chapter 5 for detailed information on Microsoft CRM's email tracking functionality. |
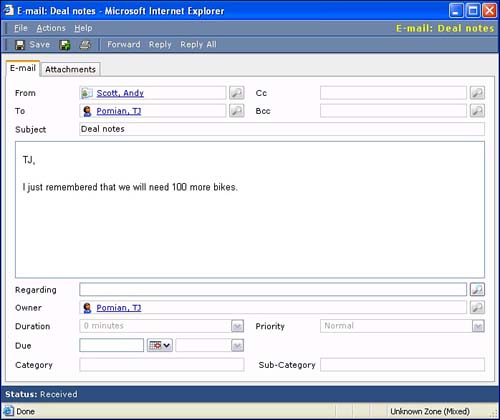
The promote button comes in handy when an email makes it past the connector, but you want it converted to an Activity anyway. This might happen when an important prospect decides, for whatever reason, to email you from an email address not on file, perhaps a personal email address. In this case, you can select the email in your Inbox, select the promote button, and then select the CRM object to which you want the new Activity attached. Figure 8.10 illustrates an email in the process of being promoted. The user selects a value for the Regarding field so that the email Activity is attached to the proper CRM record.
Figure 8.10. Promoting an unrecognized email to a CRM Activity. Note that the user must complete the Regarding field to associate the Activity with a CRM object.
Mail Merge
CRMSO has a very slick mail merge functionality that can be used to produce individual documents (one at a time) as well as multirecipient mail merges. The mail merge functionality is available from two main places in the application: the grid view and the File menu.
NOTEMail merge functionality is not available in the Microsoft CRM web client. However, using a search or query tool a user of the web client can retrieve a list of records, export the necessary fields to Microsoft Excel, and execute a mail merge directly from Microsoft Word. |
Mail merge from the grid view is available for Leads, Contacts, and Accounts and is great for doing multirecipient merges where you have selected a list of Leads, Contacts, or Accounts using either the Advanced Find tool or the standard Microsoft CRM grid.
You can use the mail merge functionality to print Quotes by opening a Quote record and selecting Print Quote for Customer from the File menu. Although you are only printing one Quote at a time this way, you are still employing the same mail merge function used in producing a multirecord mail merge.
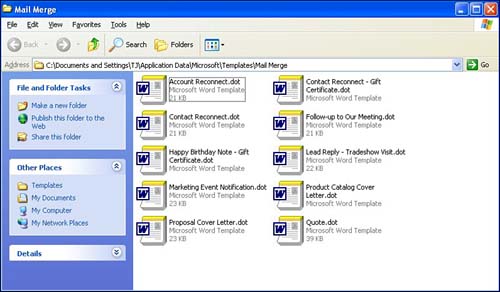
In both cases, when you have selected to do a mail merge, Microsoft Word is opened and you are presented with a screen where you can choose the document into which the data will be merged. The mail merge functionality works by opening Microsoft Word and passing it the data needed to produce the requested document. The requested Microsoft Word template must have bookmarks that match the fields being passed. CRMSO installs some preset Microsoft Word templates that can be modified to make custom templates. These templates are files with a .dot extension and by default are installed in the C:Documents and Settings<User>Application DataMicrosoftTemplatesMail Mergewhere <User> represents the user who has the application installed. Figure 8.11 shows this directory with the standard templates installed by CRMSO.
Figure 8.11. The directory for user TJ where CRMSO installs the preset mail merge templates.
Let's take a look at a mail merge in detail. We'll use one of the standard mail merge templates and tailor it for several of our Contacts.
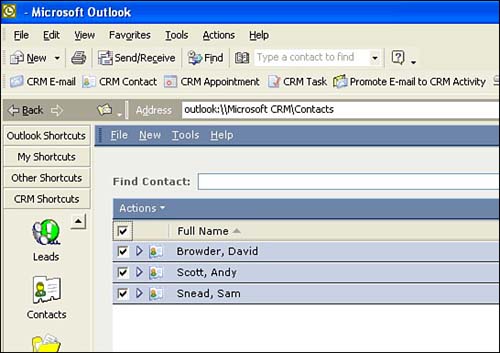
Figure 8.12 shows a list of Contacts being selected from the Microsoft CRM grid. This can be done from the standard Contacts view as well as from the Advanced Find tool on the Tools menu. After we make our selections, we'll use the options menu and select mail merge.
Figure 8.12. Selecting Contacts to do a mail merge.
After you've asked CRMSO to do a mail merge, you are presented with a screen outlining the various mail merge options. Figure 8.13 shows that screen and Table 8.4 explains each of the options.
Figure 8.13. Selecting the type of mail merge.

Figure 8.14 shows the dialog box a user receives after selecting the more fields button when preparing a merge of Contact records. Notice how the first several fields provide information about the user, not the Contact. This enables the user to add information about themself in the merged document.
With the mail merge functionality, individual sales users are empowered to automate professional communications to their prospects and customers. Furthermore, they can quickly produce detailed quote documents for presentation to their prospects.