Microsoft CRM Info Views and Searching
When you wander from the home page to many of the sub-areas under Sales and Service, you will see the Content Area change to an Info view listing of records. Figure 6.9 shows the Info view for the Leads sub-area of the Sales Area.
Figure 6.9. The Leads info view.
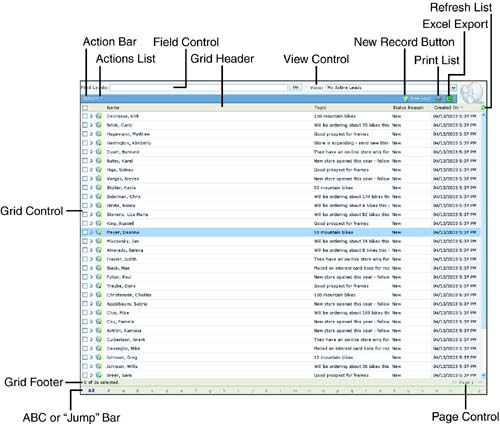
Find Control
The Find Control enables the user to quickly find records by searching through the first displayed column in the grid listing. For example, in the Contact Info view, the primary (first) column is Full Name where the full name is formatted based on the system settings for the installation. By default, Last Name is listed first followed by a comma and the First Name. If the user enters the letter g in the Find Control and clicks the Go button, the system will search through all Lead records available to the user to find those Contacts whose last names begin with the letter g. It is important to note that the Find Control does not only search within the records listed in the current view when the search is initiated. Rather, it searches through all the records to which the user has access.
The asterisk character (*) represents a search wildcard in Microsoft CRM and is assumed at the end of any search string. For example, entering smi in the Find Control results in a list of all Contacts whose last names begin with the letters “smi” (for example, Smith, Smitz, Smithereen). Entering *mi in the Find Control results in a list of all Contacts that have the characters “mi” contiguously anywhere in their full name (for example, Smith, Miller, Michelson).
The # character is the wildcard for numeric values if and only if it is used by itself. For example, a search on # returns all leads that have a name starting with a number between 0 and 9. However, a search on a# returns all records with a full name starting with a#.
View Control
The View Control enables the user to select the view used to display the listing of records. Views can be created and modified at the administrative level and are customizable on two levels—the column listing and the data filter. Chapter 11 goes into detail about how to change the column listing in a view and how to filter the results set it returns.
Figure 6.10. List of views for the Lead Info view screen.

Action Bar
The Action Bar provides the buttons to enable a user to take various actions including
Print the active list of records
Export the active list of records to Microsoft Excel
Create a new record
Take an action against the selected records using the Actions List
Selecting the Print button brings the user to another screen where he can then choose to print the list. Figure 6.11 shows the record print screen. It is a simple html page of the data in the record listing
Figure 6.11. Printing the Info View list of Lead records.
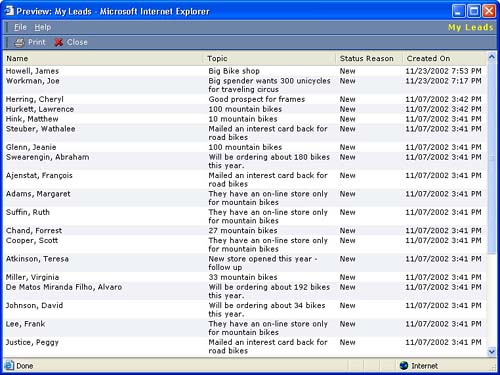
The export button calls Microsoft Excel and passes it the active list of records in the Info view. If the user does not have Microsoft Excel installed he will receive an error. If the user has Microsoft Excel installed, he will be given the opportunity to open or save the Excel file.
The Create a new <object name> button enables the user to create a new record from scratch. This is useful when the record you were seeking does not exist.
Let's take a look at the Actions list. This is displayed in Figure 6.12.
Figure 6.12. The Actions List for Lead records.

The Actions List is context-sensitive based on the type of record you have listed in the Info view. Table 6.2 lists the Actions that a user can execute against the various CRM record types. The actions a user can execute are dependent on the user's security settings. For example, a user with access only to view records will not see the Delete action.
These Actions Lists are also available after searching on the records through the Advanced Find screen on the Tools menu.
Grid Header
The Grid Header is a simple display of the columns that make up the record list. Each column heading can be clicked to sort on the values in that column. The check box on the far left can be used to select all records (to carry out Actions) and the refresh button on the far right can be used to re-retrieve the list from the CRM database.
One more thing to note about the Grid Header is that the column listing can be modified using the system customization tools. The only exception to this is that the default first column, referred to as the Primary Column, in all Info Views cannot be changed.
Grid Control
The Grid Control lists all records retrieved in the current sort or filter. Each record has a check box to select it and an arrow that can be clicked to show preliminary data about the record in the preview pane. The preview pane can be customized to show any fields on the record. You can right-click on the grid to open or print the currently highlighted record, or to refresh the content of the grid.
Grid Footer
The Grid Footer displays the total number of records retrieved. Additionally, it shows how many of the records are selected (checked). On the far right of the Grid Footer is the Page Control, which displays the currently active page of records. Remember that the number of records retrieved per page can be set at the user level by choosing Options from the Tools menu.
ABC or Jump Bar
The ABC, or Jump bar, as it is called by some enables the user to quickly jump to a list of records that begins with the selected letter of the alphabet. It is important to note that the jump bar selects only records that fall within the current result set as defined by the selected view. In other words, if you have set the view to “My Leads” and only two of your Leads' names start with the letter w, you will see only those two results. This is the opposite behavior of the Find Control, which will search through all records in the database. Keep in mind that when we say that the Find Control will search through all records in the database, it can only search records for which the user has the appropriate viewing rights. The Microsoft security model is never ignored.
Advanced Find
Having covered the Find Control and the ABC Bar, let's discuss how to search on records using multiple criteria. The Advanced Find tool under the Tools menu was made just for this. Refer to Figure 6.13.
Figure 6.13. The Advanced Find screen.
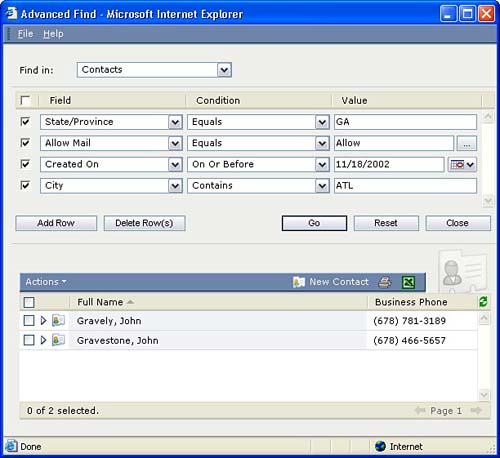
The first step in using the Advanced Find tool is to select the type of records you want to search. The options are
Accounts
Activities
Cases
Competitors
Contacts
Contracts
Invoices
Leads
Opportunities
Orders
Products
Quotes
Sales Literature
After you have selected the record type you will be able to build filters by choosing Fields, Conditions, and Values related to that record type. The search is straightforward, but there are a couple of tricks that might not be obvious.
The filters within the Advanced Find can act as AND or OR operators. Figure 6.14 shows an example of the AND operator for a situation in which a user wants to retrieve a list of all users with the letters g AND v in their last names.
Figure 6.14. The AND operator in the Advanced Find screen.
![]()
Figure 6.15 shows an example of the OR operator for a situation in which a user wants to retrieve a list of all users with the letters g OR v in their last names. Notice that only one filter is built, and the semicolon character is used to separate the OR conditions.
Figure 6.15. The OR operator in the Advanced Find screen.
![]()
The AND NOT operator can also be used as is shown in Figure 6.16 where the search will return records where the last name contains the letter “g,” but not the letter “v.”
Figure 6.16. The AND NOT operator in the Advanced Find screen.
![]()
Notice that the Advanced Find screen has buttons for adding and deleting rows. This enables you to add additional rows to build additional filters as well as to delete unwanted rows. When you click the Delete Rows button, any filter with a check next to it will be deleted. Keep in mind that the checks have nothing to do with whether the checked filter is being used in the search. The checks are there only to indicate which rows to delete.
By default, the column list for the Advanced Find results set is the same as the column set for each record type's default view. However, the Advanced Find view column set can be customized for each record type.
The presence of the Actions List on the Advanced Find screen is a nice touch. The Actions available on the list will depend on the record type selected.