Workflow Conditions
Now that you understand how to trigger workflow and create actions based on it, let's look at implementing logic to control when workflow is executed.
Workflow Manager provides three basic logic constructs you can use in creating workflow rules. You will see these options when you select the When <object> is created line at the top of the rule window, and then select the Insert Condition' link to the left. The options are
Check for conditions
Wait for conditions
Wait for timer
We will describe each of these in detail in the following section.
Check for Conditions
The “check for conditions” option takes the following format:
If

<< add conditions here >> : if multiple conditions, they will treated as an 'AND'

Then

<< add actions here >> : if multiple actions, all will execute

End If
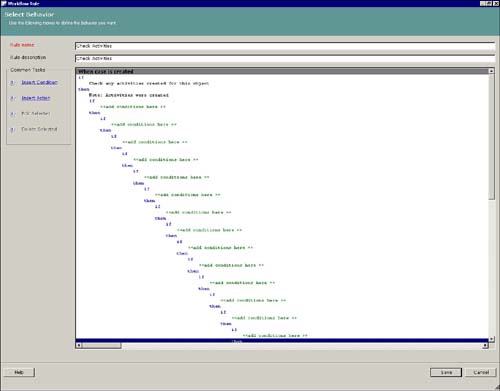
This is a traditional If Then construct that enables you to take action-based conditions you can check at the time the rule is running. If Then constructs can be nested to multiple levels as shown in Figure 12.20.
Figure 12.20. Nesting If Then statements to multiple levels.
When you select the << add conditions here >> line and click the Insert Conditions link to the left, you are presented with the following options:
Check object condition
Check activities
Else If
Check object condition enables you to compare the current values of the objects, and related objects, fields with values you enter in the rule. An example of this is
Case.origincode = Phone
Check activities presents the dialog box shown in Figure 12.21. This checks to see if any Activities were created for the active object. If Activities were created, the configured actions are taken. If not, no actions are taken.
Figure 12.21. The dialog box presented when using the Check activities condition.
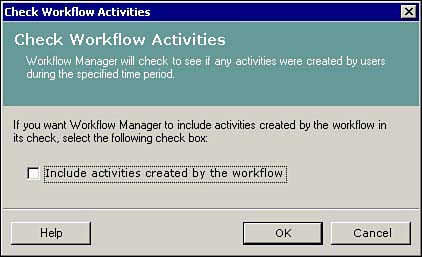
The Check Workflow Activities dialog box offers one option so you can specify whether Activities created as part of the active workflow count in your determination of whether Activities have been created.
Else If inserts an additional logical construct into the If Then statement for when you need more than a single check. Else If constructs must always be inserted inside an existing If Then. Anywhere you have an If Then you can insert additional Else If to perform additional checks.
Let's make sense of the Else If construct with a simple example. Imagine your company provides customer service exclusively through service contracts you sell to your customers. You have three levels, Gold, Silver, and Bronze. Each entitles the customer to different services:
Gold: Case is marked high priority and one-hour response is guaranteed.
Silver: Case is marked normal priority and 24-hour response is guaranteed.
Bronze: No phone support is offered, instead the customer receives an email with a link to the online knowledge base and a number to call if he is interested in a service contract upgrade.
This logic requires an If Then construct with an embedded Else If to accommodate the third condition. The workflow rule is illustrated in Figure 12.22.
Figure 12.22. Auto-prioritizing Service Cases based on the Contract Service Level.
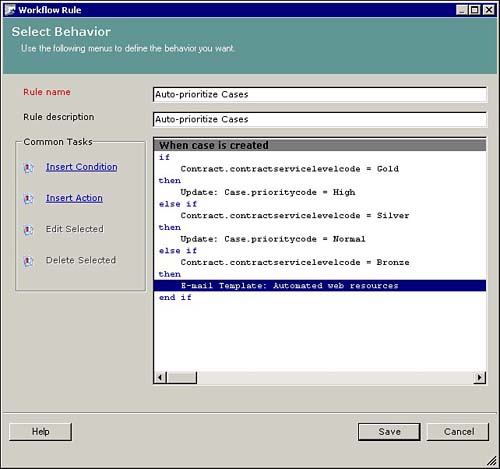
Notice that in this example, we're checking the Case's associated Contract record to get the Service Level Code. This check is inserted in the << add conditions here >> section of the construct by clicking the Insert Condition link on the workflow rule configuration screen.
Wait For Conditions
Wait for conditions enables you to take action based on the passage of time or a change in the object's condition. When you select the << add conditions here >> line and click the Insert Conditions link to the left, you are presented with the following options:
Wait for object condition
Wait for activity condition
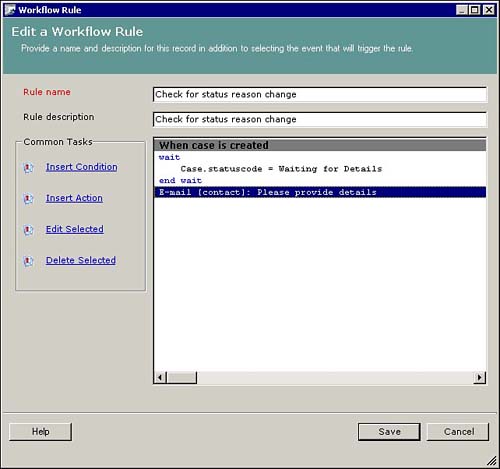
Wait for object condition is the equivalent of waiting for an update to the record. For example, you can use this option to monitor the Status Reason field to see when it has been changed and take action accordingly. Figure 12.23 illustrates a workflow rule where the Case Contact is emailed when the Status Reason has been changed to Waiting for details.
Figure 12.23. Using the Wait object condition option to check updates to a Service Case.
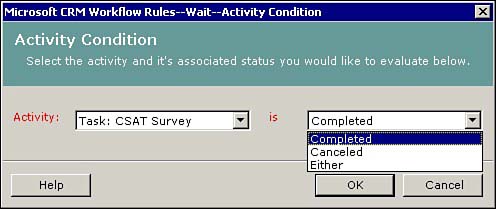
Wait for activity condition enables you to trigger workflow based on the completion or cancellation of an Activity. Figure 12.24 shows the wait activity condition screen.
Figure 12.24. Triggering workflow based on the completion or cancellation of an Activity.
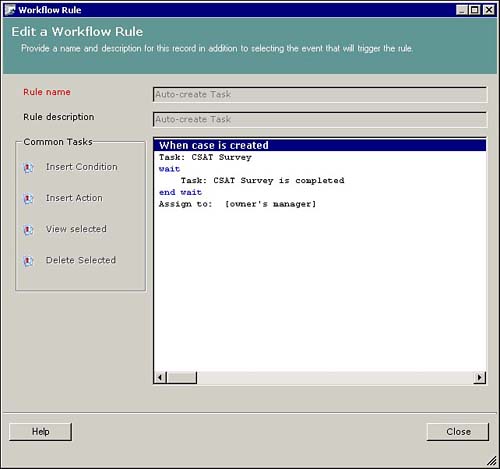
For example, suppose you require that each of your Cases be concluded with the CSR (Customer Service Representative) emailing a CSAT (Customer Satisfaction) survey to the client. You could use the Wait activity condition option, illustrated in Figure 12.25, to reassign the Case to the user's manager when this Activity is marked complete.
Figure 12.25. Reassigning a Case to the Manager when the CSAT (Customer Satisfaction Survey) has been completed.
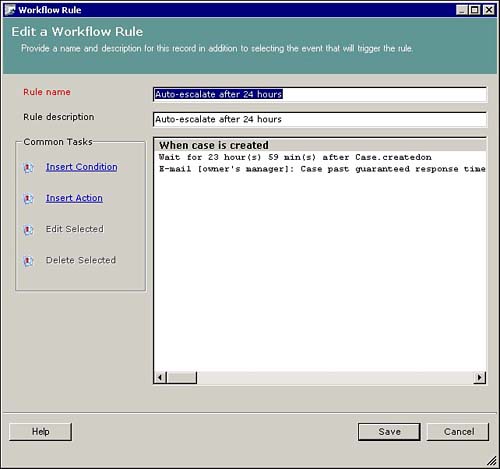
Wait for Timer
The Wait for timer option presents the screen pictured in Figure 12.26 to enable you to configure the wait conditions.
Figure 12.26. Configuring a “Wait for timer” condition in Workflow Manager.
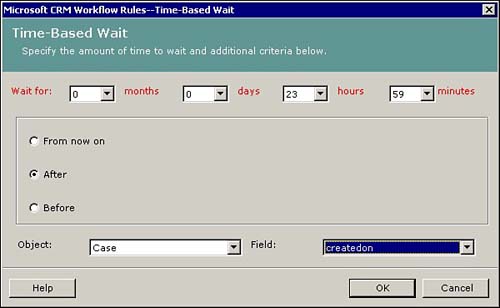
The timer configuration screen gives you the following three options when configuring time base workflow:
From now on
After
Before
You can use the After option to specify how long past the created on date/time to wait until action is taken. The From now on option starts the clock ticking as soon as the workflow rule is executed. Effectively, the After and From now on options yield the same result with the Create event. However, you could use the From now on option to create rules that enable you to promise follow-up to your customer by a certain time period.
Figure 12.27 provides an example of the After option to notify a CSR's manager if a Case is past its guaranteed response time.
Figure 12.27. Using the Wait for timer workflow option to ensure that service is provided within guaranteed response times.
The Before option monitors a date to proactively take action in advance of the date's arrival. For example, this option can be used with the Contract's cancel on date to provide notification for a Service Contract that is nearing expiration. This workflow could automatically send a template generated email outlining options for contract renewal.