Deployment Manager
Deployment Manager is installed with the Microsoft CRM server installation. You can access it on the CRM server by going to Start, Programs, Microsoft CRM, Deployment Manager. Deployment Manager is implemented as a snap-in to the Microsoft Management Console (MMC). Its interface has the familiar MMC explorer style.
As we work through the various functions in Deployment Manager you will notice that it has been designed as a tool to service multiple Microsoft CRM installations. For example, when you use User Manager to add a new user, you have to select the specific CRM implementation to which you want to add the user. Although not fully implemented at this time, this multi-deployment design is no doubt intended for organizations such as Application Service Providers that are hosting multiple Microsoft CRM deployments.
The Deployment Manager hierarchy in Microsoft Management Console consists of the following nodes:
Deployment Manager— A Microsoft Management Console application providing schema, server, license, and user configuration capabilities for Microsoft CRM
Schema Manager— A tool for adding new fields and objects mappings in Microsoft CRM
Server Manager— A tool for configuring, enabling, disabling, and refreshing the Microsoft CRM server and its associated Microsoft SQL server
License Manager— A tool for adding license keys (which unlock functionality) to Microsoft CRM
User Manager— A tool for creating Microsoft CRM users from Active Directory users
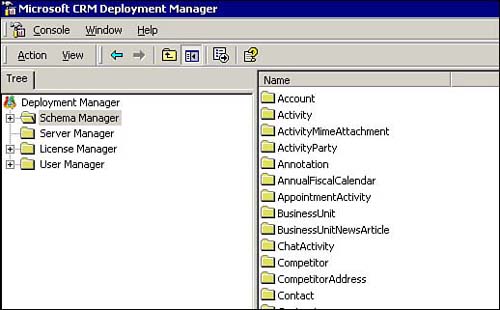
Figure 11.1 shows the layout of Deployment Manager. This looks familiar to most applications administrators because it is a snap-in to the Microsoft Management Console.
Figure 11.1. Deployment Manager is a Microsoft CRM configuration tool that is installed with the Microsoft CRM server and is a snap-in to Microsoft Management Console.
Schema Manager
Schema Manager represents the meat and potatoes of the Deployment Manager application. You will use it the most because it is where you will create new object attributes (schema fields) and map attributes from one object to another.
If you click on the plus (+) next to Schema Manager, it expands to display the objects that make up Microsoft CRM. Under each object folder, you find the Attributes and Mappings folders.
Attributes—Adding Schema Fields
Microsoft CRM ships with standard objects, each of which has a standard set of attributes. As mentioned previously, Objects can be thought of as CRM records and Attributes can be thought of as fields within a record or properties of the object. An example of a CRM object is a Lead, and an example of a Lead Attribute is the Lead's First Name.
NOTE |
By right-clicking an object folder under Schema Manager, you can select New and then you will see two options: Add Schema Field and Add Mapping. If you select Add Schema Field, you will be able to add a new field (for example, Attribute) to the object you have selected.
When schema fields are added using Schema Manager, the CRM platform is actually adding new columns to the object's underlying table. For most objects, this table is named as the object name plus the word base. For example, when you use Deployment Manager to add a field to the Contact object, the platform adds a new column to the ContactBase table in the <OrganizationName>_MSCRM database. New fields are added as properties of the object and are just as accessible throughout the application as standard object properties.
Each new field is added with a CF prefix to represent that it is a Custom Field. Additionally, a third character is added to the name you give to the field. This character represents the type of field you have added. Table 11.1 lists the available custom field types as well as their prefixes and the screen controls added when you add these fields to a screen.
NOTEAt first, it might seem like adding custom fields as new database columns is limiting. However, consider the fact that SQL Server 2000 has a 1,024 column or 8,060 character limit per table. The number of columns you can actually add depends on the data type and lengths of the individual columns, so the maximum number varies based on use and normally allows less than 1,024 columns. Regardless, you can add a lot of columns and certainly enough until a future release of Microsoft CRM introduces the ability to add new objects. |
Figure 11.2 shows the AccountBase table in design mode after a new schema field, named Region, has been added. The Microsoft CRM platform creates the field as CFPRegion to indicate that it is a custom picklist field.
Figure 11.2. The AccountBase table in the SQL Enterprise Manager design view.
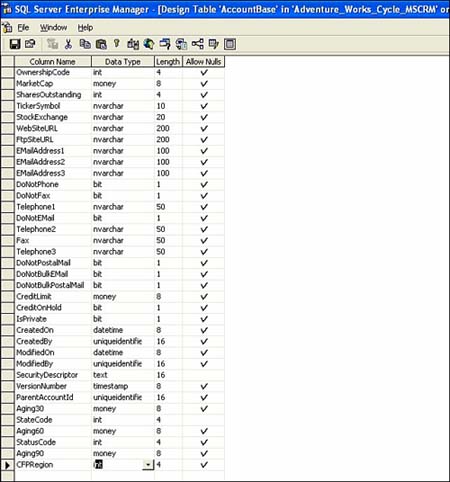
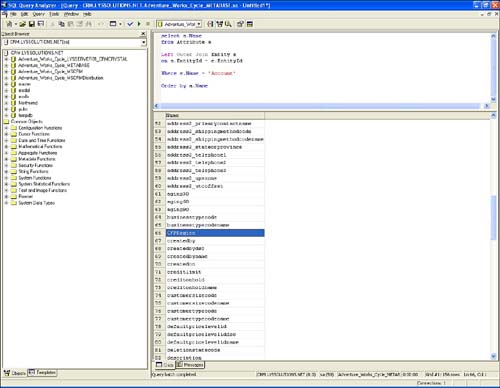
Figure 11.3 provides some insight into what is going on over in the metabase when a new schema field is added. The <Organization>_METABASE database is the database that stores descriptive information about the CRM database.
Figure 11.3. SQL Query of the Attribute table in the CRM Metabase.
NOTEMeta data is data that describes other data. In Microsoft CRM, the meta data describes all the fields and their acceptable values as well as mappings. |
The Attribute table in the metabase lists all attributes of all objects in the system. In Figure 11.3 the Attribute table has been joined with the Entity table to list all Attributes for the Account object. You can see that the platform has added CFPRegion as an Account Attribute.
If you play around with this, you will notice that the Account object has more attributes than the AccountBase table has columns. This is because certain Attributes, such as address fields, have been normalized into separate tables. However, the object model sees this as a single list of attributes.
After you have selected Add Schema Field, you are presented with a dialog box allowing you to configure the field properties, as shown in Figure 11.4.
Figure 11.4. The New Schema Field Properties dialog box.
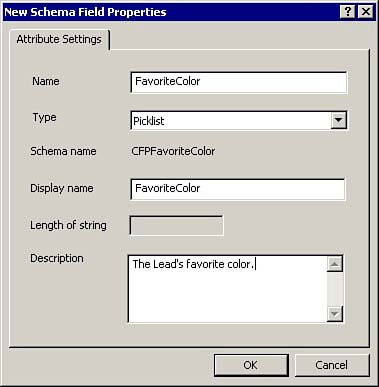
Notice on the New Schema Field dialog box that there are properties for the field name, type (field type), display name, length of string (for string fields only), and description. The names you enter here cannot include spaces, but don't be concerned about this. You'll have an opportunity to add spaces as you add these new fields to your forms. After you complete these and save your new field, you will only be able to update display name and description.
As you've now seen, adding new fields is an extremely simple proposition and you've got room to add a lot of fields. One thing to keep in mind as you're doing this is that in version 1.0, when you've added a field in Deployment Manager, you cannot remove it. Because information about the field is added to the CRM metabase, don't think that you can trick the system by simply opening the table and removing the database column. The best approach to this limitation is to plan your deployment on paper before actually adding new fields. This will force you to think through things better and make less mistakes.
NOTETo properly design your system on paper, it is helpful to start with a Microsoft CRM Specification template. This document lists all standard Microsoft CRM structures and provides a framework for modeling the system on paper prior to making any changes in the system. For a copy of this document, visit http://www.c360.com/MSCRMSpec.asp. |
Entity Mapper
Now that we understand the concept of adding new fields, let's discuss the concept of mappings. The term data mapping is generally used in relation to the conversion of data from one source to another. A conversion mapping is a definition of how fields flow from the source to the target. For example, a field called firstname in one data source might need to be imported into a field called fname in the data destination.
In many places within Microsoft CRM, we create new records from existing records.
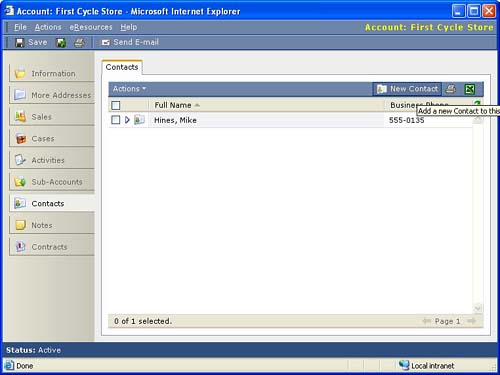
For example, in Figure 11.5 we have an Account record open and are about to click the New Contact button on the Contacts tab to add a new Contact for that Account. Mappings enable us to define how data fields on the Account record flow through to the Contact record when you create a new Contact object in this way.
Figure 11.5. Creating a new Contact from an Account record.
Lead conversion is a good example of where mappings are critical. In most sales organizations, fields are added to the Leads object to ensure that certain critical data points are captured before converting the lead into a Contact, Account, and/or Opportunity. When we add new fields to the Lead object, we probably want the data in those fields to flow through to the Contact, Account, and/or Opportunity objects upon conversion. Figure 11.6 shows that the Lead object has default mappings to the Contact, Account, and Opportunity objects. When the lead is converted, Microsoft CRM follows these mappings in taking the data from the Lead record and depositing onto the Contact, Account, and Opportunity records.
Figure 11.6. By default, Leads are mapped to Accounts, Contacts, and Opportunities for the Lead Conversion process.
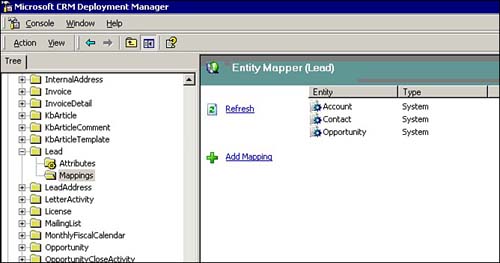
Figure 11.7 shows the Entity Mapper with the Lead to Contact mapping being edited. We arrived at this screen by selecting the Mapping folder under the Lead object to the left of the screen, and then selecting the Contact object to the right of the screen. With those two selections made, clicking the Edit Mapping button brings up the mapping edit screen.
Figure 11.7. Editing a mapping in Deployment Manager's Entity Mapper.
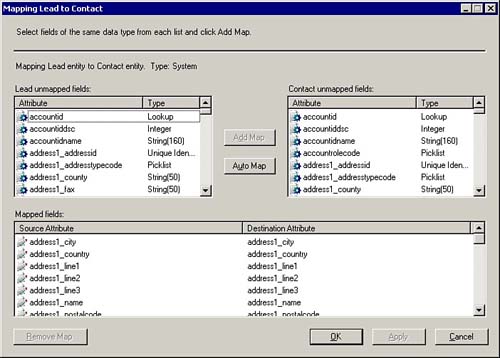
The Entity Mapper is simple enough to use, but there are few things to keep in mind. Microsoft CRM only allows you to map fields of identical data types and where data will not be truncated. Figure 11.8 shows the warning message you receive if you try a mixed type mapping.
Figure 11.8. Warning when trying to map mixed data types.

Within any given mapping a field can only be mapped into one receiving field. After you map two fields, they no longer appear on the list of available fields. For example, with Lead conversion, you can't map the Lead's phone number to two different fields on the Contact object. You can, however, map it to one field on the Contact object and one field on the Account object because these represent two separate mappings.
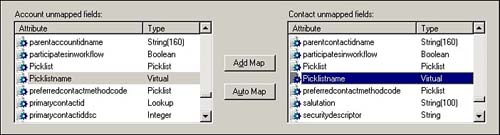
When we learn to build picklist selections shortly, we will see that each text value in a picklist is represented by an integer value. This integer value represents the index or sequence of the text value you've created for the user to see. This is why we saw earlier that a picklist is actually an integer data type and not a string. Picklist values for all fields start with a value of one and increment by one each time you add a new value. You'll notice in using the Entity Mapper that picklists are represented two separate ways. They are represented as a picklist type (refers to the integer index value of the picklist) and as a virtual type. The virtual type represents the actual text value the user sees in the field list control. Figure 11.9 illustrates the mapping of a picklist's virtual field.
Figure 11.9. Mapping a picklist name virtual field instead of the picklist integer value.
If you map a picklist type to another picklist type, Microsoft CRM transfers the integer index value from the source object to the target object regardless of the text value that the user actually sees in the field. For example, if you have a picklist field with four options on the Lead screen and a picklist field with the same four options, but in the opposite order, on the Contact screen, the mapping of these two fields will result in different text selections on the two objects.
You should map picklists using the integer value (the picklist field type in the Entity Mapper) if your corresponding text descriptions are different between the two objects you are mapping. This gives you the flexibility to modify the text descriptions without invalidating the mapping.
TIPBeware of adding values to mapped picklist fields and reordering them. Reordering values does not change their corresponding integer values. It only changes the sequence in which they are listed. |
On the contrary, if you map the picklist's virtual field as illustrated in Figure 11.10, Microsoft CRM takes care of the translation for you so that what the user sees is consistent between the two objects regardless of whether the text values are identically ordered.
Figure 11.10. Adding a new mapping in Microsoft CRM.

Attributes—Adding New Mappings
In the mapping scenarios discussed so far, we've edited existing mappings that were installed by default. Deployment Manager also provides the ability to create new mappings.
NOTECurrently, Microsoft CRM version 1.0 does not allow developers to add new objects into the application's object model. Because new objects cannot be added, it is probably unlikely that you would need to add a new mapping from scratch. |
Adding a new mapping is straightforward. You simply click the add new mapping button and select the object to which you want to map, as shown in Figure 11.10.
By default, all the mappings you use for version 1.0 have been set up, so you might never use this function. But potential scenarios exist where a developer could create a custom button to create one object from another and take the new mapping into account when doing so.
User Manager
We briefly touched on the User Manager tool in Chapter 5, “Setting Up Microsoft CRM.” Let's now take a deeper look at this useful utility.
Users can be created directly in the Microsoft CRM Web client by going to Settings, Business Unit Settings, Users and following a series of steps to add the user and assign their license and roles.
Setting up users is time-consuming for a system administrator and the User Manager tool in Deployment Manager can save time. Furthermore, because the User Manager tool enables you to select users directly from Active Directory, it narrows the margin for error experienced by having to type the user's domain logon name exactly in the standard Microsoft CRM user screen. Figure 11.11 shows the user manager wizard.
Figure 11.11. Selecting the user's Business Unit in User Manager.

User Manager is a straightforward wizard. To access it, right click the folder for the installation to which you want to add the user. The wizard walks you through a series of screens allowing you to
Select the user from a list of Active Directory users
Select the Business Unit to which the user will be added (see Figure 11.11)
Select the roles to which you want to assign the user
Select the user's license from the pool of available licenses
License Manager
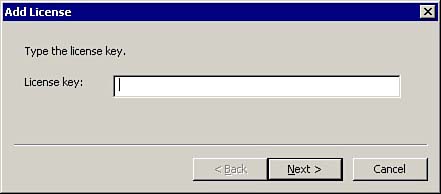
Like a lot of applications, Microsoft CRM uses a license key concept to unlock the functionality a customer has purchased. When a customer buys Microsoft CRM, the specific number of users is coded into a license key created specially for the purchasing organization. This key tells Microsoft CRM what functionality to make available and the number of users to whom to allow access. The key must be entered using License Manager before you can begin adding licenses to users. Figure 11.12 shows the Add License screen of License Manager.
Figure 11.12. Adding a License Key through License Manager.
By default, Microsoft CRM creates a user during initial installation. This user is the one who was logged in to run the application installation. This user will not have a license, nor will any licenses be available until the license key is added through License Manager.
Server Manager
Server Manager is a utility that allows you to associate the current Microsoft CRM application with a SQL Server and the appropriate MSCRM and Metabase databases on that SQL Server.
Figure 11.13. Configuring your SQL Server with Server Manager.
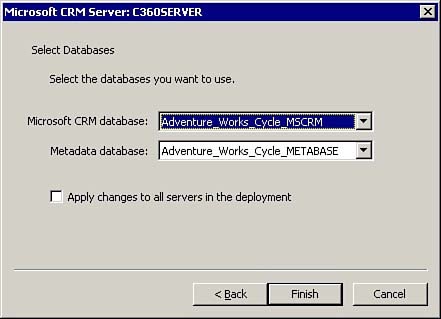
Server Manager allows system administrators to enable and disable Microsoft CRM servers and to switch the Microsoft SQL servers in the event that the current SQL server goes offline.
Importing, Exporting, and Publishing XML
As you configure your implementation of Microsoft CRM, your users will not see the configurations until you make them available by publishing them. To do this, right-click the root node of Deployment Manager (labeled 'Deployment Manager' and referred to as the 'Customization Transport Manager'). You will see the following three options:
Import Customization
Export Customization
Publish Customization
NOTEPublishing, importing, and exporting customizations actually affects what we have been referring to as configurations. Microsoft has been inconsistent in their use of these two terms. It is important to keep in mind that everything related to Deployment Manager deals with configurations and not what we have defined as customizations. |
Upon selecting the Publish Customization option, you are presented with the screen shown in Figure 11.14.
Figure 11.14. Publishing Microsoft CRM customizations with the Customization Transport Manager.
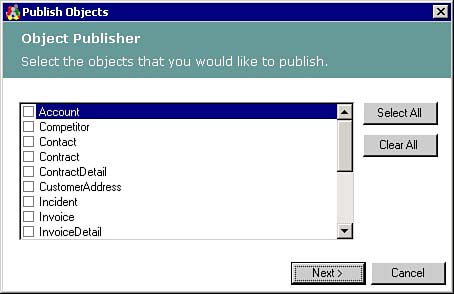
The Customization Transport Manager gives you the option to publish customizations for all objects or for only selected objects. This is nice functionality because you might encounter situations where you have customized one object and are ready to roll it out to the end users, but are in progress on another object and don't want the customizations published.
After you have selected the objects for which you want your customizations published, you are prompted to select the Web servers to which you want the customizations published, as shown in Figure 11.15.
Figure 11.15. Selecting Web servers to which to publish customizations.
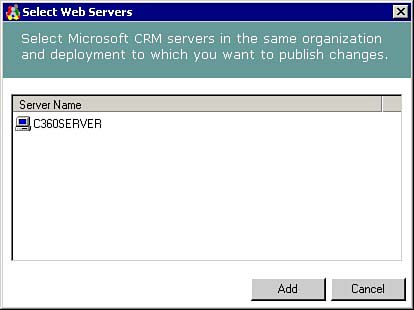
Most deployments of Microsoft CRM have a single Web server, but it is possible to have multiple Web servers in which case you would want the customization published to all of them.
NOTESometimes it is necessary to reset the Web server in order for your published customizations to show up in Microsoft CRM. To do this, select Start/Run on the Microsoft CRM server, type iisreset, and then click the OK button. This utility will stop and restart Internet Information Server (IIS) and will cause a momentary disruption in service to your users. After you have run the iisreset, the Microsoft CRM Web pages (which were previously cached) will be cleared so the next user to retrieve each page will notice a slower than normal response. |
Perhaps one of the coolest features of Microsoft CRM is that all the customizations you create are stored as meta data and can be exported into a single XML customization file for use in another implementation of Microsoft CRM. Specifically, when you export the customization XML from one Microsoft CRM installation to install in another, you are exporting.
The import process will create these new fields in the target implementation.
Attributes (schema fields you have added)
Mappings
User Interface changes (adding/modifying tabs, sections, and fields)
Queries (i.e. custom filtered views you have created)
KB Article Templates
Service Contract Templates
Email templates
Pointers for custom tabs (see Chapter 14, “Customizing Microsoft CRM”)
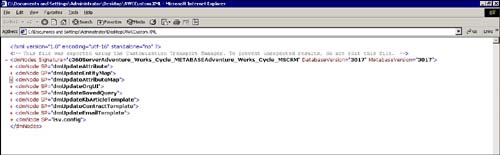
Importing customization XML is meant to be done on top of a clean installation of Microsoft CRM. It creates custom fields, add templates, and so on. It will not remove them. If you are the adventurous type, you can crack open the customization XML file that you have created and see exactly what it contains. Figure 11.16 shows the structure of the Microsoft CRM XML customization file.
Figure 11.16. The root nodes of the customization XML file.
The export/import customization process does not include any workflow you have created but Microsoft has created a separate utility to export and import workflow information. This utility is available on the Microsoft Business Solutions PartnerSource and CustomerSource Web sites. Also, although the customization XML does contain the pointers to added custom code, it does not copy over that code. This can be done manually.
NOTEUnlike customizations, descriptions of Workflow are not created in the Metabase. Workflow is housed in a series of tables in the MSCRM database. These tables all begin with the WF prefix. |
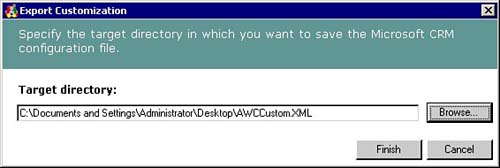
To export the customization XML, navigate to the root node of Deployment Manager, right–click, and select export customization. You'll be presented with a dialog box to specify the destination location of the XML file to be output. This dialog box is shown in Figure 11.17.
Figure 11.17. Exporting Customization XML in Deployment Manager.
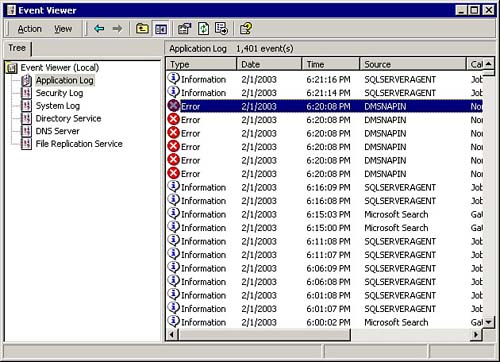
The Customization Transport Manager, as it is called, creates a single XML file containing all your customizations. If there are errors during import or export, they are written to the Microsoft Windows Event Viewer on the CRM server. You can access this application (shown in Figure 11.18) by going to the server's control panel and selecting Administrative Tools, Event Viewer. Errors generated by Microsoft CRM's Deployment Manager will be listed with a source of DMSNAPIN.
Figure 11.18. Application Log Event Viewer errors from the Deployment Manager snap-in (DMSNAPIN).