Creating a Sales Process
Up to this point, we've kept our discussion of workflow heavily weighted to creating rules. It's time to shift gears and dive head-first into the creation of our very own sales process.
A sale process can be defined as a series of stages that you must typically pass through to bring a revenue opportunity to closure. Sales processes are typically more geared toward less transactional sales, where you are actively selling as opposed to marketing, and then waiting for a consumer to place an order. Sales processes are a key component of all popular sales methodologies.
For our purposes we'll create a straight-forward, business–to-business sales process with four key steps including
- Needs Assessment
- Solution Development
- Proposal
- Delivery
Because Microsoft CRM has its own sandbox for marketing to import and qualify Leads, we'll assume that any prospects coming into this process have already been qualified by our Marketing department and are ready for us to assess their solution needs. This is our Needs Assessment stage and can consist of a single phone call or email or several face to face meetings.
After we have an understanding of the prospect's needs, we can develop a solution to address these needs. The Solution Development stage is where we develop and present the solution, refining it until we arrive at something that can be put into a proposal. By arriving at the Proposal stage, we have a proposal in place that can be converted into revenue upon signature. Proposal refinement takes place, but, assuming we've made it this far, at some point we will either Close the opportunity (win the deal) or Fallout the opportunity. We use the term Fallout here to refer to any conclusion other than winning the business. Having a Sales Opportunity fallout can be due to a number of situations (for example, lack of budget, delay, business issues) beyond simply having a competitor edge by you in the race.
In Workflow Manager we start by selecting the Opportunity object and selecting Sales Process Template. It is advisable to create a template because a lot of work generally goes into creating a sales process, and you might want to copy your template later to support a new, yet slightly different, version of the process. After you have created a sales process template, you can select Create Rule from Template from the Workflow Manager actions menu, and you will be able to give the new sales process a unique name.
The main difference between a sales process and a rule is that sales processes have stages. Within each stage you can insert multiple actions from the same list we reviewed previously. To advance from one stage to the next, you include as a condition the completion or cancellation of one or more of the Activities that has been created up to that point in the process.
Figure 12.28 provides an illustration of the flow of a simple sales process. Each stage creates an Activity that must be completed to move to the next stage.
Figure 12.28. A manually triggered sales process.
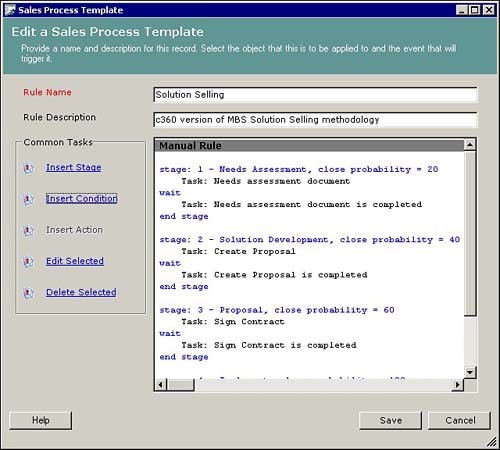
NOTEThe sales process reads from top to bottom as illustrated in Figure 12.30. It is easiest to go ahead and insert a skeleton of the process before getting too carried away adding actions to your first sales stage. You'll quickly notice that Microsoft CRM inserts the stages backwards from what you'd expect, and you have no control to reorder them after they've been inserted. If you insert them in the wrong order you need to delete them and start over. Figure 12.30. Sales Stages of a sales process.
|
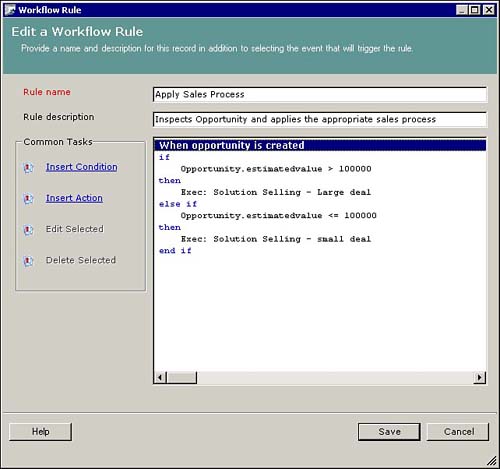
Microsoft CRM can support multiple sales processes that can be automatically triggered based on characteristics of the Sales Opportunity. If you can link your various sales processes to attributes on the Opportunity or Parent (that is, linked Contact of Account) record, you might want to create your sales processes as manual events. Then have a separate rule that inspects the Opportunity on creation and applies the appropriate sales process. Figure 12.29 shows a business rule to apply the appropriate sales process based on the size of the opportunity. Keep in mind that if you were to implement this rule you would want to make the estimatedvalue field required so a sales process would always be assigned.
Figure 12.29. Creating an Opportunity workflow rule to inspect a newly created Sales Opportunity and apply the appropriate sales process based on estimated revenue potential.
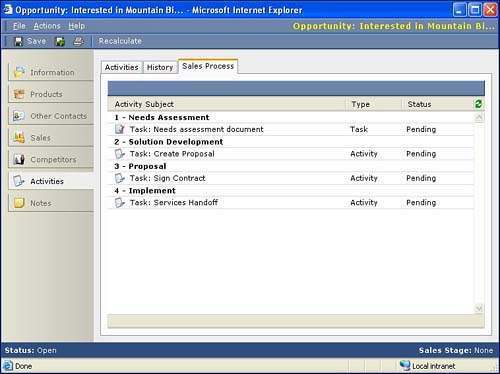
When a sales process is applied to an opportunity, it creates a list of sales stages on the Sales Process tab of the Activity area of the Sales Opportunity record. This is illustrated in Figure 12.30.
Notice that as you look at the list of Sales Stages and their associated Activities, only the first Activity is initially marked with a check. This “active” Activity can also be found on the Activities tab of the same window. After this Activity is closed, it is moved to the History tab, and the next Activity is promoted to the Activities tab.
In reality, what is happening is that the sales process is creating the Activities as you go. After a sales stage has been completed, the Activities for the next stage are created. This is why you can only open an Activity record when you are at the stage in which it is associated. Up to this point, it has not been created. The significance of this is that the relative due dates you set when creating Activity records are applied as the activities are created.
After you have worked through all the sales stages on an Opportunity, you reach the point of either manually closing the Opportunity or having workflow close the Opportunity by changing its status to Won or Lost. When this is done a new Activity record of type Resolution is created on the History tab.
NOTEIf you create a sales process and later decide to modify it, you must deactivate the process before Microsoft CRM will allow you to make modifications. Once the modifications are made, you must reactivate the process to begin using it again. It is important to note that the act of deactivating a sales process has the undesirable effect of removing that process from the Sales Process tab on the Opportunity's Activities tab. You will still be able to advance the sales process through the stages and the workflow will still fire, but you will not see the sales process listed as you could before the deactivation. In addition, once a sales process has been deactivated, you cannot manually update the sales stages of opportunities to which this process had been applied. With the deactivation, modification and reactivation of the Sales Process you have, in effect, deleted the sales process and created a new process in its place. Microsoft CRM still recognizes the “old” version of the sales process and respects its workflow but in reports dealing with Sales Process, you will end up seeing multiple groupings of what appears to be the same process. |