
Nearly all digital photos must be artificially sharpened due to the effects of the anti-aliasing filter used in most DSLRs (as explained in What are the Advantages of RAW Format?).
Skillful sharpening is an art form of its own and requires a lot of experience to be performed successfully. Interpreting the results of sharpening is also very subjective. This is why the many sharpening tools and techniques available are constantly being improved.
Sharpening is slightly self-contradictory, as it simultaneously improves the overall look of an image while destroying some fine detail. Allow for the distance your finished image will be viewed from when sharpening – the greater the distance, the more you can sharpen, as fine detail won’t be visible anyway.
Note
![]() Zoom in to a 100% view (i.e., each monitor pixel represents one image pixel) while sharpening. If the tool you are using has a 100% preview window (like the Photoshop USM filter), zoom the normal preview window to exactly 50%. This way, you can see the 100% view in the tool interface while the normal preview shows (approximately) how your image will look when printed.
Zoom in to a 100% view (i.e., each monitor pixel represents one image pixel) while sharpening. If the tool you are using has a 100% preview window (like the Photoshop USM filter), zoom the normal preview window to exactly 50%. This way, you can see the 100% view in the tool interface while the normal preview shows (approximately) how your image will look when printed.
Experienced imaging specialists usually use up to three types of sharpening on their images:
Capture sharpening. This uses a RAW editor to compensate for color interpolation and anti-aliasing effects. This type of sharpening does not apply if you shoot in JPEG format.[65]
Creative sharpening. Sharpening is used as a creative tool according to your personal taste and preferences. Some people like to sharpen some areas of an image more than others, or not at all (usually using layer masks).
Output sharpening. This type of sharpening is applied according to the specific output purpose of an image. Images that are to be presented on a monitor don’t need to be sharpened as much as those destined for offset or inkjet printing. Output sharpening is usually applied to a copy of the original image that has already been scaled and converted for printing.
You can also increase local contrast to perform a kind of color sharpening, which accentuates. The color differences between neighboring pixels of different colors. If you want to apply this type of sharpening to your images, we advise you to do so before step 2 above (once most other corrections have taken place). Generally, creative sharpening should be applied less if it is performed after increasing local contrast. We will discuss how to increase local contrast in detail in Enhancing Local Contrast.
Once you understand the basic principles of sharpening, you can take a look at some of the specialized sharpening tools and plug-ins available for use with Photoshop. You can find some recommendations for sharpening tools that we use as part of our workflow at our Digital Outback Photo website (www.outbackphoto.com). Advanced Sharpening Using Photoshop Layers looks at some of these tools and describes sharpening techniques in detail.
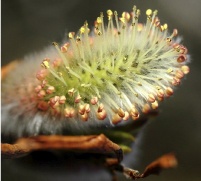
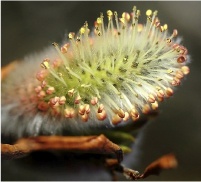
Unsharp Mask (USM) is the classic Photoshop sharpening tool. Remember that it is not always easy to judge the effects of sharpening accurately on a monitor. An image that appears hopelessly oversharpened on a monitor can look ideal when printed on an inkjet printer.
The main types of artifacts caused by sharpening should be kept to a minimum:
Halo effects (black or white lines at object edges)
Image noise (amplified by sharpening)
There are a great number of sharpening tools available, and it is up to you to decide which is the best for you with regard to functionality and your wallet.[66]
Of all the options Photoshop offers for sharpening digital images, Unsharp Mask (USM) is probably the most widely used. Most other sharpening tools are variations on the same theme. In order to sharpen your images effectively you need to understand the unsharp mask technique and its limitations. The filter can be found under Filter ▸ Sharpen ▸ Unsharp Mask, and the dialog (Figure 4-32) has three controls: Amount, Radius, and Threshold, which function as follows.
Amount •. This value determines how strongly edge contrast is increased. Start by trying values between 90 and 120 percent. Usable values can reach as much as 150 to 250 percent.
You can see the effects different values have in the image preview. The greater your image resolution, the higher the value you can effectively use.
Radius •. This value determines the number of neighboring pixels that are affected by the sharpening process. Values of 0.5 to 1.0 are often sufficient to achieve effective results; too, the higher your image resolution, the larger the radius value you can effectively use. Too large a radius value can lead to hard-looking contrast effects and to the formation of image artifacts.
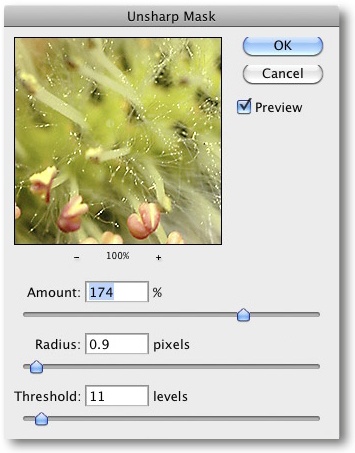
Threshold •. This value defines how many pixels to consider as an “edge”. Start at 0 and work up; larger values produce effective edge sharpening without accentuating image imperfections too much. For images with smooth gradients (e.g., skies), we usually use a value of 5–10.
Unfortunately, it is easy to sharpen too little or too much. Too much sharpening can cause significant image quality loss, especially in the form of black or white halo effects. We recommend that you start small and sharpen only a little until you get a feel for how sharpening affects your images.
The effects of sharpening depend on how an image is to be used (e.g., print or Web,), and it can take some time and a lot of experimenting to find the right settings. This is where the main limitation of the USM process comes in to play: all USM corrections affect the entire image. It is often desirable to sharpen different parts of an image to different degrees (e.g., the face and the hair in a portrait). It is difficult to avoid amplifying minor noise effects when using USM.
This is why there are a large number of specialized sharpening programs and plug-ins available for making sharpening easier and more effective. Most of these tools are based on edge masking techniques.
There is no single, universal solution to the problem of sharpening, so you will have to experiment to find out the best techniques and tools to use in each individual situation.
The CS2 version of Photoshop introduced an enhanced sharpening process called Smart Sharpen. This process uses Amount and Radius values like USM and includes an additional Remove control (Figure 4-35). We nearly always select Gaussian Blur. You can also compensate for slight camera shake using the Motion Blur option; here, you need to experiment to find the appropriate Angle setting for the supposed angle of movement of the camera relative to the subject.
If you activate the Advanced option (A), you can sharpen shadows and highlights separately. The settings you make on the Sharpen tab then apply to the midtones.
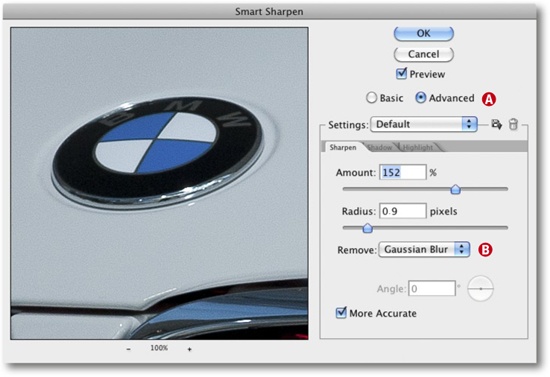
Generally, you shouldn’t sharpen as much in the shadows as in the highlights in order to avoid strengthening any noise artifacts that may already be present. If you are working on a bright sky with mainly soft edges, you should sharpen less there and concentrate on the midtones. We always check the More Accurate option, even if it costs us some computing power.
If you want to sharpen selectively, you first have to select your image area using one of the Photoshop selection tools with a soft edge setting. (The Photoshop selection tools are explained in Selection Tools.) You can then open the sharpening filter, which will then only affect the selected area. The best option is to sharpen on a separate layer using layer masks (as described in Making Selective Adjustments Using Layer Masks).
In contrast to the direct sharpening techniques we have described here, we usually sharpen on a separate layer. In other words, we flatten all of our existing layers into a new, single layer and sharpen that (Flattening and Merging Layers). This allows us to use a layer mask to protect certain image areas (the face in a portrait, for example). This technique also allows us to sharpen a little too strongly and to regulate the effect using layer Opacity settings (Using Adjustment Layers).
In order to alter our sharpening parameters later, we use our sharpening filter as a Smart Filter (Smart Objects and Smart Filters).
Where Photoshop tools aren’t sufficient for our everyday needs, we use additional plug-ins selected from the ever-increasing range available on today’s market. These range from our own cheap and simple EasyS Plus to powerful and expensive options like FocalBlade. The following are the sharpening tools we like best:
Note
![]() Third-Party Sharpening Tools addresses Photoshop plug-ins, including some sharpening tools.
Third-Party Sharpening Tools addresses Photoshop plug-ins, including some sharpening tools.
For more information on EasyS Plus see [69]
Focus Magic is a powerful tool, and claims to be able to sharpen blurred images (
 ).
).Focus Magic: www.focusmagic.com
FocusFixer: also attempts to sharpen out-of-focus images (
)FocusFixer: www.fixerlabs.com
FocalBlade is one of the most powerful (and therefore also most complex) sharpening tools available (
).Dfine (
) by Nik Software is a great sharpening tool that includes capture, creative, and output sharpening tools.
Sharpening plug-ins are constantly being developed, and it is worth keeping an eye out for new tools and newer versions of older tools. The authors of this book host a web page on the subject of Photoshop filters, where you can get test reports and update information (www.outbackphoto.com/workshop/photoshop_corner/filters.html). We will discuss more sharpening techniques in Advanced Sharpening Using Photoshop Layers and Third-Party Sharpening Tools.
[65] In that case, the camera will have already performed an internal RAW-to-JPEG conversion using its own firmware algorithm, and it will also have applied some capture sharpening.
[66] See also Third-Party Sharpening Tools).