
This recipe will take you through adding a camera to a Track View sequence and animating it. We will create a flythrough of our level using some basic animation techniques and then play it back in the editor.
To follow this recipe, you should have created a new Track View sequence with a director track already added.
Having added a new track view sequence and a director node, we need some objects to direct:
- First navigate to the misc section in the rollout bar and click-and-drag the camera entity into the level.
- This will create a wireframe preview of the camera's view. You can move this object in the world as you would with any other entity.
- Rename this camera to
cinematic_camera1. At this point, you should adjust your view to be able to quickly preview the actual camera view. - You can do this by configuring your viewport layout to have a camera and perspective view concurrently.
- For this example, however, we will only animate the camera movement from the camera's viewpoint and not from the perspective view.
- To do this, change your active view to cinematic_camera1 by right-clicking on the top bar in the viewport:
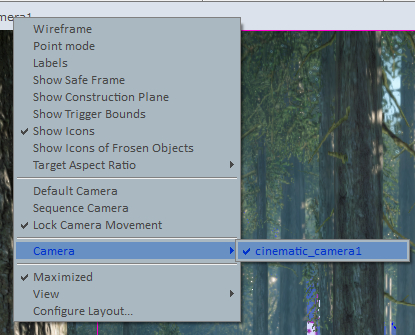
- Re-open the dialog and also de-activate the Lock Camera Movement. This will allow us to control the movement of the camera from its own perspective.
Back in the Track View editor, let's now add this camera:
- To add any entity to a Track View sequence, simply select the entity in the editor, in our case the cinematic_camera1 entity, and then add it to the track view sequence using the add selected entity icon.
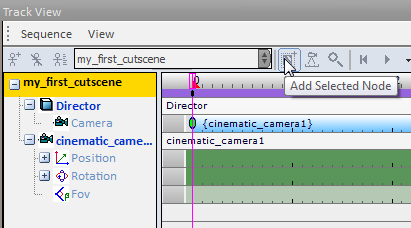
You will notice that when the camera is added to the sequence, it already has some default tracks attached.
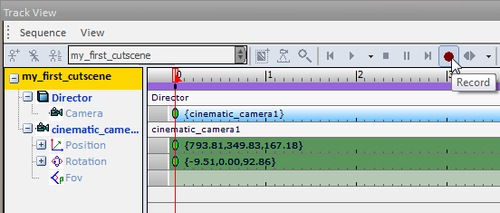
- Having unlocked the camera movement, we must now click the record icon in the Track View to automatically key frame any movement changes to an object in the editor.
- Select the camera in the editor; you can do this quickly by double-clicking the entity in the Track View. Click Record and move the camera to its initial start position.
- You can move the camera in the exact same way you navigate the viewport in the Sandbox. It does however, allow us to do interesting motions, such as banking or rotating the camera.
- Navigate the camera to a good starting position where you'd like the flythrough of the environment to begin.
- Notice that key frames are added for Position and Rotation automatically while the record icon is active.
- Next, move the active time slider to 10 seconds.
- Keeping in mind that the animation will be interpolated between two key frames, make another key frame at 10 seconds by moving the camera to a different position.
At this new position, let's add some roll to the camera:
- With the camera selected, click the select and rotate tool and then in the type-in dialogs at the bottom of the view port, type in a value in the Y parameter. The higher the value, the more the camera will roll. Use negative values to roll in the other direction.

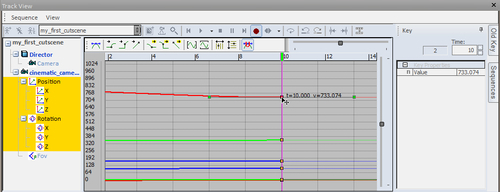
- Another effective way of adding variations to the movement is by using the curve editor. The curve editor can be accessed through the View section of the Track View editor.
- Change the view to the curve editor and select and drag one of the axis key frames to a different location at frame 10. Notice that since the key frames are stored in three XYZ channels, position keys and rotation keys can be edited independently of each other. Position keys are stored in world coordinates and rotation keys are stored in local coordinates. You may also notice the Bezier modifiers on each key frame. This will allow tangents to be adjusted between key frames.
- Change the view back to the dope sheet and scrub the time slider from frame 10 to frame 0 and back. Notice that you are instantly able to preview the animation!
- Drag the time slider to 20 seconds and create a new position for the camera in the direction the camera is currently facing forward to the final position for this recipe. Since we are animating a flythrough, you can of course create as many key frames as you like by dragging the time slider forward and moving the camera to a new position for as long as you want your sequence to last.
For this recipe, our sequence is only three key frames long.
- Preview the entire sequence by clicking the play icon.
Having created key frames at 0, 10, and 20 seconds, you may find that the camera is too fast or too slow. There are two ways to adjust this, first is the most accurate is to select all the key frames at a particular time and bring the time between key frames down by dragging them closer; alternatively, drag them further apart for longer sequences.
- To return to the default camera view, click the default camera, where you unlocked the camera's movement.
Make sure to save this sequence as we will reuse it later on in this chapter.
- Save the
.cryfile asForest_sequences.cry.
This sequence that we have created can be triggered via different means during the game mode for a variety of purposes. A simple flythrough can be used to introduce areas, give the player a unique view of events, and to further story and narrative. It is also commonly used to create game play specific events to occur, such as the movement of certain entities within the world and so forth.
You may want to know more about the playback speed or some of the other available tracks for the camera.
The Field of View (FOV) on a camera can be set and animated by changing the value on the camera entity, which will be key framed while the record is active. Alternatively, you can type in the values to a manually created key frame by double-clicking anywhere on the FOV track. Some good FOV values for cut-scenes are usually 35-45 depending on the required shot.
You can adjust the play speed of the Track View editor by clicking the pull-down icon beside the play button.
The options available will not translate to in-game triggering of this sequence and will only be used for previewing in the editor.
Animators will likely be familiar with a curve editor approach to key framing objects within Track View. You can adjust your view to contain both the curve editor and dope sheet by selecting both from the view menu.
There are many curve editor tools; most of them pertain to the editing of the tangents between key frames.