
In this recipe, we will go through the creation of a basic time of day for your level.
A common sunny daylight environment can be easily created using a bright yellowish sun color, a bright blue color sky to be used for ambient lighting, and finally, an angled sun direction to get some interesting shadows.
For this tutorial, you should have the forest level forest.cry opened. This level is installed automatically as a sample when you install the SDK.
Usually, when creating your own time of day, you should use photo reference or fairly specific concept art. Experimenting will allow you to find an interesting mix of values, but in the end you may want to achieve a certain look. So having a goal before beginning to adjust the time of day is recommended.
- Open the Time Of Day dialog from View | Open View Pane | Time Of Day.
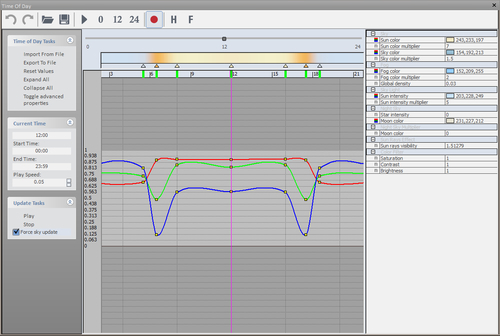
Notice, when you highlight any of the basic parameters in the Time Of Day dialog there are already key frames created on the timeline. This timeline is represented by the 24 hour slider at the top of the interface. Since the best way to learn to manipulate the time of day editor is to create your own, let's go ahead and reset all the values.
- To do this, click Reset Values in the Time of Day Tasks window.
This will effectively remove all the key frames outside of the default values at 0000 and 2400.
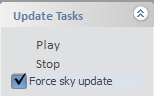
- Before we adjust the parameters to suit our needs, set Force sky update to True and ensure the record button is highlighted.
Next, let's set the current time in the level so that we can see the sun.
- To do this, click-and-drag the arrow on the slider to late afternoon. If you have difficulty getting the current time accurate, you can type in the current time.
- Set the current time to 1600.
Note
Having the sun intersect some geometry will allow sunrays to be shown more clearly.
The first setting we will adjust will be the color of the sun. The sun in CryENGINE 3 is an advanced dynamic light. Adjusting the sun color in simple terms will adjust the diffuse color for this light.
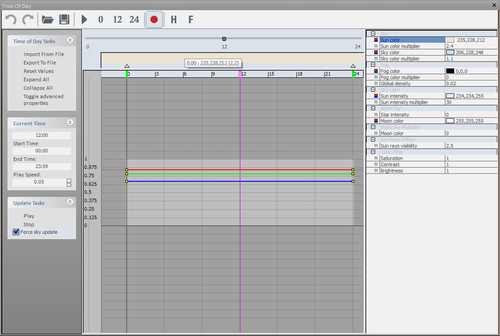
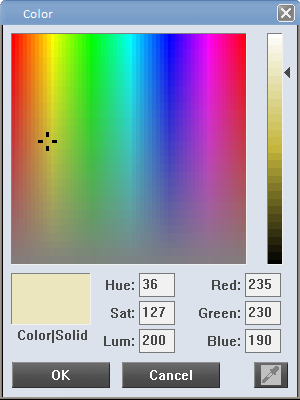
- To adjust the overall color, first click the color sampler box and click-and-drag the black target to your preferred value. In our case, let's take a realistic approach to lighting this level and set the sun color to a warm yellow tone of RGB 235, 230, 190.
- After clicking OK, you will see that new key frames have now been created on the timeline.
- The next parameter we adjust will be the multiplier for the sun color we previously set. Set the Sun color multiplier to a level of 8.
Next, we will set the sky color.
Note
Though the setting is called sky color, it is more accurately the ambient lighting color for the entire level.
To observe the effects of changing this color, simply look anywhere there is no sun affection on objects from the sun lighting.
Let's first set the color to the currently visible color of the sky:
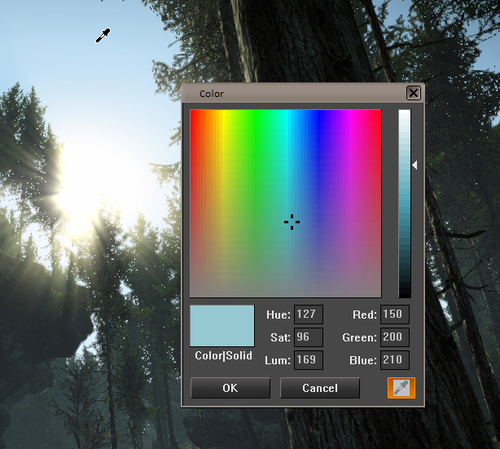
- To do this, click the color sampler box for the sky color parameter and click the sample tool.

- Next, click somewhere on the sky in the perspective viewport, this will sample its color.
- For this tutorial, set your sky color to RGB 150, 200, 210.
The sky color multiplier works as the ambient color multiplier. Since we are going for a more realistic looking time of day, set this down to 0.8.
Next is the Fog subsection of time of day. In our case, we only need to adjust the global density value.
Note
When using a dynamic sky, some haze is already calculated by the sky model. The fog specified by the fog color gets added to that haze. In many cases, the haze may be enough to get properly colored fog for a given time.
As we do not require a high amount of fog for a pleasant realistic scene, let's set the global density to a value of 0.02. The next setting we adjust will be the Sky Light parameters. We can use a handy feature of the Time Of Day dialog to copy and paste the RGB values from the sky color.
Use the sun color for a source color to warm the map or use the sky color to cool the map:
- Highlight the values in the sky color then right-click and select copy.
- Next, highlight the sun intensity values then right-click again and select paste.
- You can also type in the RGB value used in the sky color or sun color. In our case, we will use RGB 150, 200, 210.
- Adjust the Sun intensity multiplier to a bit higher than normal to get a volumetric look to the fog, use a multiplier of 50.
For the time being, we will not be setting any parameters for the night sky and night sky multiplier as we will discuss that later. The final setting we will adjust for our basic time of day will be the Sun rays Effect.
- This value controls the visibility of sun rays. Higher values will cause brighter rays to appear around the sun, lower values are a bit less stylized but more akin to a realistic look. Set this to 2.0.
- The last three parameters shown in the Time Of Day dialog are the color filter settings. However, for this process, it is much better to use color grading, which will be discussed later in this book.
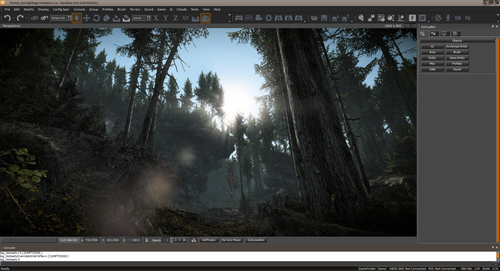
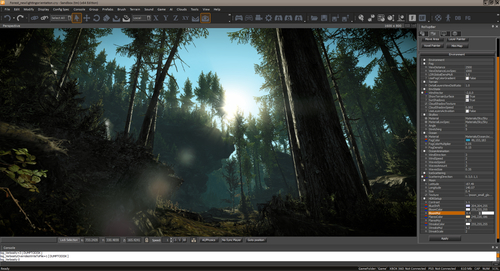
- Leave the color filter settings at default and you should have created a setting that looks like the following screenshot:
The sun in the CryENGINE is approximated by a colored directional light without distance attenuation. This is important to understand as its properties are similar to that of a regular light and properties such as color and specular level can be adjusted. However, there is an important distinction to the sun and other lights in the CryENGINE, as the sun uses a technology called cascaded shadow maps.
Sun shadows are achieved in the renderer by splitting up the view frustum into multiple parts that the CryENGINE can handle separately, also known as Cascaded Shadow Maps. Additionally, Variance Shadow Maps are also used for the lower resolution shadows from the terrain.
Sky light parameters are solely used to compute the atmospheric appearance of a dynamic sky. They do not directly affect the rendering of objects in the world (for example, lighting colors and intensities). However, they are used by the engine to compute an approximate fog color to automatically fog the entire scene in the appropriate colors.
The Time Of Day dialog has a huge variety of settings to simulate realistic and surrealistic lighting effects. Having completed setting up the basic parameters will make it substantially easier to adjust the advanced effects that the time of day allows you to adjust to achieve a photorealistic-looking outdoor lighting.
You may want to know what the reason for forcing sky update is, or what the record and play functions do.
Setting the Force sky update to True in the Time Of Day dialog forces a complete update of the sky light calculations in each frame shown in the perspective view. Should this not be set to true, the sky light calculations will be distributed over several frames and the time it will take to update will be highly dependent on the platform that is running the engine. You should be aware of this when editing some of the parameters within the time of day as some will take extra time to update.