
From the Creating a new car XML recipe, we skipped the Damages and Components section of the XML. Now it is time to return to that section and give this car a weak spot.
Complete the Creating a new car XML recipe. Then open MyVehicle.xml in Notepad or an equivalent editor.
- We need to first create a new cell in between
<Physics>and<Components/>. Copy the following code snippet to that location:<Damages submergedRatioMax="0.6" submergedDamageMult="1" collDamageThreshold="10" groundCollisionMinMult="1.3" groundCollisionMaxMult="1.4" groundCollisionMinSpeed="8" groundCollisionMaxSpeed="22"> <DamageMultipliers> <DamageMultiplier damageType="bullet" multiplier="0.125"/> <DamageMultiplier damageType="collision" multiplier="1"/> </DamageMultipliers> <DamagesGroups> <DamagesGroup name="Destroy" useTemplate="CarDestroy"> </DamagesGroup> </DamagesGroups> </Damages>
- The
<Damages>tag here handles the global damage done to the entire vehicle, such as if the vehicle is submerged under water, collisions with the entire vehicle, global damage multipliers (which will be further explained in the How it works... section) and also the<DamagesGroups>tag, which usually handles the destruction of the vehicle. We will cover that later on. - Next, we will need to create the components of the vehicle:
<Components>
<Component name="Hull" damageMax="100" position="0,0.5,1" size="2.5,4,2" useBoundsFromParts="0">
<DamageBehaviors>
<DamageBehavior class="Group" damageRatioMin="1">
<Group name="Destroy"/>
</DamageBehavior>
</DamageBehaviors>
</Component>
<Component name="weakspot" damageMax="100" position="0,-2,1" size="2.5,1,2" useBoundsFromParts="0">
<DamageMultipliers>
<DamageMultiplier damageType="bullet" multiplier="1"/>
</DamageMultipliers>
<DamageBehaviors>
<DamageBehavior class="Group" damageRatioMin="1">
<Group name="Destroy"/>
</DamageBehavior>
</DamageBehaviors>
</Component>
</Components>
- The two components set previously create two different bounding boxes. One is the main hull, which wraps around 85 percent of the vehicle at the front, while the other is the weakspot, which covers the back.
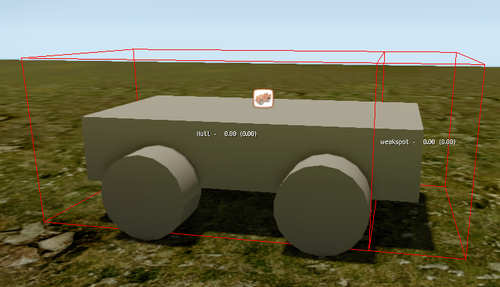
Since the components do not overlap each other, this allows for the vehicle to respond differently when the vehicle gets hit in either location. In this example, we have set up a DamageMultiplier on the weakspot component to be much higher for bullets. This will make sure the bullet damage it receives is not reduced and will quickly reach the component's maximum health limit of 100. When that happens it will call the damage behaviour group Destroy, which was written at the beginning of the recipe.
The damage group Destroy uses the DamagesTemplate called CarDestroy. This template is a global DamageBehaviour that's written in an external XML and can be accessed from other vehicle XMLs for ease of setup.
Additional damage behaviors can be utilized such as Burn, Effect (particle effects), Explosion (with impulse), HitPassenger, and many more. See def_vehicle.xml for the complete list.