
In the CryENGINE, not all animation needs to be driven by bones. The engine supports animating hard body geometry, which can be far more optimal for certain assets and in certain situations. You might want to animate complex scenes such as the destruction of an object in 3ds Max and then export that to the engine, or you might simply want to open the door on a vehicle—all this can be done using rigid body geometry animation.
Animated hard body geometry data only supports directly linked objects and does not support skeletal-based animation. It is composed of two file types:
.cga(Crytek Geometry Animation).anm(Additonal Animation)
Let's creates some rigid body animation:
- In 3ds, create two simple spheres primitives in the scene.
- Convert the primitives to edit polys.
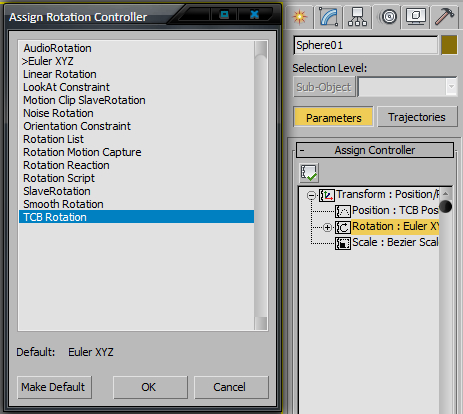
- As we will be exporting a
.anmfile for a.cgageometry, we must convert all the objects that will be animated to the Tension Continuity and Bias controller or TCB. - Change the controller types for position and rotation to TCB under the 3ds Motion tab.
- Now, create a very simple animation for the objects in the scene. Bouncing the spheres is a simple animation to make.
- Next, we must export the geometry before exporting the animation for it.
- Select all the objects and add them to the Object Export list by clicking add selected.
- For this example, make sure export file per node is set to
falseas we would like to have both the geometric objects in a single.cgafile. - Next, make sure that the
cgafile type is selected in the Export To drop-down box. - Save the max file as
cookbook_bouncing_balls.maxunder thegame/objects/bouncingballsfolder. - Press the Export Nodes button. This will export the objects to the same folder that the source file is located.
- The file will assume the source file's name unless you check Custom Filename. This will allow you to type in a unique name.
- Next, for good workflow, we should examine our newly created
.cgain the character editor. - Open the CryENGINE Sandbox and the character editor.
- Click File | Open and navigate to the folder you exported your
.cgafile to. - Each CGA file contains a default animation, and it is the length of the timeline that was active when the
.cgafile is exported. - We now have an existing CGA file that we want to add with a selectable animation to create a second animation for the
.cga. - When the animation is complete, navigate to the Object Export section of the exporter and set Custom Filename to true and set a filename that uses the name of the
.cgaobject you are adding it to, as a prefix in the name. - As an example, the test
.cgafile contains the object you are animating, in addition to the default animation. In this case, you need to name your.anmfiletest_[n].anm, wherenquestions the name of the additional animation. - Press the Export Nodes button.
- The
.anmfile must be saved to the same folder as the.cga; otherwise, you will not be able to preview it in the character editor.
.anm files are the simplest animation that you can export to the CryENGINE. They do not require as much processing power as a skinned mesh and can be animated fairly easily. These types of animations can be used on a variety of environmental objects that require some moving parts. The .anm file format is also the principal animation format for any vehicle animation.
You may want to know how to bake physically simulated animations into .cga animations and how to use an animobject entity.
- To pre-bake physical destruction, you can use
.cgaobjects with baked.anmanimations. - This can be very useful for complex destruction of large objects.
- The same rules apply when creating pre-baked physics for
.cgaobjects, as all the position and rotation controllers of the objects in the CGA need to be set to TCB. - When exporting pre-baked physics animations select merge all nodes in the export options.
- Turn off all Bone Export options, but tell the exporter to export every
1frames. - Select one object that is not moving and parent all the other pieces to it. This object can be one you set to unyielding. In buildings, use the foundation.
- The current animation will show up as Default in the CGA you export. No CAL file is needed to play it.
- Open your CGA in the character editor and play the animation labeled Default. You should see your animation play.
When using the pre-baked .cga in the game environment, it must be placed as an animobject.
There are two important properties available when using pre-baked .cga:
- The first is that ActivatePhysicsThreshold is a fraction of levels gravity; thus, a heavier piece will be harder to activate since the gravitational force that acts on it is stronger.
- The second is the mass. Mass is set as the overall value for the entire CGA; for instance, a Mass of 100 on a CGA with 100 pieces would yield 1kg per piece.
- You may want to create a vehicle to animate. Refer to the Creating a new car mesh recipe in Chapter 8,Creating Vehicles