
The Rollup Bar is one of the most commonly used tools within Sandbox. By default, it is located to the right of the viewport typically along the right edge of the interface. This is where entity parameters, settings, and controls are listed and accessed.
The Rollup Bar is split into four very different panels, which are accessed from their corresponding tabs.
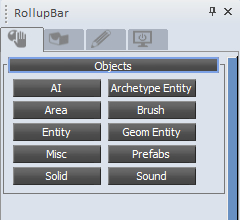
The first tab contains the object and entity creation tools for the editor, as well as being the tab that will display all entity-specific information and dialogs.
The second tab has the overall environmental, vegetation, and terrain editing tools. The tools in this tab are used to modify the specific level you currently have loaded in Sandbox.
The third tab contains the display options.
The last one is the layer organizational tool.
In this task, we will only use the Objects and Entities tab, which is the first and default tab within the Rollup Bar. To access the majority of scene elements throughout this book, we will use this tab.
It holds interfaces to the various Database libraries and the brush database on your hard drive.
You must have a pre-existing level opened in Sandbox to complete this recipe.
Let's start using the Rollup Bar.
- In the Rollup Bar, click on the Brush button.
- This will display a browser linked to the
CryENGINE3/Game/Objectsdirectory of your build. - Brushes are compiled geometry containing no extra data other than collision. Typically, most levels are created with brushes as they are simple geometry.
At the bottom of the browser window you will see a dialog box that says filter:
- This is a very useful feature when browsing for specific objects.
- Type in
villagein the filter dialog. - Once you hit enter the browser will then simplify the contents of the browser to the folder that contained any objects with the name village in them.
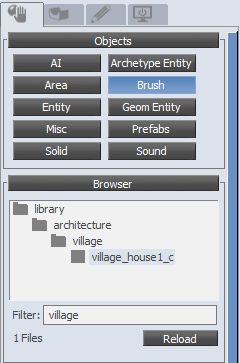
- Browse to the default SDK folder
Objects/library/architecture/village/and notice there is an object calledvillage_house1_c.cgf. - You can now drag this object out of the brush browser and into your level!
Within the Objects tab, there are a variety of libraries and object types that support drag-and-drop functionality.
They are separated logically into a few different areas.
There are a variety of different sections contained in the Rollup Bar. These sections are further explained later and will be used throughout the course of this book.
This section within the Rollup Bar contains AI control objects, which are used to control AI entities and their behaviours in the level. They can define a specific behaviour for an AI with reference to its location or other variables in the level. AI control objects can define navigation paths or an area for the AI on the terrain, including boundaries and forbidden areas. The objects can be used by AI actors to perform specific actions or events, such as animations and changes of behaviour.
The Area section contains the area objects, which are used to create three-dimensional zones in the level that can be used to trigger events.
The Misc Objects section includes various tools and functions used during a level's creation such as roads, rivers, and comments.
The Solids tool is used to create simple structures and objects, or placeholders for future art assets. This is one of the best forms of white boxing the engine has available!
The Archetype section allows users to access currently loaded archetype libraries within a given level. An Archetype entity is based on a regular entity and specifies individual parameter values for that regular entity. The main advantage of archetypes is that if the value of an archetype parameter is changed, all instances of that archetype in the level will be updated automatically. Archetype entities are organized into .xml libraries, which can be created in the editor under the Database view.
The Geom entity section is a browser similar to the brush browser but instead allows for the placement of a very simple entity that takes its physicalization parameters from its assigned geometry. When objects are placed as Geom entities and it have user-defined properties (discussed later), they become interactive entities with physical values, so they can behave like real-life objects. It is similar to a basic entity, but simpler, more efficient, and has fewer configurable parameters.
The Prefabs section contains the currently loaded Prefab libraries for a given level.
Prefabs are groups of objects that can be placed in the level as instances similar to archetype entities. Altering one prefab universally applies the changes to each instance of the prefab object. Any iteration to the prefab is required to be saved to the Prefabs library to ensure they are correctly propagated across an entire series of levels.