
The CryENGINE has a robust character and animation system.
It is however important to realize that, for the character creation process to go smoothly, you should follow the recommended workflow put forth in this first recipe for the creation and subsequent animation of skinned characters.
Locate the character assets that are shipped with the CryENGINE SDK.
In most cases, a character subfolder is created within your particular game's object folder.
In the SDK, the default character is located in GameobjectsCharacters
eutral_male.
When creating character assets for the CryENGINE, you will typically save them to two or three different .Max files. The first file will contain the main character; the second scene contains the first LOD of the character and its ragdoll physics mesh. The third file is optional, as it usually contains just the head of the character. The head is separated as it makes it easier to edit independently of the rest of the character.
Before we begin, some important things to note about the geometry used for characters for the CryENGINE are:
- Characters must be facing forward on the Y+ axis in 3ds Max
- The skinned geometry must have no transformations applied and its pivot should be set to origin, or 0,0,0
As there are many tutorials available for character modeling and texturing, we will not go into deep detail of the actual modeling and texturing process. Rather, we will learn to manipulate the SDK character and explore how we can use this to build our own character.
Let's use the sample skeleton to learn how to create our own character:
- Locate the Max file named
SDK_character_male.max, which is stored underGameobjectsCharacters eutral_male.You should now be viewing the neutral male character scene, as shown in the following screenshot:
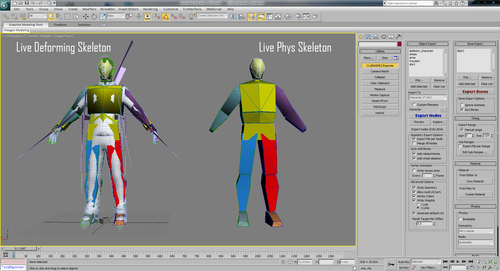
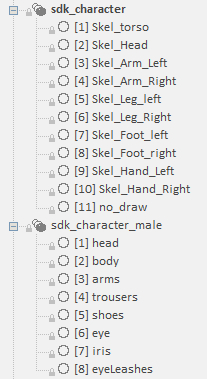
- Let's explore the nodes within the Max file:
- The deforming skeleton is a typical starting point for all characters as it is responsible for many tasks
- It deforms the render meshes of the character based on skinning information
- The actual geometry of the bones in this skeleton will be used for hit detection and physics for an active or alive character
- Materials applied to the deforming skeleton are also used for hit detection and can be used to apply physical impulses or to read where the character has been hit
- Open the select by name list in 3ds Max by pressing the shortcut H or by clicking the select by name icon.
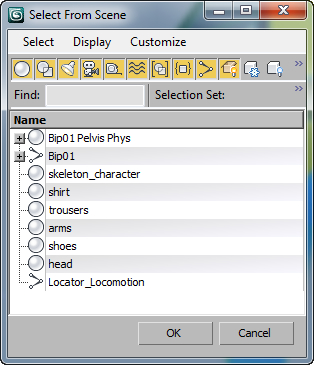
- All the nodes under and including Bip01 are what comprise the Live Deforming Skeleton.
- At this point, if you are working on a custom character, you will want to import your custom mesh into the
neutral_male.maxscene.Note
When creating your own character, you do not necessarily need to match your render mesh to the SDK skeleton. However, keep in mind that if you do not use the neutral_male Live Skeleton, it will mean that your custom character will not be able to use the existing animation set that ships with the SDK.
To achieve high fidelity animations, current generation games can include hundreds of individual animations, so to get a character in game quickly it's best to use the pre-built skeleton.
- The second skeleton that must be in the scene when you create your character is the Live Physics Skeleton, also called the Live Phys Skeleton.
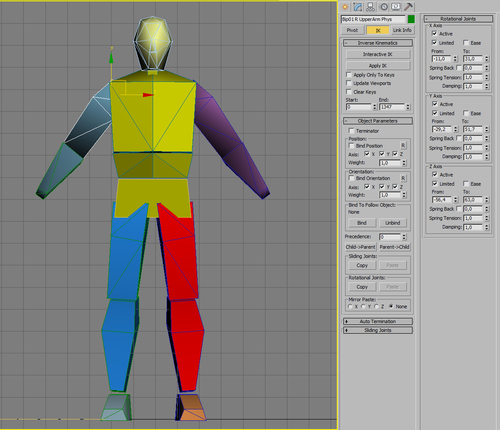
- The best way to understand the Live Phys Skeleton is to think about it in terms of a set of constraints to each bone in the Live Skeleton. When a bone is present in this Phys skeleton, it signals its counterpart in the Deforming Skeleton that it should be physical in the world when the character is alive. The Phys skeleton for your character also stores physical properties for its counterpart which are stored in the phys skeleton bone's IK properties, as seen in the following screenshot:
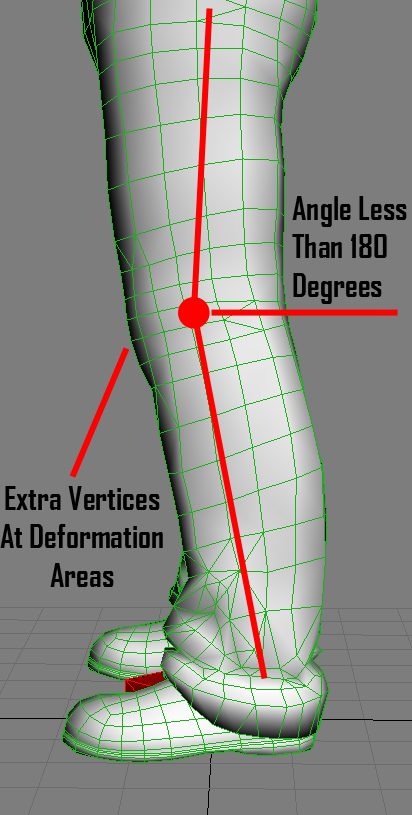
Now that we understand the function of both the skeletons in the main character max file, we will discuss the setup of different portions of the character. As you create the mesh, you will find it significantly easier to skin and animate your character if it properly matches the existing skeleton. Another important consideration is the density of vertices at key areas, such as the knees and elbows. Spending a few extra vertices in these locations will greatly increase the quality of the deformation when animated.
- Always make sure that, whether you use the SDK skeleton or your own custom skeleton, the model matches the joints in the skeleton.
- Having created geometry for the character, you will have to skin this geometry to the skeleton for animation.
- This can be done by applying the 3ds max modifier skin to your geometry and by adding the Live Skeleton bones that should affect that character into the skin modifier.
- When applying the skin modifier, ensure that your skeleton is in the bind or neutral pose.
- Before exporting your character mesh, there is a technique that can be used to make it very easy to modify certain parts of the character in the engine directly.
- This can be achieved by exporting a
skeleton_character, which is simply a single triangle usually hidden in the pelvis or set to a no draw material skinned to the entire live skeleton. This will allow you to export a blank skeleton onto which you can add your attachments using the Character Editor. - If not already done, add the
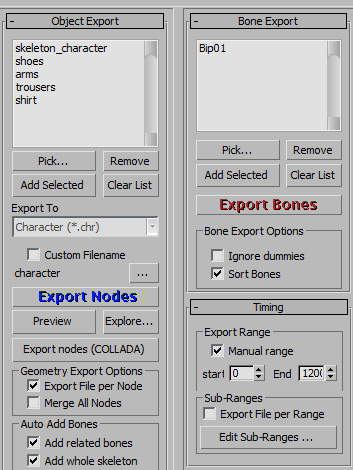
skeleton_characterobject to the export nodes list in the CryENGINE exporter. - You will notice that when adding a skinned object to the export nodes list, it will, by default, automatically add the required skeleton to the export.
- As we will be exporting this file as a character, the format we are required to use is the
.chrformat.When managing multiple character meshes in a single scene, it is important to use the export file per node parameter in the export settings. This will use the name of the object in 3ds max as the name of the
.chrcreated. The added benefit is a one-click export of any number of character meshes. - Let's now add the remaining characters in this scene to the export list.When you are done, the CryENGINE exporter should appear as shown in the following screenshot:
- Once you have added the remaining characters to the scene, you can now export the render meshes and the skeleton!
- To do this, click the export nodes button.
(Good workflow dictates that we test our export in game.)
- Open Sandbox. Click open View | Character Editor.
- Using the File | Open dialog in the character editor, you can now open the exported
.chrfiles. - As we want to assemble our character into a single manageable file, we can now create a
.cdf(Character Definition File) using the character editor. - To do this, click on File | Open and open the
skeleton_character.chrfile. You can preview the skeleton by adjusting the debug options at the bottom of the character editor.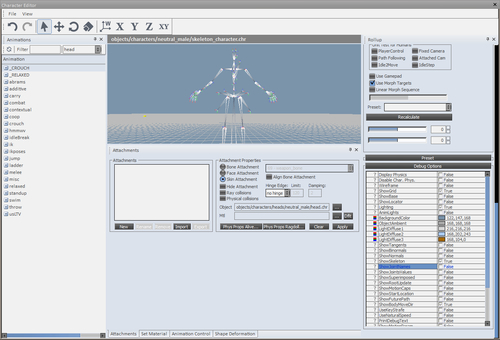
- Let's now begin to add the attachments that will make up our character:
- In the attachment properties select skin attachment.
- Then under the attachments window click new.
- Name the new attachment
shirt. - Select the browse button beside the object string and browse to the
shirt.chrwe exported earlier. - Leave the material field blank for now as it takes the default material applied to the attachment model.
- To view the attachments on the character click apply.
- You will see that the shirt is now attached to the skeleton and if an animation is played, the shirt reacts to the parent skeleton appropriately.
- Add the remaining pieces of the character we exported earlier.
- Now that we have assembled this character, we need to save it for later use in engine.
This can now be used later as the player model, AI friendly, enemy characters, and animated cinematic characters!
Characters allow us to use complex animation and locomotion on characters and thus be able to create working and realistic characters imperative when creating a game. It can be used as the player's representative model in game, in cut scenes, and finally as artificial intelligence.
The attachment system is one of the principle reasons behind the Character Editor. Current generation games can have upto 20 to 30 different character-models and thus, using attachments is one way to avoid repeatedly displaying the same character over and over again to the player. The attachments system also allows designers and artists to give the character a unique look in a very intuitive and easy way.
When working with an example character, you will have noticed that the bones of the skeleton were colored and thus had a material applied from within 3ds.
When creating materials for characters, this is an option available to you as it can be used later on via code or other means to identify areas where characters have been hit. Sometimes, characters are simple enough that the render materials can be added in addition to the bone materials in one larger multi subobject material, or they can be separated as in the following example:
You can see that the sdk_character.mtl contains sub-materials for each physical bone as well as a no_draw material for the simple triangle used in the skeleton_character.
A character LOD (Level of Detail) is in geometry with a lower polygonal resolution that will be faded automatically in-between based on the character's distance from the camera in the game engine.
To create LODs, you must copy the original character mesh and then reduce its triangle count, which can be done manually, or for the sake of speed you can use automated modifiers in max such as Multires.
Once the polygon count has been lowered, the fastest way to skin the LOD (similar to the main character) is to use the skin wrap modifier in 3ds max and use the original mesh and skinned mesh as the target. You can then convert this skin wrap modifier to a regular skin modifier and then export the newly created LOD.
LOD objects must follow the _LODn naming convention where n is the number of the LOD.
When using the character editor in sandbox, you can add other types of attachments to characters other than skin attachments. One such attachment is the bone attachment. Adding bone attachments is a way to have any model, be it a .cgf, .cga, and other .chrs, constrained to a single bone within your character. This can be useful for rigid body attachments such as weapons and props such as sunglasses or helmets. When applying bone attachments, you may sometimes have to align the bone attachment. When set, this aligns the pivot of the geometry with the bone. In other words, the rotation of the joint and the rotation of the attachment will remain identical throughout animations.
- Use your character in interesting ways by going to the Hangman on a rope recipe mentioned in Chapter 11,Fun Physics
- Carry on to the next section to learn how to set up the ragdoll reaction for characters