
In this section, we will cover the basics of painting your heightmap by hand. This recipe will teach you how to flatten, raise, lower, and smoothen the heightmap by hand, painting in both the Terrain Editor window as well as Perspective View.
Using the Terrain Brush from the Terrain Editor is good for a general high level pass over your level; it is only decent when starting on a fresh level. For more detailed work, many designers use the Terrain Brush from within the Perspective Viewport to see their results instantly. We will be covering both methods.
On the right-hand side of this window you will see a rollout menu that reads Terrain Brush. This menu is the focal point of this recipe and has the same functions in both the Terrain Editor and Perspective View methods.
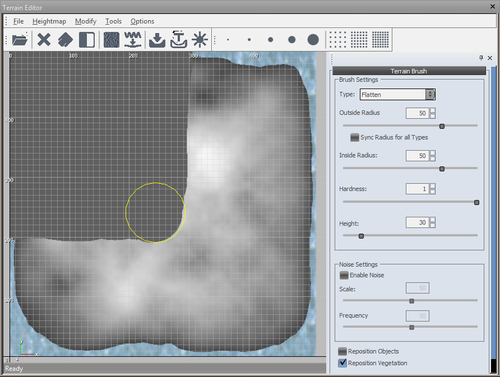
- To start, we will flatten a section of the level. Change the Type of brush (drop-down menu to Flatten) and set the following parameters:
- Outside Radius = 50
- Inside Radius = 50
- Hardness = 1
- Height = 30
- Now paint over the north-west corner of the map and flatten that whole quarter of the map.
- Change the Type of brush to Smooth and set the following parameters:
- Outside Radius = 50
- Hardness = 0.7
- Between the flattened area and the rest of the generated heightmap, paint over this area, which will smoothen the slope between the lower flattened area and the higher up locations.
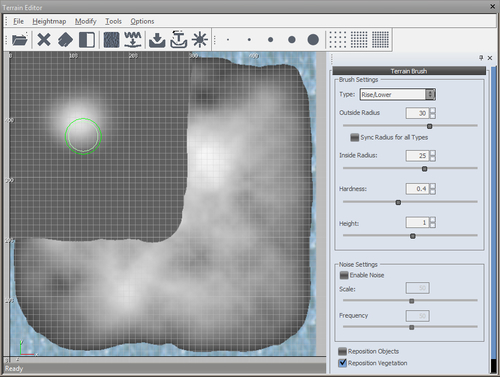
- Change the Type of brush to Raise/Lower and set the following parameters:
- Outside Radius = 30
- Inside Radius = 25
- Hardness = 0.4
- Height = 1
- In the Flattened area, paint around in the same spot to see the heightmap rise.
- Sculpt the terrain in the perspective view. The Perspective View method has the very same brushes as demonstrated previously, except you can find where to change them in the Rollup Bar under the Terrain tab | Modify button.
Even though each of the brush's functions are self-explanatory based on their name, they share many of the same properties. These properties are Outside Radius, Inside Radius, Hardness, and Height (with the exception of Smooth). The following is what each of these properties does:
- Outside Radius: The outer edge of the brush that will feel the least impact from the rest of the brush's parameters.
- Inside Radius: The inner area that will feel the most impact. Depending on Hardness and Height, there is a fall off between the Inside Radius and Outside Radius.
- Hardness: How hard should the brush be when painting? Basically, if the Hardness is set to 1, then within one click you will have the desired height. If set to 0.01, then it will take 100 clicks to achieve the same result. (For smooth, this controls how hard it will try to normalize the triangles of the heightmap).
- Height: This controls the desired height you wish the Flatten tool to set the terrain to, or controls the step size (meters) of the Raise/Lower tool.
Here are some other additional settings you may wish to use when sculpting a terrain.
Enabling Noise only works with the Flatten and Raise/Lower brushes. This setting adds a bit of random variation to the heightmap when painting with these brushes.
Enabling either of these tickboxes will reposition the Object/Vegetation after the height underneath that Object/Vegetation has changed (this does not work if the object is underneath the terrain).
All vegetation that is affected is under the Terrain | Vegetation tab in the Rollup Bar.
All objects affected are under the Objects tab in the Rollup Bar.
- The Generating a procedural terrain recipe
- The Navigating a level with the Sandbox Camera recipe in Chapter 1,CryENGINE 3:Getting Started.