
In this recipe, we will show you how to create a Prefab and look at some of the global uses for them.
The house and the tree are just two objects that will be used to demonstrate creating a Prefab.
Before we begin, we must create a new library to store these objects:
- Open the DataBase View (View | Open View Pane | DataBase View).
- Open the Prefabs Library tab.
- Create a new Prefab library named My_Prefabs.
- Select both the House and the Tree.
- In the main toolbar, click on Prefabs | Make from Selection.
- Group =
Houses. - Name =
House_with_tree. - Click on the Save Modified Libraries in the DataBase View.
This has now created a new Prefab for you:
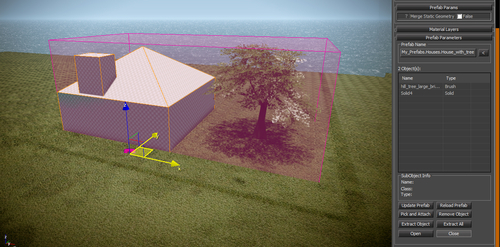
Prefabs are much like groups of any object/entity within the engine. The difference is that they are self-contained groups that can be propagated to all other maps if the Prefab itself changes.
The major benefit of Prefabs is that any logic, sound, art, AI navigation, or additional work may be done on this grouped asset without the level designer needing to place a whole new asset every time. Each time the Prefab gets updated, the level designer will see the change once the level is re-opened with the new Prefab library.
Here are some extra functions that can be used with Prefabs.
After the Prefab is selected in the level, you can then select an object from the Prefab list and choose to extract that object from the Prefab. This allows the designers to take objects out of the Prefabs if required and modify them on their map individually.
Extract All will allow the designers to unpack everything from the Prefab completely. This is normally done to allow designers access to link logic to objects within the Prefab (Prefabs do not allow any links to pass outside of their packed content).
Without extracting the objects, it's still possible to change any of the properties of an object within that group. Simply open the group and select the object you wish to manipulate inside.
To close the Prefab, select the group and click on the Close button.
You may also choose to pick and attach other objects/entities and put them into the already existing Prefab. Simply align the object/entity to the relative location you wish to have it within the Prefab. Then click Pick and Attach and select that object.
Alternatively, you can select an object from the Prefab's list and click Remove Object. This will remove the object from the Prefab and leave it where it was located on the map.
Both of these methods affect what is stored in the Prefab, however the Prefab itself is not automatically updated. After you've chosen to modify the Prefab in any way, (Pick and Attach/Remove Object/Modified an Object inside the Prefab) you must then click on Update Prefab. This will make sure the Prefab is re-written into the DataBase View. To make sure the Prefab library is saved, go to the DataBase View and save the Prefab Library.