
In CryENGINE3, characters have realistic physics applied to them. When a character is reacting only physically to the world and not playing a specific animation, we typically call them ragdolls. Ragdolls are usually used to make every death of an AI character look unique and exciting; this can be very rewarding and fun for the player!
Working with and editing ragdolls can be a lot of fun. This recipe will take you through the setup and theory of using ragdolls in CryENGINE3.
As mentioned previously, characters are stored in multiple Max files.
In the SDK, the default character is located in GameobjectsCharacters
eutral_male.
In this case, we are interested in the SDK_character_male_LOD1.max file.
Let's begin by getting accustomed with the sample ragdoll file:
- Open the
SDK_character_male_LOD1.maxfile.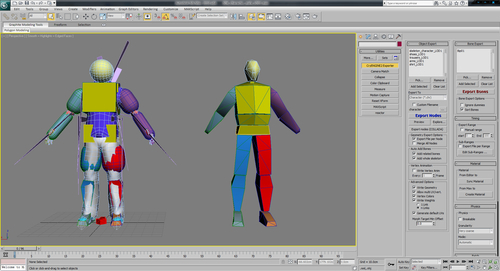
Note
You will notice similarities with the main character file mentioned in the previous recipes. The deforming skeleton in this scene is used as the dead physical skeleton of the character. Because this skeleton will react physically with many objects in the world, it is important that it be made from simple primitives, such as capsules, boxes, or spheres.
The second skeleton in the scene, the Phys skeleton, acts identically to the main character Phys skeleton, except that it acts as the set of switches and constraints for only the ragdoll's deforming skeleton. If you are creating a custom character, creating this
_LOD1file is not complicated.A very good technique to create the geometry for the ragdoll's deforming skeleton is to align some primitives created in max to the existing live skeleton. Using the editpoly modifier on the bones, you can then attach the new primitive geometry to your bone and remove the old bone geometry.
- Having set up the geometry for physics and this ragdoll, we can now save the file with the
_LOD1suffix. - Next, you can create the first LOD of your render mesh character attachments manually or by using a more automated process such as multires.
- Ensure that the objects in max also have the
_LOD1suffix as we will be using export file per node when we export these characters. - Once you are ready, click the export nodes button. There are really two different ways to test the ragdoll physics of a character in the CryENGINE.
- Open Sandbox and open any level.
- Now, place an AI entity into the world and ensure that its model parameter is set to either your custom model or, if you are using the SDK skeleton, ensure it is set to
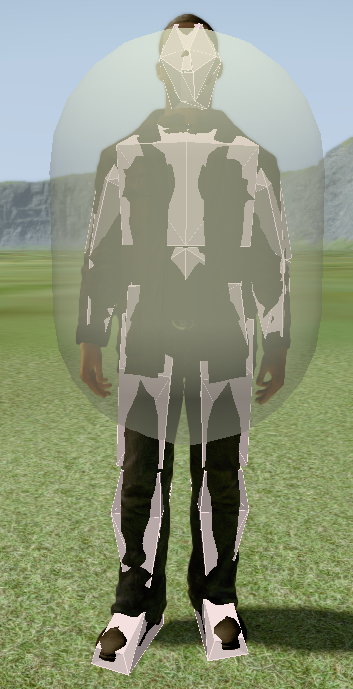
Objects/Characters/neutral_male/sdk_character_male_v2.cdf. - Next, as we are testing the physics enter the following console variable in the console:
p_draw_helpers = 1 - Now you can see the live deforming skeleton rendered as a pink geometry:
- You should now enter into game mode (control G) and shoot the character until his health reaches
0. - Once the character's health runs out, the entity will switch to ragdoll.
- Another way you can quickly kill the AI entity is to right-click the entity and to select the kill event under select events.
- You will see that, when the character is killed, all the bones react according to the IK settings in the Phys skeleton of the
_LOD1.maxfile.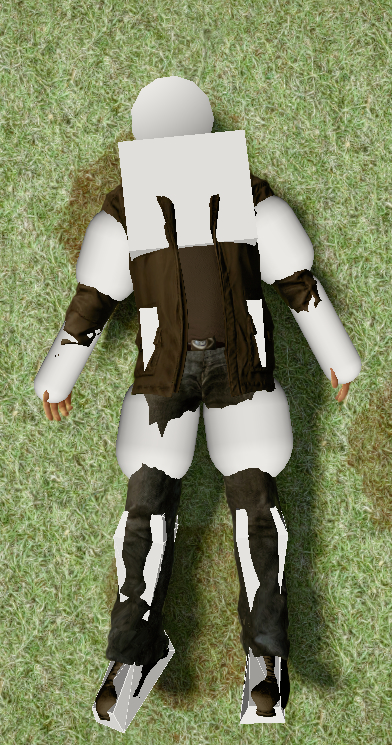
- The final and—in my opinion—most effective way to test the ragdoll of a particular character is to use a dead body entity.
- You can find this entity under the Entity | Physics tab.
- Drag-and-drop this entity into the level and set the model path to your custom character or to the sample character. The model path is as follows:
Objects/Characters/neutral_male/sdk_character_male_v2.cdf. - By default, resting is set to
trueon the dead body; ensure that this is set to false to have the ragdoll simulate. - You can enable the simulation by pressing the AI/Physics button or by entering game mode.
When a character is killed, the physics system takes over the character as we do not need to play a certain death animation with an effective physics system. The character's skeleton then takes the _LOD1 live deforming skeleton's geometry and simulates the bones according to the IK settings within _LOD1 Phys skeleton.
You may want to know how to adjust the physical characteristics of the ragdoll further or how to save the physical state, or pose, of a ragdoll character.
The IK limits applied to the Phys skeleton are the key to a good looking ragdoll simulation! These limits are applied as IK rotational limits from the bone in the dead body Phys skeleton.
Editing this IK information can take a good deal of testing. To adjust the IK limits for a bone in the phys skeleton, you can select it in 3ds max and go to the hierarchy tab in the rollout bar. Under the IK setting, you will be able to access all the rotational constraints for the Phys skeleton.
ParentFrames is a technique that can be used to allow joints to rotate beyond the (-90°, 90°) range. To create a parent frame and an additional parent object, the bone must be created.
If the joint needs to rotate beyond the (-90°, 90°) IK Y limit, an additional parent node for the bone can be created, and IK rotational limits will be relative to it. The objects must have the naming convention +' Phys ParentFrame'.
An example setup can be seen in the SDK sample character .max file:
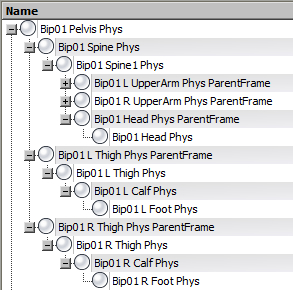
When the angle of a particular bone varies greatly from its immediate child, it is recommended to use a ParentFrame object.
Dead body entities can be used in levels as well as for testing character physics. Typically, workflow is to create the entity with the resting set to false and enable AI/Physics to simulate it in the editor. Then, the physical state can be saved by using the Save State button in the entity parameters.