
The textures we will create throughout the course of this book will be created in Photoshop and will be stored in the TIF image format saved using the CryTIF plugin.
CryTIF is a Photoshop plugin developed by Crytek that can load and save merged Photoshop images as .TIF files. When saving the .TIF file, the plugin calls upon the Resource Compiler to display a dialog to the user where the compression settings can be selected. The settings that get chosen in the dialog are stored as metadata on the TIF file.
It's important to realize though that the .TIF format images are not used directly in the engine but are rather converted to a more optimized format, in this case, from a .tif to a .dds, by the Resource Compiler.
Let's go over what you need to do to be able to create textures for CryENGINE.
Photoshop must be closed for the installation of the CryTIF plugin to work.
You should have completed tutorial one or have run the SettingsMgr.exe to ensure that the build path is set up correctly to your installation of the CryENGINE 3. You can find the SettingsMgr.exe in the root directory under /Tools.
Note
The SDK installer should automatically install the plugins for the installed version of Photoshop during the CryENGINE 3 tools installation.
In case a manual installation is required, copy the following files to the root Photoshop directory:
Bin32zlib1.dllBin32jpeg62.dllBin32libtiff3.dll
Copy the file that enables support for the CryTif format
ToolsCryTIFPlugin.8bi to the root Photoshop Plugins folder.
Let's go ahead and create our first texture:
- Start Photoshop.
As we will simply be creating our first .TIF file, a complex texture is not required.
- Create a new image with dimensions 512 x 512.
- Create a simple pattern or import your own texture.
- Next, select File | Save As in Photoshop.
- Save this file as a CryTIF (.TIF) file type. This format should now be available as a file format in the Photoshop file dialog.
- Save this texture to your root directory under
textures/test_pattern.tif.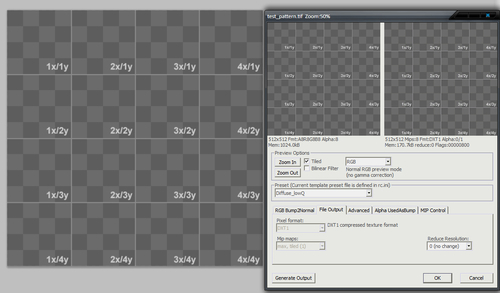
Once you select Save you will be presented with the CryTIF texture dialog. The primary function of this dialog is to add metadata to the texture, which can later be used by the Resource Compiler to compress the texture appropriately for whatever platform it is being created for.
In the upper area, you can see two images: the original image on the left, and a preview of the processed image using the preset on the right.
Directly below the two images are the different image properties such as resolution, number of mip maps, texture format, and memory consumption.
- In this example, take the preset diffuse_lowQ.
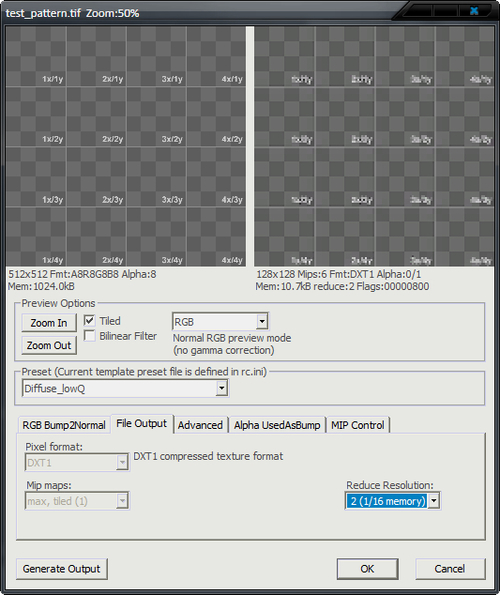
- Click one of the image previews and use your mouse wheel to preview the tiling of the texture.
- Finally, notice the effects of reducing the resolution in this image by setting the reduce resolution to 2 (1/16th memory).
The preview image updates to show the compression that will be applied to the texture when conversion is performed:
- Set the reduce resolution back to 0.
- Click on Generate Output to manually perform the .TIF to .DDS conversion.
Pressing the Generate Output button forces an immediate conversion to the target output format without closing the CryTIF dialog box.
- Click OK to write the meta data to the .TIF file and to save the .TIF, which is now ready for use in CryENGINE!
When applying a texture to a material in CryENGINE using the .TIF extension, it will automatically load the .DDS version. For example, a diffuse texture path of textures/ test_pattern.tif will load the file textures/test_pattern.dds at runtime.
The CryTIF (.TIF) format is used in the overall asset creation pipeline as an intermediate file format. The .TIF format is used because it contains the uncompressed texture information as well as having the ability to store different settings for the Resource Compiler as meta information.
The CryTIF plugin is a very artist-friendly tool, but it can be even more powerful when the presets and the .dds file generation are completely understood. These are discussed further as follows.
Should an error occur and the system path to the root directory is lost by the plugin, you can restore the path Photoshop under Help/About Plug-In/CryTIFPlugin.
If the RC executable cannot be found, the configuration dialog will be opened automatically and a path to your root directory can be entered.
This drop-down list holds the presets that the texture can have saved onto it for use in conversion. It is important to select an appropriate preset for the type of texture you are creating, as not all textures can use the same settings; normal maps, for example, require a different compression than diffuse maps. Some common presets used are Diffuse_highQ for a diffuse texture, Specular_HighQ for specular, and Normalmap_highQ for Normalmaps. The preset with _lowQ produces slightly lower quality results at the benefit of less memory consumption in some cases.
You can add new presets to the .ini file by locating the file in the bin32/rc/. By default, the resource compiler uses the rc_presets_pc.ini file.
As the .DDS file is used as the final output, it is possible to edit the source .TIF file and then switch to CryENGINE and look at the results of the settings that you have changed instantly. The resource compiler automatically reloads/updates changed textures when Sandbox is running. This is commonly used for quickly testing compression settings without reopening the texture dialog box with every new conversion setting.
- Now, having created a texture for use in CryENGINE, you can preview it quickly by jumping to the Making basic shapes with solid tool recipe in Chapter 3, Basic Level Layout. You can apply this texture to whatever solid you create
- You may also want to continue to the next recipe to set up your units in 3ds to be able to model your own objects to apply your texture to