
Locomotion animations are absolutely essential for AI and player actions and animations.
Authoring these assets can be easy if a few principles are understood regarding a very important rig element called the Locator_Locomotion.
The locomotion locator or Locator_Locomotion as the node is called, is used in the engine to describe the logical movement and orientation of the animation. This node needs to be added to motions which translate in a non uniform way, such as a start or stop transition, which have peaks and troughs in acceleration.
Let's learn how to create the structure needed to support locomotion animations:
- When using a biped, the easiest way to add the ability to use locomotion is to turn on figure mode and create a prop named
Locator_Locomotion. - In this way, the animation for the locator can be saved inside the biped file, making it easier for exporting.
- Simply access figure mode, go to the structure menu of biped, and check the box Props:1:
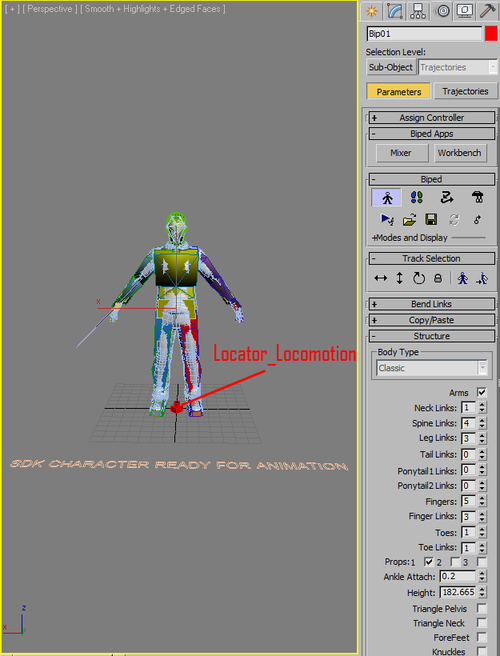
- Make sure the bone faces the positive Y axis in its local coordinate system. We will now begin animating the locator.
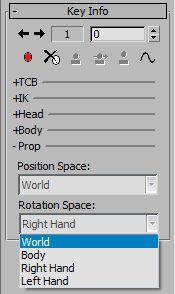
- Start by setting a key for the prop, then navigate to the prop menu under the Key Info group of the biped motion menu and set both Position Space and Rotation Space to world. This will allow you to animate the node independent of the root of the character.
- When creating an animation in which the character has to turn quickly as in an idle to run transition, the locator needs to be a projection of the Bip01 on the ground, yet it must travel in a straight line on one axis. Its height must be set to 0.
- Keep in mind that the locator should be moving in a straight line in the direction with no deviation to either side. However, the actual translation of the locator in its forward moving direction should follow the Bip01 as closely as possible.
Properly setting up locomotion animations allows the use of the procedural blend space system within CryENGINE. This system uses LMGs or locomotion groups.
An LMG is an XML file containing a blend-code and a list of animation names in a fixed order:
<LocomotionGroup>
<BLENDTYPE type="STF2" />
<CAPS code="RUN" />
<ExampleList>
<Example Position=" 0, 1, 0" AName="combat_run_rifle_forward_fast" />
<Example Position="-1, 0, 0" AName="combat_run_rifle_left_fast" />
<Example Position=" 0,-1, 0" AName="combat_run_rifle_back_fast" />
<Example Position=" 1, 0, 0" AName="combat_run_rifle_right_fast" />
<Example Position=" 0, 1, 0" AName="combat_run_rifle_forward_slow" />
<Example Position="-1, 0, 0" AName="combat_run_rifle_left_slow" />
<Example Position=" 0,-1, 0" AName="combat_run_rifle_back_slow" />
<Example Position=" 1, 0, 0" AName="combat_run_rifle_right_slow" />
</ExampleList>
</LocomotionGroup>
The blend-code is used at loading time to identify the type of LMG, to extract the features out of the root-motion, to verify the assets, and to compute the blend-values at runtime. The game simply specifies a parameter and the animation system generates the desired motion. The motion features are extracted directly out of the clips.
The idea behind locomotion groups is to collect multiple variations of a motion-type and arrange them in a spatial data-structure, which in CryENGINE is called blendspace. At runtime, it then applies interpolation and extrapolation techniques to create an infinite number of motions between and around these example motions.
Animating human figures can be very complex. However, it is possible to describe many actions with a relatively small number of motion-parameters. For example, a locomotion cycle might be characterized by the speed, body-orientation, travel-direction, turn-radius, and slope-angle. Such kinematic and physical properties can be combined with abstract properties like mood or style.
While a programmer is not required to use existing LMG blend-codes, programmers are needed for their creation. Fortunately, LMG blend-codes already exist for most locomotion purposes.
Having created some basic locomotion, you may want to know some specifics when creating swimming animations or locomotion loops.
For swimming transitions or vehicle transitions the locator can be a straight blend between the ground position of 0, 0, z and end at the Bip01 location and forward-looking direction of the character.
For loops, only setting keys for the start and end of the animation is necessary, if you wish to add a locator to them. They are technically not needed, but for batch processing it keeps the database clean.
The orientation of the locator in an idle mode to move transition should remain looking forward until frame 10.
When the orientation changes (left, right, left reverse, or right reverse) this should occur in the following 6 frames, so the new orientation is complete at frame 16.
When changing the orientation 180 degrees for reverse transitions, make sure you rotate the locator 0.1 degrees back to its original orientation to avoid flipping of the character.
- You must know how to animate a character to be able to create locomotion animations. Refer to the Animating your character in CryENGINE recipe mentioned in the earlier sections of this chapter
- If you haven't yet created a character then refer to the Creating a skinned mesh recipe mentioned in the earlier sections of this chapter