
In this recipe, we will show you how to build the basic mesh structure for your car to be used in the next recipe. This recipe is not to viewed as a guide on how to model your own mesh, but rather as a template for how the mesh needs to be structured to work with the XML script of the vehicle. For this recipe, you will be using 3DSMax to create and export your .CGA.
Note
.CGA (Crytek Geometry Animation): The .cga file is created in the 3D application and contains animated hard body geometry data. It only supports directly-linked objects and does not support skeleton-based animation (bone animation) with weighted vertices. It works together with .anm files.
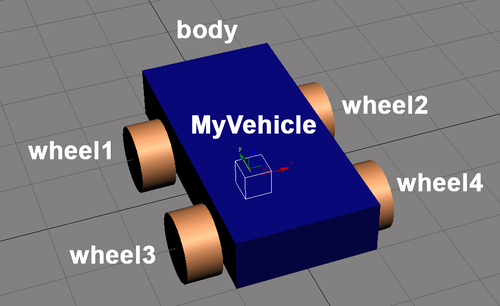
Review the Creating and exporting the static objects recipe of Chapter 6, Asset Creation. Create a box primitive and four cylinders within Max and then create a new dummy helper.
After creating the basic primitives within Max, we need to rename these objects. Rename the primitives to match the following naming convention:
- Helper = MyVehicle
- Box = body
- Front Left Wheel = wheel1
- Front Right Wheel = wheel2
- Rear Left Wheel = wheel3
- Rear Right Wheel = wheel4
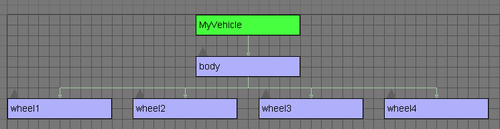
From here you can now set up the hierarchy to match what we will build into the script:
- In Max, link all the wheels to the body mesh.
- Link the body mesh to the MyVehicle dummy helper.
Your hierarchy should look like the following screenshot in the Max schematic view:
Next, you will want to create a proxy mesh for each wheel and the body. Be sure to attach these proxies to each mesh. Proxy meshes can be a direct duplication of the simple primitive geometry we have created.
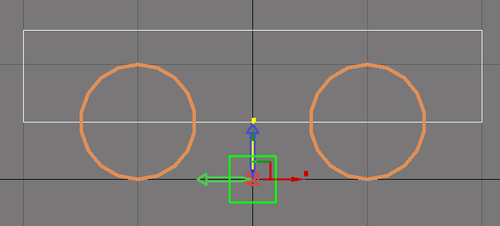
Before we export this mesh, make one final adjustment to the positioning of the vehicle:
- Move the body and the wheels up on the Z axis to align the bottom surface of the wheels to be flushed with 0 on the Z.
- Without moving the body or the wheels, be sure that the MyVehicle helper is positioned at 0,0,0 (this is the origin of the vehicle).
- Also, re-align the pivot of the body to 0,0,0.
Once complete, your left viewport should look something like the following screenshot (if you have your body still selected):
After setting up the materials that you learned from Chapter 6, Asset Creation, you are now ready to export the CGA:
- Open the CryENGINE Exporter from the Utilities tab.
- Select the MyVehicle dummy helper and click the Add Selected button.
- Change the export to: Animated Geometry (*.cga).
- Set Export File per Node to True.
- Set Merge All Nodes to False.
- Save this Max scene in the following directory:
MyGameFolderObjectsvehiclesMyVehicle. - Now, click on Export Nodes to export the CGA.
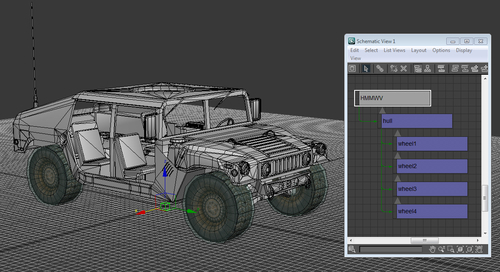
This setup of the CGA is a basic setup of the majority of the four wheeled vehicles used for CryENGINE 3. This same basic setup can also be seen in the HMMWV provided in the included assets with the SDK package of CryENGINE 3.
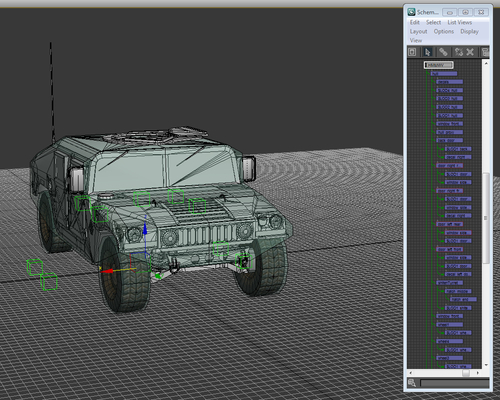
Even though the complete HMMWV may seem to be a very complicated mesh used as a vehicle, it can also be broken down into the same basic structure as the vehicle we just created.
The main reason for the separation of the parts on the vehicles is because each part performs its own function. Since the physics of the vehicle code drives the vehicle forward in the engine, it actually controls each wheel independently, so it can animate them based on what they can do at that moment. This means that you have the potential for a four wheel drive on all CryENGINE 3 vehicles, all animating at different speeds based on the friction that they grip.
Since all of the wheels are parented to the body (or hull) mesh, this means that they drive their parent (the body of the vehicle) but the body also handles where the wheels need to be offset from in order to stay aligned when driving. The body itself acts as the base mesh for all other extras put onto the vehicle. Everything else from Turrets to Doors to Glass Windows branch out from the body.
The dummy helper is only the parent for the body mesh due to the fact that it is easier to export multiple LODs for that vehicle (for example, HMMWV, HMMWV_LOD1, HMMWV_LOD2, and so on). In the XML, this dummy helper is ignored in the hierarchy and the body is treated as the parent node.
Here are some of the more advanced techniques used.
A more advanced trick is the use of dummy helpers set inside the hierarchy to be used in later reference through the vehicle's mod system. How this works is that if you had a vehicle such as the basic car shown previously, but you wanted to add on an additional mesh just to have a modified type of this same car (something like adding a spoiler to the back), then you can create a dummy helper and align it to the pivot of the object, so it will line up to the body of the mesh when added through the script later on.
This same method was used in Crysis 2 with the Taxi signs on the top of the Taxi cars. The Taxi itself was the same model used as the basic civilian car, but had an additional dummy helper where the sign needed to be placed. This allowed for a clever way to save on memory when rendering multiple vehicle props within a single area but making each car look different.
Adding the basic body and four wheels to make a basic car model is only the beginning. There are limitless possibilities to what you can make as far as the parts on a vehicle are concerned. Anything from a classic gunner turret seen on the HMMWV or even tank turrets, all the way to arms for an articulated Battlemech as seen in the Crysis 2 Total Conversion mod—MechWarrior: Living Legends. Along with the modifications system, you have the capabilities to add on a great deal of extra parts to be detached and exploded off through the damage scripts later on. The possibilities are limitless.
- Creating a new car XML
- The Creating and exporting the static objects recipe in Chapter 6,Asset Creation