
Before we can do anything with the gameplay of the project that you are creating, we first need a foundation of a new level for the player to stand on. This recipe will cover how to create a new level from scratch.
At any point, with Sandbox open, you may create a new level by following these steps:
- Click File (found in the top-left of the Sandbox's main toolbar).
- Click New.
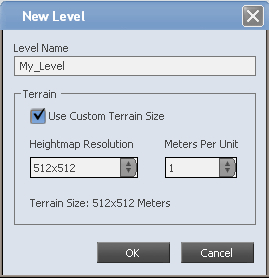
From here, you will see a new dialog screen that will prompt you for information on how you want to set up your level. The most important aspect of a level is naming it, as you will not be able to create a level without some sort of proper name for the level's directory and its .cry file. You may name your level anything you wish, but for the ease of instruction we shall refer to this level as My_Level:
- In the Level Name dialog box, type in
My_Level. - For the Terrain properties, use the following values:
- Use Custom Terrain Size: True
- Heightmap Resolution:512x512
- Meters Per Unit: 1
- Click OK.
Depending on your system specifications, you may find that creating a new level will require anywhere from a few seconds to a couple of minutes. Once finished, the Viewport should display a clear blue sky with the dialog in your console reading the following three lines:
Finished synchronous pre-cache of render meshes for 0 CGF's
Finished pre-caching camera position (1024,1024,100) in 0.0 sec
Spawn player for channel 1
This means that the new level was created successfully.
Let's take a closer look at each of the options used while creating this new level.
This option allows the developer to control whether to have any terrain on the level to be manipulated by a heightmap or not. Sometimes terrain can be expensive for levels and if any of your future levels contain only interiors or only placed objects for the player to navigate on, then setting this value to false will be a good choice for you and will save a tremendous amount of memory and aid in the performance of the level later on.
This drop-down controls the resolution of the heightmap and the base size of the play area defined. The settings can range from the smallest resolution (128 x 128) all the way up to the largest supported resolution (8192 x 8192).
If the Heightmap Resolution is looked at in terms of pixel size, then this dialog box can also be viewed as the Meters Per Pixel. This means that each pixel of the heightmap will be represented by these many meters. For example, if a heightmap's resolution has 4 Meters Per Unit (or Pixel), then each pixel on the generated heightmap will measure four meters in length and width on the level.
Even though this Meters Per Unit can be used to increase the size of your level, it will decrease the fidelity of the heightmap. You will notice that attempting to smoothen out the terrain may be difficult as there will be a wider minimum triangle size set by this value.
If you need to change your unit size after creating the map, you may change it by going into the Terrain Editor | Modify | Set Unit Size. This will allow you to change the original Meters Per Unit to the size you want it to be.