The most common automation tool provided by vSphere is PowerCLI, a command-line and scripting tool built on Windows PowerShell that provides cmdlets used for managing and automating vSphere and other VMware products.
Today, two versions of PowerShell and PowerCLI exist:
- PowerCLI 6.5: This version is based on the standard Windows PowerShell
- PowerCLI 10.0: This version is based on PowerShell Core, which is a multi-platform implementation of PowerShell
PowerShell Core can be installed on Windows, Linux, and macOS and it is the recommended version of PowerShell to use. Microsoft is going to deprecate old Windows PowerShell, so you should switch to PowerCLI 10 if you have not done so already. As mentioned, PowerShell Core can be installed even on macOS. You can use PowerCLI directly from your macOS, and you do not need to use Windows to jump hosts anymore!
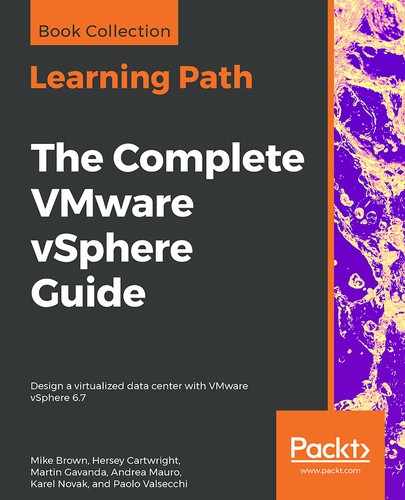
The following screenshot shows PowerCLI running directly on macOS X:
If you have not install PowerShell Core yet, check the official manual of PowerShell Core at the following link: https://docs.microsoft.com/en-us/powershell/scripting/setup/installing-powershell?view=powershell-6.
Once the PowerShell Core is installed, you can easily install PowerCLI directly from the PowerShell Core.
The installation process of PowerCLI 10 has been simplified and requires us to run a command from the PowerShell console.
To install PowerCLI, follow this procedure:
- Open the PowerShell console and run the following command:
Install-Module -Name VMware.PowerCLI
- To see the installed modules, run the following command:
Get-Module vmware* -listavailable
- Before you start to use PowerCLI, don't forget to change the default behavior of PowerShell Core if you are using self-signed certificates. By default, they are not trusted:
Set-PowerCLIConfiguration -InvalidCertificateAction Ignore
To try PowerCLI, open the PowerShell Core console where the VMware PowerCLI module has been installed. From the console, connect the vCenter Server instance to query, then run the following command (enter the login credentials when prompted):
Connect-VIserver –server VCSA_fqdn
To get a list of VMs running in the selected vCenter Server instance, enter the following command:
Get-vm

Remembering all PowerCLI commands and the correct syntax is not easy for most people, and the documentation is not always available to help. A useful cmdlet is available in PowerShell that provides information about a specific command is Get-help. To find the correct syntax to use with a specific cmdlet, Get-help helps you to find the information you need. For example, to find which parameters can be used with the Get-VM cmdlet to retrieve the list of running VMs, you can enter the following:
Get-help Get-VM
You get a brief explanation of the command, the syntax to use, and the description. If you append -example at the end of the command, the system also displays examples of how to use the command. You can pipeline multiple PowerShell cmdlets to build a script in a single line of code.
Sometimes, the Get-* command will retrieve only the necessary information about the object, such as PowerState, number of CPUs, and memory size, but there may be more properties of the object.
To get the full list, you can append Select-Object * on the command, as follows:
Get-vm -name Linux-Prod1 | Select-Object *
The output of the command is displayed in the following screenshot:
