Default settings configured during the vCSA installation can be modified from the Update Manager administration area, and these changes are only applied to the Update Manager instance that's specified. If you have multiple Update Manager instances in your SSO domain, changes are not propagated to other instances in the group. To specify the Update Manager instance to work with, you have to select the name of the vCenter Server on which the Update Manager instance is registered.
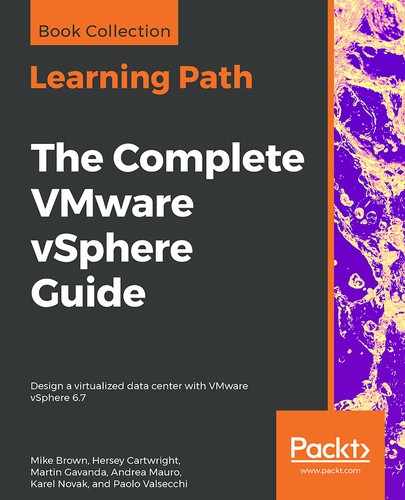
To configure VUM from the vSphere Web Client, select Home | Update Manager and specify the vCenter Server instance to edit. In the Manage tab, you can specify the following VUM configuration settings:
You can see the following tabs in the configuration settings:
- Network Connectivity: From this tab, you can only change the IP address or the hostname for the patch store.
- Download Settings: Edit this area to specify the patch type to download and additional custom URLs to specify third-party patch repositories. By enabling the Use a shared repository option, you can specify the URL of the UMDS instance that's used to centralize the downloads. If a proxy is used to access the internet, edit the Proxy Settings area to specify the correct parameters. Patches in ZIP format can also be imported into the repository by using the Import Patches button.
- Download Schedule: In this area, you specify the frequency of patch downloads with the option of sending a notification email (SMTP settings must be configured in vCenter Server by accessing Configure | General area).
- Notification Check Schedule: This is used to specify the frequency that's used by Update Manager to check the VMware repository for notifications about patch recalls, new fixes, and alerts.
- VM Settings: You can specify whether a snapshot of the VM should be taken before applying the patch. In case the remediation fails, you can quickly roll back to the snapshot taken before the remediation. Since snapshots affect VM performance, it's strongly recommended that a snapshot retention policy is defined to delete the created snapshots, saving precious storage space.
- Host/Cluster Settings: This area allows you to control the operations that are required during remediation. To apply the updates, the target host must be put in maintenance mode, and the running VM must be migrated to other hosts of the cluster to ensure availability. The operation can be automated if vSphere vMotion is configured and DRS is enabled in the cluster. You can also specify that you wish to install patches on PXE booted hosts, but updates are lost after the host reboots if the patch is not included in the host image as well.
The configuration of these settings may vary, depending on the setup of your infrastructure. However, as a general guideline, you can configure host and cluster settings as follows:
- Disable any removable media devices: Removable devices may prevent the host from entering in maintenance mode
- Disable admission control: It is suggested that this parameter is disabled to make additional resources available to the cluster, especially if you have a few hosts
- Disable FT: This is required if you have only two hosts
- vApp setting: Enabled by default, this allows you to specify the use of the smart reboot feature to reboot the virtual appliances, thus maintaining the correct startup dependencies.