vMotion has been around for more than fifteen years. The first version was introduced in 2003, which means it is a mature technology.
vMotion utilizes a similar technology (similar based on its behavior, but completely different from a technical perspective) as a snapshot. When you invoke vMotion, a snapshot of the memory is created, allowing new write operations to memory to be stored in a dedicated, known, section. Then, the content of the memory is migrated, and in the end, the data that has changed during the vMotion invocation are synced.
You might be wondering why you should use vMotion, so there is a list of several tasks that involves the use of vMotion:
- ESXi maintenance mode: If you have a DRS-enabled cluster, DRS will automatically migrate VMs from the ESXi host that is going into maintenance mode.
- Troubleshooting: You are experiencing one of the VMs behaving strangely. You can try to migrate it to a different ESXi hypervisor to determine if the problem is widespread or is only occurring on a single ESXi server.
- Cluster balancing: DRS might invoke vMotion to move VMs around the cluster for better resource balance.
- Host standby: DPM might invoke vMotion to move VMs from the ESXi host that is going into standby mode.
- Affinity rules: Some VMs should not be run together or should be run on the same ESXi hypervisor. If not, vMotion will be used to correct the situation.
Although it might sound like an easy task, many things are going on under the hood:
- As a first step, vCenter server will validate whether the source VM can be run on the destination server.
- Then, a new VM process is started on the second ESXi server and resources for the VM are reserved.
- A memory checkpoint is initialized on the source VM so that all changes in the memory are written to the dedicated memory section.
- The content of the memory is transferred over the network to the destination ESXi hypervisor.
- Changes in memory during the transfer are again checkpointed and synced with the destination ESXi hypervisor. The checkpoint/checkpoint-restore operation might repeat several times.
- The source VM is stopped and the remaining memory fragments are synced to the destination.
- Once the vMotion process is finished, a reverse ARP packet is sent to the physical switches.
- The VM process running on the the source ESX hypervisor is terminated and deleted.
As stated, there will be multiple iterations of the memory checkpoints. The reason behind this is that if the VM is configured with a lot of memory and the memory is actively used, the delta between the creation of the checkpoint and the resulting changes will be quite large, meaning that the VM will be suspended for a quite long period. Therefore, multiple checkpoints are created when using vMotion.
Let's have a look at the following example:
|
Iteration number |
Memory to transfer |
Time for the transfer |
Changes during the memory transfer |
|
1 |
16,384 MB |
30 seconds |
3,072 MB |
|
2 |
3,072 MB |
8 seconds |
512 MB |
|
3 |
512 MB |
2 seconds |
64 MB |
|
4 |
64 MB |
0.25 seconds |
4 MB |
|
5 |
4 MB |
VM freeze for takeover |
No new delta checkpoint created |
vCenter server is responsible for validation, and it invokes the vMotion process on the ESXi hypervisors, but it is not involved in the actual data transfer. Therefore, an active vMotion process must always be allowed to run to completion, even if the vCenter server crashes.
As with any technology, specific prerequisites need to be met:
- The ESXi hypervisor must be licensed for vMotion
- The ESXi hypervisor must be configured with a VMkernel adapter with the vMotion service enabled on the adapter
- The ESXi hypervisor must have the same physical CPU or EVC must be configured
- The ESXi hypervisor must have shared storage accessible by the source and destination ESXi hypervisor
Moreover, there are of course certain limitations as well, which can be found at http://www.vmwarearena.com/vmware-interview-questions-vmotion/.
The migration of a VM is performed by following this procedure:
- From vSphere Client, log in to vCenter Server, right-click the VM to move, and click the Migrate option.
- In the migrate window, select the migration type to perform, choosing from the following options:
- Change computer resource only: The VM is moved to a different compute resources, such as host, cluster, resource pool, or vApp. A powered-on VM is moved using vMotion.
- Change storage only: The VM disks are moved to a different datastore on the same host. The storage vMotion feature is used to move a powered-on VM to a new datastore.
- Change both compute resource and storage: Virtual disks are moved to a new datastore and computer resources are moved to another host. Cold or hot migration can be used to change the host and datastore. If the network of the VM is moved between distributed switches, network configuration and policies are transferred to the target switch.
- Change computer resource only: The VM is moved to a different compute resources, such as host, cluster, resource pool, or vApp. A powered-on VM is moved using vMotion.
- Based on the migration type selected, you must then specify the compute resource, storage location, and vMotion priority (high or normal) to finalize the migration.
- You also have the option to change the vNIC assignment during the vMotion invocation (such as changing the Port Group to which the VM belongs); this is handy if you do not use a distributed vSwitch, and the naming convention is not the same on the source and destination ESXi hypervisor.
Starting from vSphere 6.0, vMotion has been enhanced, introducing new functionalities such as Cross vSwitch vMotion, Cross vCenter vMotion (xVC-vMotion), and Long Distance vMotion (LD-vMotion):
- Migrate to another virtual switch: A VM can be migrated to a different type of virtual switch (standard or distributed) without reconfiguring the physical and virtual network. You can move the VM from a standard to a standard or distributed switch and from a distributed to another distributed switch.
- Migrate to another datacenter: During the migration, you can specify the target data center to move the VM between data centers. In the target data center, you can specify a dedicated port group on a distributed switch for network settings.
- Migrate to another vCenter Server system: VMs can be moved between vCenter Servers if they are connected in Enhanced Linked Mode, and also between vCenter servers that are located a long distance from each other.
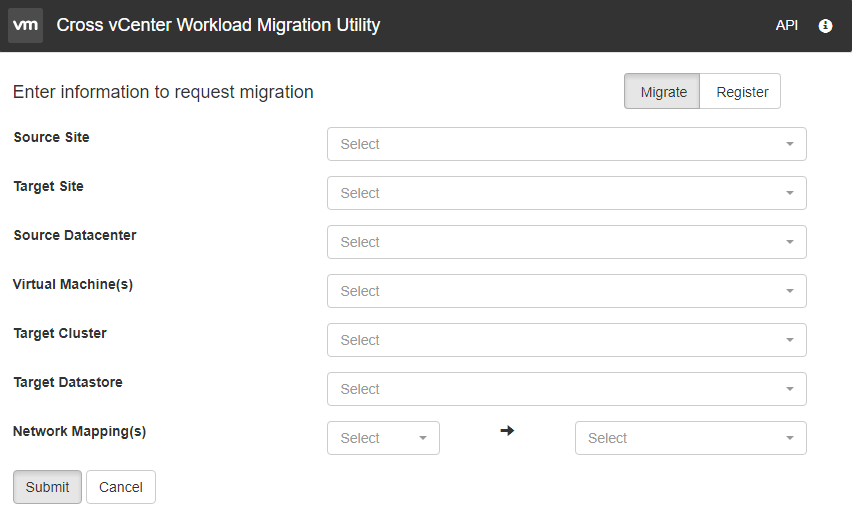
Please note that it is even possible to migrate to a different vCenter server that is not connected using Linked Mode. Although this functionality is presented in the APIs, it is not possible to use the UI to invoke such a migration.
You can see Cross vCenter Workload Migration Utility GUI in the following screenshot:

