
- Dedication
- Special Upgrade Offer
- Acknowledgments
- 1. About this book
- 2. Getting started with OneNote 2013
- 3. Storing your notes
- 4. Writing basic notes
- 5. Taking notes to another level
- Writing quick notes
- Reading, moving, and deleting quick notes
- Handwriting notes and converting them to text
- Creating and constructing outlines
- Date-stamping and time-stamping notes
- Attaching a file or copying a file’s content to a note
- Sending files to OneNote
- Inserting images from a scanner or digital camera
- Inserting a picture from your computer or network
- Inserting a picture from an Internet source
- Taking a screen clipping
- Constructing simple math equations
- Constructing complex math equations
- Recording audio and video notes
- Playing back audio and video notes
- 6. Putting a table in a note
- 7. Linking your notes
- 8. Making OneNote easier to use
- 9. Using the spelling checker on your notes
- 10. Drawing notes
- Drawing free-form with a pen or highlighter
- Creating a custom pen or highlighter
- Drawing lines, shapes, and graphs
- Using the eraser
- Panning to see your work
- Selecting lines and shapes
- Moving lines and shapes
- Resizing and deleting lines and shapes
- Arranging overlapping lines, shapes, images, and containers
- Rotating and flipping lines and shapes
- 11. Organizing your notes
- 12. Searching for stray notes
- 13. Housecleaning in OneNote
- 14. Conducting research in OneNote 2013
- 15. Distributing your notes
- 16. Using OneNote with other Office 2013 applications
- 17. Sharing notebooks with others
- 18. Customizing OneNote 2013
- Adding or removing Quick Access Toolbar buttons
- Changing the order of buttons on the Quick Access Toolbar
- Repositioning the Quick Access Toolbar
- Resetting the Quick Access Toolbar
- Creating or removing a ribbon tab
- Creating or removing a ribbon group
- Adding or removing commands from a ribbon group
- Renaming a ribbon tab or group
- Moving a ribbon tab or group
- Resetting your ribbon customizations
- 19. Using OneNote Web App
- A. About the author
- Index
- About the Author
- Special Upgrade Offer
- Copyright
Creating a custom pen or highlighter
OneNote 2013 offers options for creating pens and highlighters in the color and width of your choice. After you create a pen or highlighter, it is added to the Favorite Pens list, which appears at the top of the Pens gallery.
To create a custom pen or highlighter, start by designating a pen or highlighter tip, choose a thickness, and then choose a color.
Pens and highlighters that you create are added automatically to the Favorite Pens list. By right-clicking a pen or highlighter in this list, you can move it higher or lower in the list, or remove it altogether.
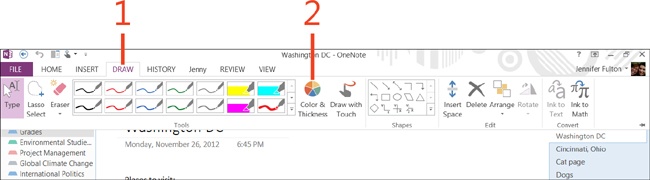
Create a custom pen or highlighter
-
On the ribbon, click the Draw tab.
-
In the Tools group, click Color & Thickness.
-
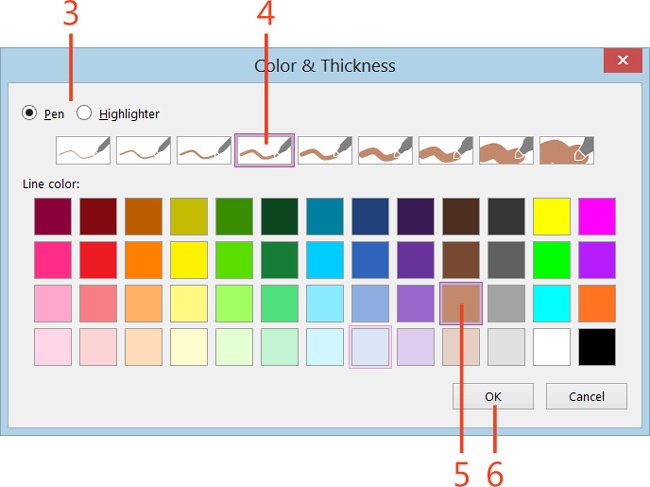
In the Color & Thickness dialog box, click the Pen or Highlighter option.
-
Choose a Thickness option.
-
In the line color gallery, choose a Line Color option.
-
Click OK.
The pen or highlighter you created is added to the Favorites Pens list at the top of the Pens gallery.
-
No Comment