 Slide shows
by Andrea Vacche, Patrik Uytterhoeven, Rihards Olups
Zabbix: Enterprise Network Monitoring Made Easy
Slide shows
by Andrea Vacche, Patrik Uytterhoeven, Rihards Olups
Zabbix: Enterprise Network Monitoring Made Easy
- Zabbix: Enterprise Network Monitoring Made Easy
- Table of Contents
- Zabbix: Enterprise Network Monitoring Made Easy
- Zabbix: Enterprise Network Monitoring Made Easy
- Credits
- Preface
- I. Module 1
- 1. Getting Started with Zabbix
- The first steps in monitoring
- Zabbix features and architecture
- Installation
- Summary
- 2. Getting Your First Notification
- 3. Monitoring with Zabbix Agents and Basic Protocols
- 4. Monitoring SNMP Devices
- 5. Managing Hosts, Users, and Permissions
- 6. Detecting Problems with Triggers
- 7. Acting upon Monitored Conditions
- 8. Simplifying Complex Configurations with Templates
- 9. Visualizing Data with Graphs and Maps
- 10. Visualizing Data with Screens and Slideshows
- 11. Advanced Item Monitoring
- 12. Automating Configuration
- 13. Monitoring Web Pages
- 14. Monitoring Windows
- 15. High-Level Business Service Monitoring
- 16. Monitoring IPMI Devices
- 17. Monitoring Java Applications
- 18. Monitoring VMware
- 19. Using Proxies to Monitor Remote Locations
- 20. Encrypting Zabbix Traffic
- 21. Working Closely with Data
- 22. Zabbix Maintenance
- A. Troubleshooting
- B. Being Part of the Community
- 1. Getting Started with Zabbix
- II. Module 2
- 1. Zabbix Configuration
- 2. Getting Around in Zabbix
- 3. Groups, Users, and Permissions
- 4. Monitoring with Zabbix
- Introduction
- Active agents
- Passive agents
- Extending agents
- SNMP checks
- Internal checks
- Zabbix trapper
- IPMI checks
- JMX checks
- Aggregate checks
- External checks
- Database monitoring
- Checks with SSH
- Checks with Telnet
- Calculated checks
- Building web scenarios
- Monitoring web scenarios
- Some advanced monitoring tricks
- Autoinventory
- 5. Testing with Triggers in Zabbix
- 6. Working with Templates
- 7. Data Visualization and Reporting in Zabbix
- 8. Monitoring VMware and Proxies
- 9. Autodiscovery
- 10. Zabbix Maintenance and API
- C. Upgrading and Troubleshooting Zabbix
- III. Module 3
- 1. Deploying Zabbix
- 2. Distributed Monitoring
- 3. High Availability and Failover
- Understanding high availability
- Understanding the levels of IT service
- Some considerations about high availability
- Implementing high availability on a web server
- Configuring the Zabbix server for high availability
- Implementing high availability for a database
- Summary
- 4. Collecting Data
- 5. Visualizing Data
- 6. Managing Alerts
- 7. Managing Templates
- 8. Handling External Scripts
- 9. Extending Zabbix
- 10. Integrating Zabbix
- D. Bibliography
- Index
We now have a couple of screens, but to switch between them, a manual interaction is required. While that's mostly acceptable for casual use, it would be hard to do if you wanted to display them on a large display for a helpdesk. Manual switching would soon get annoying even if you simply had Zabbix open on a secondary monitor all the time.
Another functionality comes to the rescue—slide shows. Slide shows in Zabbix are simple to set up, so go to Monitoring | Screens. Why a screen page? Zabbix 3.0 changed the slide show operations to be the same way as maps and screens by moving both viewing and configuration to the monitoring section. Slide shows didn't get their own section, though; to access them, choose Slide shows from the dropdown in the upper-right corner. Click on the Create slide show button. Enter First slide show in the Name field, and click on the Add control in the Slides section. Slides are essentially screens, which is what we can see in the popup. Click on Local servers. We do not change the default value in the Delay field for this slide or screen. Leaving it empty will use the value of 30 from the Default delay field above.
Again, click on Add in the Slides section, and then click on Experimental screen. This time, enter 5 in the DELAY field for this screen:
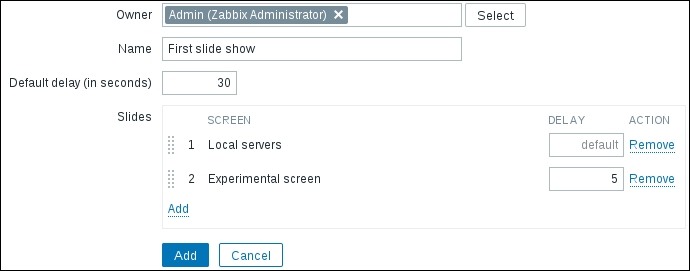
Notice the handles on the left-hand side—the same as in graphs and icon mapping, we can reorder the slides here. We won't do that now; just click on the Add button at the bottom.
Now, click on First slide show in the NAME column. It starts plain, showing a single screen, and it then switches to the other screen after 30 seconds, then back after 5 seconds, and so the cycle continues. As we have dynamic screen items included in the slideshow, we can also choose the host in the upper-right corner—that will affect the dynamic screen items only.
We could show more screens, for example, a large high-level overview for 30 seconds, and then cycle through the server group screens, showing each one for 5 seconds.
Take a look at the buttons in the upper-right corner:
The first button allows us to add this slideshow to the dashboard favorites, the same as with graphs and screens. The third button is the full-screen one again. But the middle button allows us to slow down or speed up the slideshow—click on it:
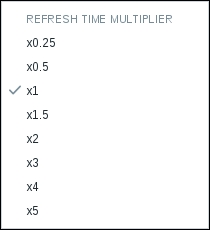
Instead of setting a specific time, we can make the slideshow faster or slower by applying a multiplier, thus maintaining the relative time for which each slide should be displayed.
There's also another reason to choose global screens over templated or host screens: only global screens can be included in slideshows.
Old versions of Zabbix had a memory leak in the slide show functionality. There have also been several cases of memory leaks in browsers. If you see browser memory usage consistently increasing while using Zabbix slide shows, consider upgrading. If that is not possible, one of the slides could reload the page using a URL element and JavaScript, which, in most cases, should reduce memory usage. http://www.phpied.com/files/location-location/location-location.html suggests 535 different ways of doing this.
Both screens and slide shows can also be created by normal users and then shared since Zabbix 3.0, the same way we shared maps in Chapter 9, Visualizing the Data with Graphs and Maps. The same as with maps, other users will need access to all the elements and subelements included in such screens and slide shows to be able to access them.
-
No Comment