
In this day and age, web applications are virtually ubiquitous. Some kinds of websites or a collection of web pages is typically the final product or the service of a complex structure that comprises different databases, application servers, web servers, proxies, network balancers and appliances, and more. When it comes to monitoring duties, it makes sense to go just a step further and monitor a resulting site or web page in addition to all the backend assets that enable the said page. The advantages as far as warnings and notifications go, are fairly limited, as failure to reach a web page is certainly a critical event. But it hardly gives any insight into what may be the actual problem if you haven't set up the correct metrics and triggers on the backend side. On the other hand, it may be crucial to have a collection of data about a website's performance. In order to anticipate possible problems, substantiate SLA reporting, and plan for hardware or software upgrades.
One big advantage of Zabbix's web-monitoring facilities is the scenario concept. You can define a single web scenario that is composed of many simple steps, each one building on the previous and sharing a common set of data. Furthermore, every such definition includes the automatic creation of meaningful items and graphs, both at the scenario level (overall performance) and at the single-step level (local performance). This makes it possible to not only monitor a single web page but also simulate entire web sessions so that every component of a web application will contribute to the final results. A single scenario can be very complex and requires a great number of items that would end up being difficult to track and group together. This is the reason why web monitoring in Zabbix has its own web configuration tab and interface, separate from regular items, where you can configure monitoring on a higher level.
Note
To perform web monitoring, the Zabbix server must be initially configured with cURL (libcurl) support. Please refer to Chapter 1, Deploying Zabbix.
Web scenarios support plain HTTP/HTTPS, BASIC, NTLM, form-based authentication, cookies, submission of form fields, and checking of page content in addition to the HTTP code responses.
For all their power, web scenarios also suffer from a few limitations when it comes to monitoring the modern Web.
First of all, JavaScript is not supported, so you can't simulate a complete AJAX session exactly as a human user would experience it. This also means that any kind of automated page reloads won't be executed in the scenario.
Furthermore, while you can submit forms, you have to know in advance both the name of the fields and their content. If either of them is generated dynamically from page to page (as many ASP.NET pages are to keep the session information), you won't be able to use it in subsequent steps.
These may seem to be negligible limitations, but they may prove to be quite important if you need to monitor any site that relies heavily on client-side elaborations (JavaScript and friends) or on dynamic tokens and form fields. The reality is that an increasing number of web applications or frameworks use one or both of these features.
Nevertheless, even with these limitations, Zabbix's web monitoring facilities prove to be a very useful and powerful tool that you may want to take full advantage of, especially if you produce a lot of web pages as the final result of an IT pipeline.
To create a web scenario, you need to go through Configuration | Host and then click on Create scenario. You'll see a window, as shown in the following screenshot:

Within this form, you can define parameters other than the usual ones, such as Name, Application, and Update interval, which represents the frequency with which our scenario is executed. Even the user Agent and the number of Retries can be defined. Once you've defined the user Agent that you would like to use, Zabbix will act as the selected browser by presenting itself as the browser defined. Regarding Retries, it is important to know that Zabbix will not repeat a step due to a wrong response or a mismatch of the required string.
Another important and new section is Headers. Here, you can specify the HTTP headers that will be sent when Zabbix executes a request.
There are three methods of authentication supported for web monitoring; you can see them in the relative Authentication tab, as shown in the following screenshot:
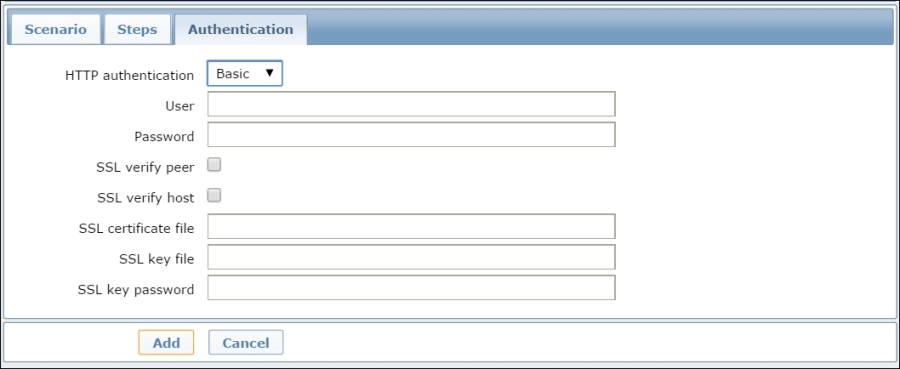
Those method are Basic, NTLM, and form-based. The first two are fairly straightforward and just need to be defined at the scenario level. The NTLM authentication will provide two additional fields to enter the username and password. Starting with Zabbix 2.2, we have now fully supported the use of user macros in the username and password fields. Again, on this tab, we can even enable the SSL verification. The SSL verify peer checkbox enables the web server certificate checking, and the SSL verify host checkbox is used to verify the Common Name field or the Subject Alternate Name field of the web server certificate. The SSL certificate file checkbox is used for client-side authentication; here, you need to specify a PEM certificate file. If the PEM certificate contains even the private key, you can avoid specifying the relative key on SSL key file and SSL key password.
Both fields, SSL certificate files and SSL key file, support HOST.* macros.
Coming back to authentication, we need to highlight form-based authentication, which relies on the ability of the client (a Zabbix server in this instance) to keep the session cookies, and which is triggered when the said client submits a form with the authentication data. While defining a scenario, you'll need to dedicate a step just for the authentication. To know which form fields you'll need to submit, look at the HTML source of the page containing the authentication form. In the following example, we'll look at the Zabbix authentication page. Every form will be slightly different, but the general structure will largely be the same (here, only the login form is shown in an abbreviated manner):
<form action="index.php" method="post">
  <input type="hidden" name="request" class="input hidden" value="" />
  <!-- Login Form -->
  <div>Username</div>
  <input type="text" id="name" name="name" />
  <div>Password</div>
  <input type="password" id="password" name="password" />
  <input type="checkbox" id="autologin" name="autologin" value="1" checked="checked" />
  <input type="submit" class="input" name="enter" id="enter" value="Sign in" />
</form>
You need to take note of the input tags and their name options because these are the form fields you are going to send to the server to authenticate. In this case, the username field is called name, the password field is called password, and finally, the submit field is called enter and has the value Sign in.
We are now ready to create a scenario; we will then define our scenario as shown in the following screenshot:
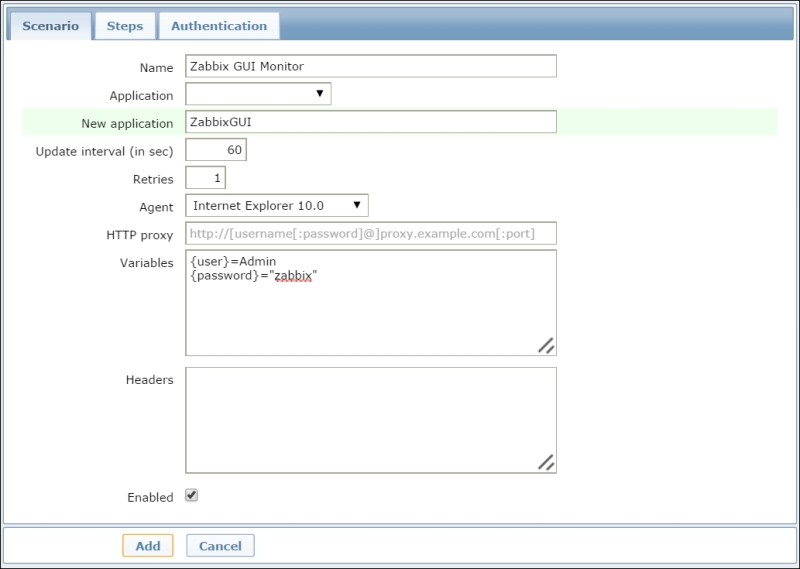
As you can see, in the Variables field, we have defined two variables that we're going to use in the next steps and then in the authentication step. This is a useful feature as it allows us to the variable defined across the scenario.
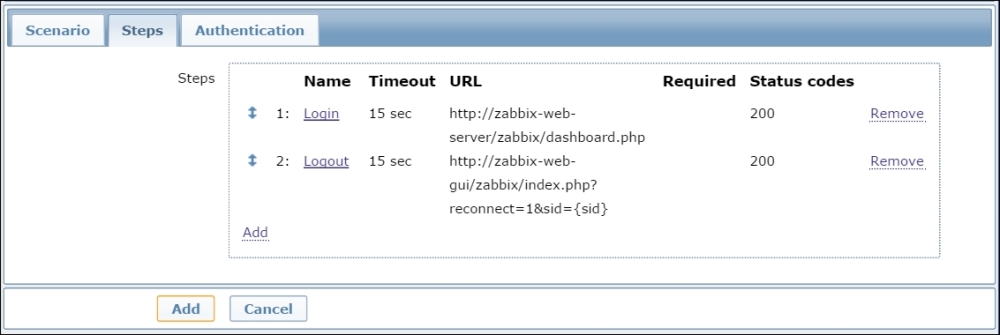
The next thing to do is the authentication, and then we need to add one step to our scenario, as shown in the following screenshot:

Please note the usage of the predefined variables {user} and {password}. As per the required string, we can use Connected, which appears right in the footer once you're connected, and, of course, Required status codes will be 200. In this example, we are defining a new variable that represents the authentication token. This variable will be used during the logout process and will be populated by the data received. From now on, every URL that you'll check or every form that you'll submit, will be in the context of an authenticated session, assuming the login process was successful, of course.
Note
Starting with Zabbix 2.4, each step defined supports web redirects. If the checkbox is flagged Zabbix, set the cURL option CURLOPT_FOLLOWLOCATION (http://curl.haxx.se/libcurl/c/CURLOPT_FOLLOWLOCATION.html). Also, it is possible to retrieve only the header for each page instead of setting the cURL option CURLOPT_NOBODY. More information is available at http://curl.haxx.se/libcurl/c/CURLOPT_NOBODY.html.
One common mistake when it comes to web monitoring is that the authentication part is taken care of at the start of a scenario but rarely at the end during logout. If you don't log out of a website, depending on the system used to keep track of the logged-in users and active sessions, a number of problems may arise.
Active sessions usually range from a few minutes to a few days. If you are monitoring the number of logged-in users, and your session's timeouts are on the longer side of the spectrum, every login scenario would add to the number of active users reported by the monitoring items. If you don't immediately log out at the end of the scenario, you may, at the very least, end up with monitoring measurements that are not really reliable, and they would show a lot of active sessions that are really just monitoring checks.
In the worst-case scenario, your identity manager and authentication backend may not be equipped to handle a great number of non-expiring sessions and may suddenly stop working, bringing your whole infrastructure to a grinding halt. We can assure you that these are not hypothetical situations but real-life episodes that occurred in the authors' own experience.
At any rate, you certainly can't go wrong by adding a logout step to every web scenario that involves a log in. You'll make sure that your monitoring actions won't cause any unforeseen problem, and at the very least, you will also test the correct functioning of your session's tear-down procedures. Logout steps are also usually quite easy as they normally involve just a GET request to the correct URL. In the case of the Zabbix frontend, you would create the following final step (as shown in the following screenshot) before ending the scenario:
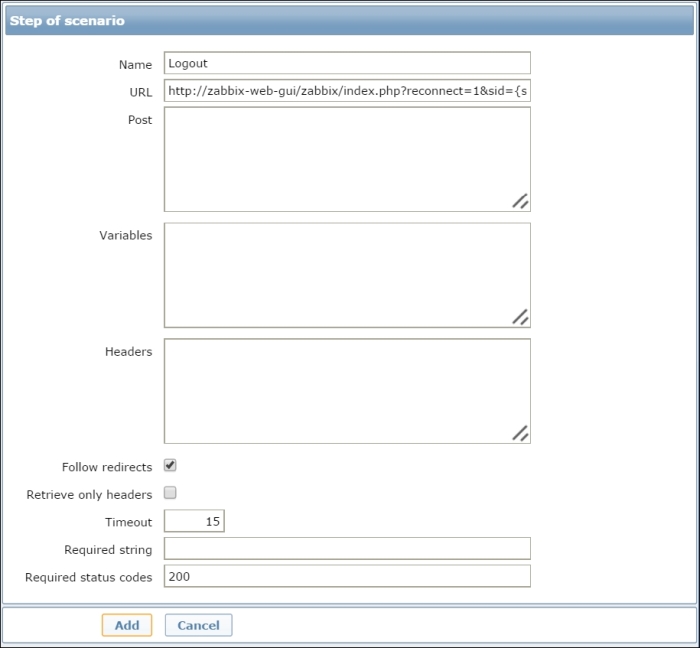
Once you have defined this logout step, your scenario will look similar to the following screenshot:
Please note the use of the {sid} variable in the logout string. Also, in this example, we have used zabbix-web-gui. This obviously needs to be replaced with your own web server.
Furthermore, please consider that every new session uses up a small amount of computing resources whether it's disk space or memory. If you create a large number of sessions in a short time, due to frequent checks, you could end up significantly degrading the website's performances. So, take care to:
- Include all the required steps within your scenario
- Avoid duplicating scenarios for simple checks
- Always define a logout step
- Bear in mind that the frequency needs to be a reasonable value and doesn't affect the monitored system
Also, it is important to know that you can't skip steps included in web scenarios. They are all executed in the defined order. Also, if you need a more verbose log, you can increase it at the real-time HTTP poller using the following command:
$ zabbix_server –R log_level_increase="http poller"
As a last tip, bear in mind that the history for which we are monitoring items is of 30 days and for 90 trends.