
Armed with this knowledge about SNMP OIDs, let's get to the real deal—getting SNMP data into Zabbix. To make the following steps easier, you should choose an entry that returns string data. We could use a UPS serial number, such as the one discovered previously to be PowerNet-MIB::upsAdvIdentSerialNumber.0. Do the same for some network printer or manageable switch; if you don't have access to such a device, you can choose a simple entry from the Net-SNMP enabled host, such as the already mentioned system description, SNMPv2-MIB::sysDescr.0.
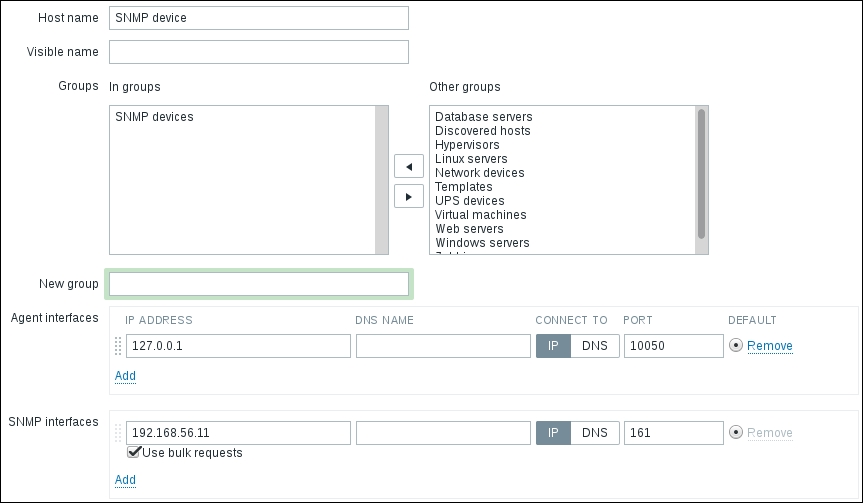
Now is the time to return to the Zabbix interface. Go to Configuration | Hosts, and click on Create host. Then, fill in the following values:
- Host name: Enter
SNMP device. - Groups: If in the In groups listbox there's a group, select it and click on the
 button.
- New group: Enter
SNMP devices. - SNMP interfaces: Click on Add.
- DNS NAME or IP ADDRESS: Enter the correct DNS name or IP address next to the SNMP interfaces we just added. If you have chosen to use an SNMP-enabled device, input its IP or DNS here. If you don't have access to such a device, use the Another host IP address or DNS name.
- CONNECT TO: Choose DNS or IP, according to the field you populated.
When you are done, click on the Add button at the bottom. It's likely that you won't see the newly created host in the host list. The reason is the Group dropdown in the upper-right corner, which probably says Linux servers. You can change the selection to All to see all configured hosts or to SNMP devices to only see our new device. Now is the time to create an item, so click on Items next to SNMP devices and click on the Create item button. Fill in the following values:
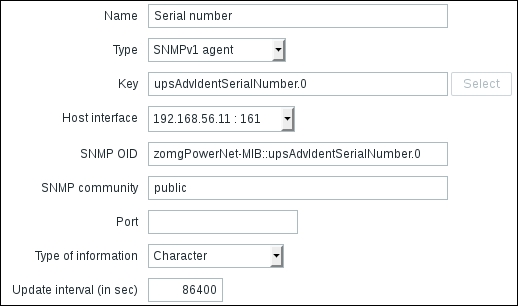
- Name: Enter something sensible, such as
Serial number, if you are using an OID from an SNMP agent, orSystem descriptionif you are using the Net-SNMP daemon. - Type: Change to the appropriate version of your SNMP agent. In the displayed example,
SNMPv1 agentis chosen because that's the only version our device supports. - Key: This is not restricted or too important for SNMP items, but required for references from triggers and other locations. You can choose to enter the last part of the textual OID, such as
upsAdvIdentSerialNumber.0orsysDescr.0. - SNMP OID: This is where our knowledge comes in. Paste the SNMP OID you have found out and chosen here. In the example,
PowerNet-MIB::upsAdvIdentSerialNumber.0is entered. If you are using the Net-SNMP daemon, enterSNMPv2-MIB::sysDescr.0 - SNMP community: Unless you have changed it, keep the default
publicvalue. - Type of information: Select Character.
- Update interval (in sec): This information doesn't really change that often, so use some large value, such as
86400.
When you are done, click on the Add button at the bottom.
Now, the outcome will depend on several factors. If you are lucky, you will already see the incoming data in Monitoring | Latest data. If you have chosen some vendor-specific OID, like in our example, it is possible that you will have to go back to Configuration | Hosts, click on Items next to SNMP device, and observe the status of this item:

Now what's that? How could it be? We saw in our tests with Net-SNMP command line tools that there actually is such an OID. Well, one possible situation when this error message appears is when the specified MIB is not available, which could happen if you tried SNMP queries previously from a different host.
Zabbix server works as if ALL is set for MIB contents; thus, you don't have to do anything besides copying the MIB to the correct directory (usually /usr/share/snmp/mibs) on the Zabbix server and restarting the server daemon. If you did not copy the OID, instead deciding to retype it, you might have made a mistake. Verify that the entered OID is correct.
After fixing any problems, wait until Zabbix server refreshes the item configuration and rechecks the item. With the item configured, let's see what data we can get in Zabbix from it. Navigate to Monitoring | Latest data, expand the filter, clear the Host groups field, and start typing SNMP in the Host field—SNMP device should appear, so choose it and click on Filter. Expand the other category if needed, and look for the serial number. You should see something like this:
The serial number has been successfully retrieved and is visible in the item listing. This allows us to automatically retrieve data that, while not directly tied to actual availability or performance monitoring, is still quite useful. For example, if a remote device dies and has to be replaced, you can easily find the serial number to supply in a servicing request, even if you neglected to write it down beforehand.
In case you can't or don't want to copy vendor-specific MIB files to the Zabbix server, you can always use numeric OIDs, like we did before. While not being as descriptive, they are guaranteed to work even if the copied MIBs are not available for some reason or are removed during a system upgrade.
But how do we derive the corresponding numeric OID from a textual one? While we could use snmpget to retrieve the particular value and output it in numeric form, that requires the availability of the device and network roundtrip. Fortunately, there's an easier way: the snmptranslate command. To find out the numeric form of the OID, we can use PowerNet-MIB::upsAdvIdentSerialNumber.0:
$ snmptranslate -On PowerNet-MIB::upsAdvIdentSerialNumber.0
.1.3.6.1.4.1.318.1.1.1.1.2.3.0
You must have MIBs placed correctly and pass their names to Net-SNMP tools for translation to work.
The default output format for Net-SNMP tools is the short textual one, which only outputs the MIB name and object name. If you would like to find out the corresponding textual name, use the following:
$ snmptranslate .1.3.6.1.2.1.1.1.0
SNMPv2-MIB::sysDescr.0
You can also use the -Of flag to output an OID in full notation:
$ snmptranslate -Of PowerNet-MIB::upsAdvIdentSerialNumber.0
.iso.org.dod.internet.private.enterprises.apc.products.hardware.ups.upsIdent.upsAdvIdent.upsAdvIdentSerialNumber.0
Previously, we monitored incoming traffic on the eth0 device using an active Zabbix agent daemon item. If we have snmpd set up and running, we can also try retrieving outgoing traffic, but this time, let's try to use SNMP for that.
Monitoring network traffic using the Zabbix agent daemon is usually easier, but SNMP monitoring is the only way to obtain this information for many network devices, such as switches and routers. If you have such a device available, you can try monitoring it instead, though the network interface name will most likely differ.
One way to find the item we are interested in would be to redirect the output of snmpwalk to a file and then examine that file. Looking at the output, there are lines such as these:
IF-MIB::ifDescr.1 = STRING: lo
IF-MIB::ifDescr.2 = STRING: eth0
Great, so the desired interface, eth0 in this case, has an index of 2. Nearby, we can find actual information we are interested in—traffic values:
IF-MIB::ifOutOctets.1 = Counter32: 1825596052
IF-MIB::ifOutOctets.2 = Counter32: 1533857263
So, theoretically, we could add an item with the OID IF-MIB::ifOutOctets.2 and name it appropriately. Unfortunately, there are devices that change interface index now and then. Also, the index for a particular interface is likely to differ between devices, thus potentially creating a configuration nightmare. This is where dynamic index support in Zabbix comes into use.
Let's look at what a dynamic index item OID would look like in this case:
|
|
|
|
|
|
Database OID |
Literal string "index" |
Index-based OID |
Index string |
- Database OID: This is the base part of the OID that holds the data we are interested in, that is, without the actual index. In this case, it's the OID leading to
ifOutOctets, in any notation. - Literal string "index": This is the same for all dynamic index items.
- Index-based OID: This is the base part of the OID that holds the index we are interested in. In this case, it's the OID leading to
ifDescr, in any notation. - Index string: This is the string that the index part of the tree is searched for. This is an exact, case-sensitive match of all OIDs from the previous base OID. Here, the name of the interface we are interested in,
eth0, will be searched for. No substring or other matching is allowed here.
The index that this search will return will be added to the database OID, and the following queries will gather values from the resulting OID.
You can easily view the index to determine the correct string to search for with Net-SNMP tools:
$ snmpwalk -v 2c -c public localhost .iso.org.dod.internet.mgmt.mib-2.interfaces.ifTable.ifEntry.ifDescr
IF-MIB::ifDescr.1 = STRING: lo
IF-MIB::ifDescr.2 = STRING: eth0
IF-MIB::ifDescr.3 = STRING: sit0
As can be seen, this machine has three interfaces: loopback, Ethernet, and a tunnel. The picture will be very different for some other devices. For example, an HP ProCurve switch would return (with the output shortened) the following:
$ snmpwalk -v 2c -c public 10.196.2.233 .iso.org.dod.internet.mgmt.mib-2.interfaces.ifTable.ifEntry.ifDescr
IF-MIB::ifDescr.1 = STRING: 1
IF-MIB::ifDescr.2 = STRING: 2
...
IF-MIB::ifDescr.49 = STRING: 49
IF-MIB::ifDescr.50 = STRING: 50
IF-MIB::ifDescr.63 = STRING: DEFAULT_VLAN
IF-MIB::ifDescr.4158 = STRING: HP ProCurve Switch software loopback interface
Now that we know the OID to use for dynamic index items, let's create one such item in Zabbix. Navigate to Configuration | Hosts, click on Items next to the correct host you want to create the item for, and click on Create item. Fill in the following values:
- Name:
Outgoing traffic on interface $1 - Type: SNMPv2 agent
- Key:
ifOutOctets[eth0] - SNMP OID:
IF-MIB::ifOutOctets["index","ifDescr","eth0"] - Units:
Bps - Store value: Delta (speed per second)
Same as before, replace eth0 with an interface name that exists on the target system. When you are done, click on the Add button at the bottom.
Tip
Make sure that the compound OID is entered correctly, paying close attention to quotes and spelling. We discussed the reason to use the Numeric (unsigned) type of information in Chapter 3, Monitoring with Zabbix Agents and Basic Protocols.
The newly added item should start gathering data, so let's look at Monitoring | Latest data. If you don't see this item or the data for it, navigate back to Configuration | Hosts and click on Items next to the corresponding host—there should be an error message displayed that should help with fixing the issue. If you have correctly added the item, you'll see the traffic data, as follows:
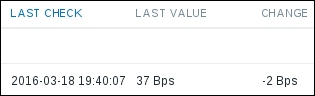
Dynamic index items are quite common. Many network devices have fixed port names but varying indexes. Host-based SNMP agents place things such as disk usage and memory statistics in dynamic indexes; thus, if you have such devices to monitor, Zabbix support for them will be handy.
Using dynamic index items can slightly increase overall load, as two SNMP values are required to obtain the final data. Zabbix caches retrieved index information, so the load increase should not be noticeable.
A dynamic SNMP index enables us to easily monitor a specific interface or other entity by name, but it would not be a very efficient method for monitoring a larger number of interfaces. We will discuss an automated solution, low-level discovery, in Chapter 11, Advanced Item Monitoring.
You might have spotted the checkbox next to the SNMP interfaces section, Use bulk requests:

When requesting values from SNMP hosts, Zabbix may request one value at a time or multiple values in one go. Getting multiple values in one go is more efficient, so this is what Zabbix will try to do by default—it will ask for more and more values in one connection against a device until all SNMP items can be queried in one go or the device fails to respond. This approach enables us to find the number of values that a device is configured to return, or is technically capable of returning, in one go. No more than 128 values will be requested in one attempt, however.
Only items with identical parameters on the same interface will be queried at the same time—for example, if the community or the port is different, Zabbix will not try to get such values in one attempt.
There are quite a lot of devices that do not work properly when multiple values are requested; thus, it is possible to disable this functionality per interface.