
Our first steps in website testing were fairly simple. Let's do something more fancy now. We will attempt to log in to the Zabbix frontend, check whether that succeeds, and then log out. We should also verify that the logout operation was successful, by the way.
We will do this with a larger number of individual steps for greater clarity:
- Step 1: Check the first page
- Step 2: Log in
- Step 3: Check login
- Step 4: Log out
- Step 5: Check logout
We will set up this scenario on A test host. Go to Configuration | Hosts, click on Web next to A test host, and click on Create web scenario. Fill in these values:
- Name:
Zabbix frontend - New application:
Zabbix frontend - Variables: Enter the following lines here:
{user}=Admin
{password}=zabbix
The variables we filled in use a different syntax than other macros/variables in Zabbix. We will be able to use them in the scenario steps, and we'll see how exactly that is done in a moment. And now, on to the steps—switch to the Steps tab. For each of the steps, first click on the Add link in the Steps section. In the end, click on the Add button in the step properties, and proceed to the next step. For all the steps, adapt the URL as needed—the IP address or hostname and the actual location of the Zabbix frontend.
On the first page, fill in the following details:
- Name:
First page - URL:
http://127.0.0.1/zabbix/index.php - Required string:
Zabbix SIA - Required status codes:
200
In the URL, we also appended index.php to reduce the amount of redirects required. Required string will be checked against the page contents. That also includes all the HTML tags, so make sure to list them if your desired string has any included. We also chose a text that appears at the bottom of the page to ensure that the page is likely to have loaded completely. And the status code: the HTTP response code of 200 is ok; we require that specific code to be returned.
- Name:
Log in - URL:
http://127.0.0.1/zabbix/index.php - Post:
name={user}&password={password}&enter=Sign in - Required status codes:
200
Most of the things in this step should be clear, except maybe the new Post string. It follows the standard syntax of specifying multiple values, concatenated with an ampersand. We are finally using the variables we specified earlier, and we pass them according to the input field names in the login form. The last variable, enter, is a hidden input in the Zabbix frontend login page, and we must pass a hardcoded value of Sign in to it. To find out these values for other pages, check the page source, use browser debugging features, or sniff the network traffic.
We could assume that the logging in succeeded. But it is always best to check such things. We could have missed some hidden variable, or we could have made a mistake in the password. So, we'll use a separate step to be sure that logging in really succeeded. Note that all further steps in this scenario will act as a logged-in user until we log out. Zabbix keeps all received cookies for latter steps during the whole scenario. When logged in, one distinguishing factor is the profile link, which uses the top-nav-profile class—and that would be the string we would check for:
- Name:
Check login - URL:
http://127.0.0.1/zabbix/index.php - Required string:
top-nav-profile - Required status codes:
200
Don't add this step yet. Before continuing with the next step—logging out—we should discuss what will we need for it. Logging out is considered an action that modifies something, so we actually have to pass a session ID as an sid variable. We must obtain it somehow now, and that can be done by extracting the ID from the page source here. Values can be extracted from the web page, assigned to variables, and reused in subsequent steps. Let's also fill in the following:
Variables: {sid}=regex:sid=([0-9a-z]{16})Now, the step can be added. The syntax here deserves to be discussed in more detail. While the first part of the variable assignment is the same as assigning some value manually, the second part, after the equals sign, starts with the keyword regex. Then, separated by a colon, a regular expression follows. It is matched against the page source. In our case, we start by looking for the sid= string, followed by 16 alphanumeric characters. These alphanumeric characters are the session ID, and we have included them in a capture group. Note that this is not Zabbix-specific but a standard regular expression functionality. The contents of the matched capture group will be assigned to the variable. Extracting and reusing the session ID is the most common use of this functionality, but anything one might want to reuse in subsequent steps can be extracted from the page and assigned to a variable if we can come up with a regex for that.
Now that we have the session ID, we are ready to log out. We have to use a different URL, though. If you look at the page source, the logout control uses JavaScript to redirect to a relative URL, like this:
index.php?reconnect=1&sid=b208d0664fa8df35
The two important variables here are reconnect and sid. The reconnect one has to be simply set to 1. As for sid, we luckily extracted that value in the previous step, so we have all the components to log out:
- Name:
Log out - URL:
http://127.0.0.1/zabbix/index.php?reconnect=1&sid={sid} - Required status codes:
200
Tip
Logging out is important. Otherwise, the sessions won't be removed for a year by default, and every frontend check will add one session. A large number of sessions will slow down the Zabbix frontend. We'll discuss session maintenance in Chapter 22, Zabbix Maintenance.
We will check whether there's a string we only expect to see on the login page. Logging out could have invisibly failed otherwise:
- Name:
Check logout - URL:
http://127.0.0.1/zabbix/index.php - Required string:
Sign in - Required status codes:
200
The final steps should look like this:

If everything looks good, click on the Add button at the bottom of the page to finally save this scenario. We could let the scenario run for a while now and discuss some step parameters we didn't use:
- Follow redirects: This specifies whether Zabbix should follow redirects. If enabled, it follows up to 10 hardcoded redirects, so there is no way to check whether there's been a specific number of redirects. If disabled, we can check for the HTTP response code to be
301or some other valid redirect code. - Retrieve only headers: If the page is huge, we may opt to retrieve headers only. In this case, the Required string option will be disabled as Zabbix does not support matching strings in the headers yet.
- Timeout: This specifies the timeout for this specific step. It is applied both to connecting and performing the HTTP request, separately. Note that the default timeout is rather large at
15seconds, which can lead to Zabbix spending up to 30 seconds on a page.
Tip
We could have used a user macro for a part or all of the URL—that way, we would only define it once and then reference it in each step. We discussed user macros in Chapter 8, Simplifying Complex Configuration with Templates.
After the scenario has had some time to run, let's go to Monitoring | Web page. Choose Linux servers in the Group dropdown and click on Zabbix frontend in the NAME column:
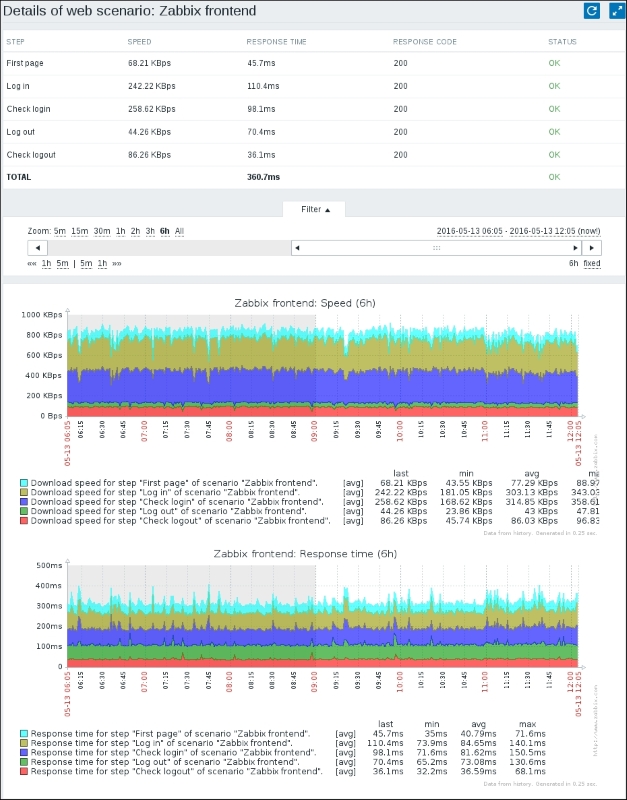
The scenario seems to be running correctly: log in and log out seem to work properly. Note that if it fails for you, the failure could actually be in the previous step. For example, if it fails on Step 3: Check login, the actual fault is likely in Step 2: Log in—that is, the login failed.
The approach we took with five steps was not the most simple one. While it allowed us to split out each action in its own step (and provided nice graphs with five values), we could have used a much more simple approach. To check login and logout, the simplest approach and the minimum number of steps would have been these:
- Log in and check whether that is successful
- Log out and check whether that is successful
As an extra exercise, consider creating a new scenario and achieving the same goal in two steps.