
While querying SNMP-capable devices is a nice method that requires little or no configuration of each device in itself, in some situations, information flow in the reverse direction is desired. For SNMP, these are called traps. Usually, traps are sent upon some condition change, and the agent connects to the server or management station on port 162 (as opposed to port 161 on the agent side, which is used for queries). You can think of SNMP traps as being similar to Zabbix active items; as with those, all connections are made from monitored machines to the monitoring server.
The direction of the connections isn't the only difference—SNMP traps have some other pros and cons when compared to queries. For example, SNMP traps are usually more capable of detecting short-lived problems that might have been missed by queries. Let's say you are monitoring incoming voltages on a UPS. You have decided on a reasonable item interval that would give you useful data and wouldn't overload the network and Zabbix server—let's say some 120 seconds, or 2 minutes. If the input voltage suddenly peaks or drops for a minute, your checks might easily miss this event, thus making it impossible to correlate it with problems with other devices that are not connected to the UPS. Another benefit that traps provide is reduced network and Zabbix server load as the information is only sent when an event occurs and there is no constant querying by the server. One drawback is partial decentralization of the configuration. SNMP trap-sending conditions and parameters have to be set for each device or device group individually. Another drawback is a lack of the guaranteed sending of the traps. Almost all SNMP implementations will use UDP, and trap information might get lost without any trace.
As such, SNMP traps aren't used to replace SNMP queries. Instead, they supplement them by leaving statistical information-gathering to the queries and providing notifications of various events happening in the devices, usually notifying us of emergencies.
In Zabbix, SNMP traps are received by snmptrapd, a daemon again from the Net-SNMP suite. These traps then have to be passed to the Zabbix daemon with some method. There are several ways of doing it, and we will explore two different approaches:
The first method, especially when using the embedded Perl code approach, is the most simple one and will offer the best performance. A custom script will provide the most flexibility but will also require more effort.
Using embedded Perl code in snmptrapd is the easiest method to set up. Unless you need extra functionality, it is suggested to stick with this method.
We'll start by configuring snmptrapd to pass information to Zabbix. There is an example script in the Zabbix sources called misc/snmptrap/zabbix_trap_receiver.pl. Place this file in some reasonable location—perhaps a bin subdirectory in the Zabbix home directory. If the directory does not exist, create it, as follows:
# mkdir -p /home/zabbix/bin; chown zabbix /home/zabbix
Place the zabbix_trap_receiver.pl file in this directory:
# cp misc/snmptrap/zabbix_trap_receiver.pl /home/zabbix/bin
Now, on to instructing snmptrapd to use that script. We only need to tell the trap daemon to process all the received traps with this script. To do this, you'll have to find the location where your distribution places the Net-SNMP configuration files—usually, /etc/snmp/. In this directory, look for a file named snmptrapd.conf. If it's there, edit it (create a backup copy before you do anything); if it's missing, create it. Edit it as root and make it look as follows:
authCommunity execute public
perl do "/home/zabbix/bin/zabbix_trap_receiver.pl";
This will accept all traps that have the community set to public and pass them to the Perl receiver script.
Start or restart the trap daemon. It might be worth taking a quick look at the zabbix_trap_receiver.pl file. Notice the line that specifies the path:
$SNMPTrapperFile = '/tmp/zabbix_traps.tmp';
Behind the scenes, traps are passed to the Zabbix server through a temporary file. We'll discuss this in a bit more detail later in this chapter.
Now on to the items on the Zabbix side. To test the most simple thing first, we will try to send values from the Zabbix server. Navigate to Configuration | Hosts, click on A test host in the NAME column, and click on Add in the SNMP interfaces section. Click on the Update button at the bottom, and then click on Items next to A test host. Click on Create item and enter these values:
- Name:
SNMP trap tests - Type: SNMP trap
- Key:
snmptrap[test] - Type of information: Character
When you're done, it should look like this:
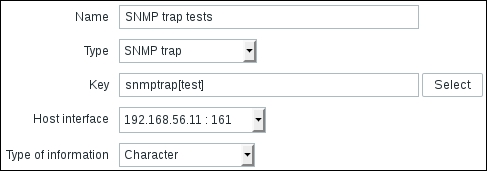
This item will collect all traps that this host gets, if the traps contain the string test. We have the trap daemon configured to place traps in a file, and we have the item to place these traps in. What's left is telling the Zabbix server where to get the traps. Open zabbix_server.conf and modify the StartSNMPTrapper parameter:
StartSNMPTrapper=1
There is a special process in Zabbix that reads traps from a temporary file. This process is not started by default, so we changed that part of the configuration. Take a look at the parameter just above this one:
SNMPTrapperFile=/tmp/zabbix_traps.tmp
Notice how it matches the file in the Perl script. A change in the script should be matched by a change in this configuration file and vice versa. At this time, we will not change the location of this temporary file.
After these changes have been made, restart the Zabbix server daemon.
Now, we are ready to test this item. Let's send a trap by executing the following from the Zabbix server:
$ snmptrap -Ci -v 2c -c public localhost "" "NET-SNMP-MIB::netSnmpExperimental" NET-SNMP-MIB::netSnmpExperimental s "test"
This slightly non-optimal Net-SNMP syntax will attempt to send an SNMP trap to localhost using the public community and some nonsense OID. It will also wait for a response to verify that snmptrapd has received the trap successfully—this is achieved by the -Ci flag. It uses the default port, 162, so make sure the port is open in your firewall configuration on the Zabbix server to receive traps.
If the command is successful, it will finish without any output. If it fails with the snmpinform: Timeout error message, then several things could have gone wrong. As well as double-checking that UDP port 162 is open for incoming data, verify that the community in the /etc/snmp/snmptrapd.conf file matches the one used in the snmptrap command and that the snmptrapd daemon is actually running.
If everything goes well, we should be able to see this item with a value on the latest data page:
Now, let's send a different trap. Still on the Zabbix server, run this:
$ snmptrap -Ci -v 2c -c public localhost "" "NET-SNMP-MIB::netSnmpExperimental" NET-SNMP-MIB::netSnmpExperimental s "some other trap"
This trap will not appear in the item we created. What happened to it? As the value that we sent did not contain the string test, this value did not match the one in the item. By default, such traps are logged in the server logfile. If we check the logfile, it should have something similar to the following:
9872:20160318:232004.319 unmatched trap received from "127.0.0.1": 23:20:02 2016/03/18 PDU INFO:
 requestid                      253195749
 messageid                      0
 transactionid                  5
 version                        1
 notificationtype               INFORM
 community                      public
 receivedfrom                   UDP: [127.0.0.1]:54031→[127.0.0.1]:162
 errorindex                     0
 errorstatus                    0
VARBINDS:
 DISMAN-EVENT-MIB::sysUpTimeInstance type=67 value=Timeticks: (2725311) 7:34:13.11
 SNMPv2-MIB::snmpTrapOID.0      type=6  value=OID: NET-SNMP-MIB::netSnmpExperimental
 NET-SNMP-MIB::netSnmpExperimental type=4  value=STRING: "some other trap"
This is not so easy to trigger on, or even see in, the frontend at all. We will improve the situation and tell Zabbix to handle such unmatched traps for this host by placing them in a special item. Navigate to Configuration | Hosts, click on Items next to A test host, click on Create item, and then fill in these values:
- Name:
SNMP trap fallback - Type: SNMP trap
- Key:
snmptrap.fallback - Type of information: Character
When you're done, click on the Add button at the bottom.
The key we used here, snmptrap.fallback, is a special one. Any trap that does not match any of the snmptrap[] items will be placed here. Retry sending our previously unmatched trap:
$ snmptrap -Ci -v 2c -c public localhost "" "NET-SNMP-MIB::netSnmpExperimental" NET-SNMP-MIB::netSnmpExperimental s "some other trap"
Let's check the latest data page again:

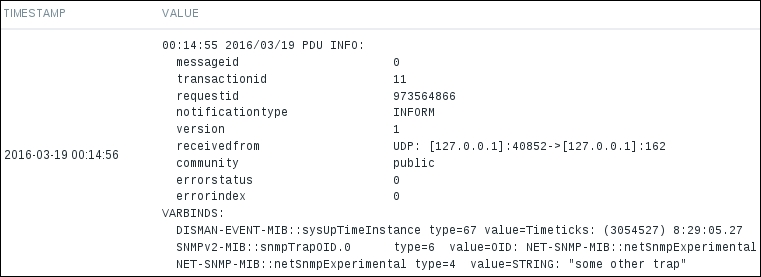
The fallback item got the value this time. To see what the value looks like, let's click on the History link next to one of these items:

It contains quite a lot of information, but it also looks a bit strange, almost as if the value was cut. Turns out, with this method, the trap information that is recorded in the database is quite verbose and the character information type does not offer enough space for it—this type is limited to 255 characters. We cannot even see the string we sent in the trap that matched or failed to match the filter. Let's try to fix this with the mass update functionality again. Go to Configuration | Hosts and click on Items next to A test host. Mark the checkboxes next to both SNMP trap items and click on the Mass update button. In the resulting form, mark the checkbox next to Type of information and choose Text:
Click on the Update button. This should have fixed it, but we don't know that for sure yet. Let's verify—send both of these traps again:
$ snmptrap -Ci -v 2c -c public localhost "" "NET-SNMP-MIB::netSnmpExperimental" NET-SNMP-MIB::netSnmpExperimental s "test"
$ snmptrap -Ci -v 2c -c public localhost "" "NET-SNMP-MIB::netSnmpExperimental" NET-SNMP-MIB::netSnmpExperimental s "some other trap"
If we look at the history of one of these items now, we will see that this change has indeed helped, and much more information is displayed—including the custom string we used for distributing these values across items:
The first item we created, with the snmptrap[test] key, can actually have a regular expression as the item parameter. This allows us to perform more advanced filtering, such as getting a link up and down traps in a single item. If a trap matches expressions from multiple items, it would get copied to all of those items.
We figured out how to get values in specific items, but how did Zabbix know that it should place these values in A test host? This happens because the address of the host that the trap came from matches the address in the SNMP interface for these items. To test this, let's copy the trap items to Another host. Navigate to Configuration | Hosts and click on Items next to A test host. Mark the checkboxes next to both SNMP trap items and click on the Copy to button. Choose Hosts from the Target type dropdown and mark the checkbox next to Another host. Then, click on Copy.

Looks like that failed, and Zabbix complains that it can not find an interface. Another host did not have an SNMP interface; thus, these items can not be attached to any interface at all. Go to Configuration | Hosts, click on Another host, then add a new SNMP interface with the address that this host has, and click on Update. Try to copy the SNMP trap items from A test host to Another host the same way as done previously, and it should succeed now:

With the items in place, let's test them. Send two test traps from Another host, the same way we sent them from the Zabbix server before:
$ snmptrap -Ci -v 2c -c public <Zabbix server> "" "NET-SNMP-MIB::netSnmpExperimental" NET-SNMP-MIB::netSnmpExperimental s "test"
$ snmptrap -Ci -v 2c -c public <Zabbix server> "" "NET-SNMP-MIB::netSnmpExperimental" NET-SNMP-MIB::netSnmpExperimental s "some other trap"
Replace <Zabbix server> with the IP or DNS name of the Zabbix server. These commands should complete without any error messages.
The traps should be placed properly in the items on Another host.
If traps do not arrive at all or do not fall into the correct items, there are a few things to check. If the traps do not appear when sent from a remote host, but work properly when sent from the Zabbix server, check the local firewall on the Zabbix server and make sure incoming UDP packets on port 162 are allowed. Also make sure that the IP address the Zabbix server sees in the incoming traps matches the address in the SNMP interface for that host.
Sometimes, one might see that traps arrive at the SNMP trap daemon but do not seem to be passed on. It might be useful to debug snmptrapd in this case—luckily, it allows a quite detailed debug output. Exact values to use for various file locations will differ, but the following might work to manually start the daemon while enabling all debug output:
# /usr/sbin/snmptrapd -A -Lf /var/log/net-snmpd.log -p /var/run/snmptrapd.pid -DALL
Here, -Lf specifies the file to log to and -DALL tells it to enable full debug.
If the received trap is in a numeric format and not very readable, you might have to add specific MIBs to the /etc/snmp/snmp.conf file so that they are found by snmptrapd.
What happens if Zabbix decides that a trap does not belong to any item on any host? This could happen because there are no trap items at all, the fallback item is missing, or the address in the incoming trap is not matched with any of the SNMP interfaces. By default, the Zabbix server logs such traps in the logfile. An example record from the logfile is as follows:
  2271:20150120:124156.818 unmatched trap received from [192.168.168.192]: 12:41:55 2015/01/20 PDU INFO:
  errorindex                     0
  transactionid                  1
  requestid                      1752369294
  messageid                      0
  receivedfrom                   UDP: [192.168.168.192]:45375->[192.168.1.13]:162
  errorstatus                    0
  version                        1
  notificationtype               INFORM
  community                      public
VARBINDS:
  DISMAN-EVENT-MIB::sysUpTimeInstance type=67 value=Timeticks: (77578087) 8 days, 23:29:40.87
  SNMPv2-MIB::snmpTrapOID.0      type=6  value=OID: NET-SNMP-MIB::netSnmpExperimental
  NET-SNMP-MIB::netSnmpExperimental type=4  value=STRING: "non-matching trap"
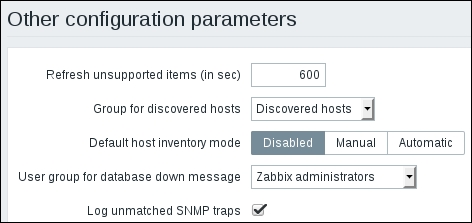
The logging of non-matching traps can be controlled. If we go to Administration | General and choose Other from the dropdown in the upper-right corner, the last checkbox there is Log unmatched SNMP traps. Unmarking it will stop logging such traps:
And what if you would like to try out Zabbix's SNMP trap handling without setting up an SNMP trap daemon, perhaps on some development server? That should be very easy as you can simply append trap information to the temporary file. It's a plaintext file, and Zabbix does not know who added content, the trap daemon, user, or somebody else. Just make sure to add all the data for a single trap in one go.
The temporary file to pass traps from the trap daemon to Zabbix is placed in /tmp by default. This is not the best practice for a production setup, so I suggest you change it once you are satisfied with the initial testing.
Note that the temporary file can grow indefinitely—Zabbix only reads data from it, and never rotates or removes the file. Rotation should be set up separately, probably with the logrotate daemon.
Zabbix may also receive traps that are parsed by SNMP Trap Translator (SNMPTT, http://www.snmptt.org/). This method uses the same temporary file and internal process approach as the embedded Perl trap receiver solution. SNMPTT can be useful for making received data human-readable.
Remember that it changes passed data, so depending on how things are set up, adding SNMPTT might require changes to item mapping, triggers, or other configuration.
The method covered earlier, the embedded Perl receiver, is easy to set up and performs well. If it is not possible to use it for some reason or some advanced filtering is required, a custom script could push trap values to items. This subsection will use an example script shipped with Zabbix to demonstrate such a solution.
We'll place the example SNMP trap parsing script in the Zabbix user's home directory:
# cp misc/snmptrap/snmptrap.sh /home/zabbix/bin
Let's take a look at that script now. Open the file we just copied to /home/zabbix/bin/snmptrap.sh. As you can see, this is a very simplistic script, which gets passed trap information and then sends it to the Zabbix server, using both host snmptrap and key snmptrap instances. If you are reading carefully enough, you've probably already noticed one problem: we didn't install any software as ~zabbix/bin/zabbix_sender, so that's probably wrong.
First, let's find out where zabbix_sender is actually located:
$ whereis zabbix_sender
zabbix_sender: /usr/local/bin/zabbix_sender
On this system, it's /usr/local/bin/zabbix_sender. It might be a good idea to look at its syntax by running this:
$ zabbix_sender --help
This allows you to send a value to the Zabbix server, specifying the server with the -z flag, port with -p, and so on. Now let's return to the script. With our new knowledge, let's look at the last line—the one that invokes zabbix_sender. The script seems to pass values retrieved from the SNMP trap as parameters to zabbix_sender; thus, we can't make any decisions and information transformation between snmptrapd and Zabbix. Now, let's fix the problem we noticed:
- Change
ZABBIX_SENDERto read/usr/local/bin/zabbix_sender(or another path if that's different for you) - Additionally, change the last line to read
$ZABBIX_SENDER -z $ZABBIX_SERVER -p $ZABBIX_PORT -s "$HOST" -k "$KEY" -o "$str"—this way, we are also quoting host and key names, just in case they might include spaces or other characters that might break command execution
Save the file. Let's prepare the Zabbix side now for trap receiving. On the frontend, navigate to Configuration | Hosts and click on Create host. Fill in the following values:
Click on the Add button at the bottom. Notice that the hostname used here, snmptraps, must be the same as the one we configured in the snmptrap.sh script; otherwise, the traps won't be received in Zabbix.
Now, click on Items next to the snmptraps host, and then click on Create item. Enter these values:
- Name:
Received SNMP traps - Type: Zabbix trapper
- Key:
snmptraps - Type of information: Character
When you are done, click on the Add button at the bottom. Again, notice how we used the exact same key spelling as in the snmptrap.sh script.
We're done with configuring Zabbix for SNMP trap receiving, but how will the traps get to the script we edited and, in turn, to Zabbix? The same as before, this is where snmptrapd steps in.
Let's create a simplistic configuration that will pass all the received traps to our script. To do this, we will edit snmptrapd.conf. If you created it earlier, edit it (you may comment out the lines we added previously); if it's missing, create the file. Edit it as root and make it look as follows:
authCommunity execute public
#perl do "/home/zabbix/bin/zabbix_trap_receiver.pl";
traphandle default /bin/bash /home/zabbix/bin/snmptrap.sh
We commented out the Perl receiver line and added a line to call our new script. The default keyword will make sure that all received traps go to this script (that is, unless we have other traphandle statements with OIDs specified, in which case only those received traps will get to this script that don't match any other traphandle statement). Save this file, and then start or restart the snmptrapd daemon as appropriate for your distribution.
Now, we should be able to receive SNMP traps through all the chain links. Let's test that by sending a trap same the way as before from the Zabbix server:
$ snmptrap -Ci -v 2c -c public localhost "" "NET-SNMP-MIB::netSnmpExperimental" NET-SNMP-MIB::netSnmpExperimental s "test"
Once the command completes successfully, check the frontend for the results. Go to Monitoring | Latest data and select SNMP devices in the filter:
Great, data from our test trap has been received here. It's trimmed in the table view, though, so click on History to view all of it:

Excellent, we can see our trap in its entirety. Notice how with this custom script we decided to parse out only the specific string, instead of pushing all the details about the trap to Zabbix. Let's check what it looks like with several traps received one after another. From the console again, execute the following:
$ snmptrap -Ci -v 2c -c public localhost "" "NET-SNMP-MIB::netSnmpExperimental" NET-SNMP-MIB::netSnmpExperimental s "another test"
Refresh the History screen we had open in the browser and check whether the result is satisfactory:

Our latest trap is nicely listed, with entries being ordered in descending order.
But wait, everything after the first space is missing from the informative text. That's not desirable, so let's try to fix this problem. As root, open the /home/zabbix/bin/snmptrap.sh file and look for the line that strips out addresses from received information:
oid=`echo $oid|cut -f2 -d' '`
address=`echo $address|cut -f2 -d' '`
community=`echo $community|cut -f2 -d' '`
enterprise=`echo $enterprise|cut -f2 -d' '`
As seen here, when using a space as the separator, only the second field is grabbed. We want the full details captured instead, as otherwise, A Very Important Failure would simply show up as A for us. Let's add a dash to the field parameter so that all trailing fields are captured as well:
address=`echo $address|cut -f2- -d' '`
This should solve the problem, so let's test it again:
$ snmptrap -Ci -v 2c -c public localhost "" "NET-SNMP-MIB::netSnmpExperimental" NET-SNMP-MIB::netSnmpExperimental s "A Very Important Failure"
Return to the frontend and refresh the history listing:

Finally! The data from our important traps won't be lost anymore.
While that is great for receiving all traps in a single location, it also makes traps harder to correlate to particular hosts, and especially hard to observe if you have lots and lots of trap-sending hosts. In such a case, it becomes very desirable to split incoming traps in some sort of logical structure, similar to the way we did with the Perl receiver solution earlier. At the very least, a split based on existing hosts can be performed. In this case, all received traps would be placed in a single item for that host. If there are particular traps or trap groups that are received very often or are very important, these can be further split into individual items.
For example, if a network switch is sending various traps, including link up and down ones, we'll probably want to place these in a single item so they do not obscure other traps that much. If the switch has many workstations connected that are constantly switched on and off, we might even want to drop these traps before they reach Zabbix. On the other hand, if this switch has very important connections that should never go down, we might even go as far as creating an individual item for notifications coming from each port.
All the methods work by either replacing, improving, or hooking into the handler script, snmptraps.sh.
One way to approach trap distribution is to create custom mappings that choose an appropriate destination for the trap depending on any parameters, including source host, OID, and trap details. Such mapping, while being relatively cumbersome to set up, is also the most flexible, as you can perform all kinds of specific case handling. It also requires double configuration—most changes have to be made both to the Zabbix configuration and to these mappings.
Custom mapping can use file-based lookup, a separate database, or any other kind of information storage.
Another method is to tap into existing knowledge, through the Zabbix database. As the database already holds information on host/IP address relationships, we can simply look up the corresponding hostname. Let's modify snmptraps.sh so that all traps coming from hosts defined in Zabbix end up in an snmptraps item for that specific host, but other traps are collected in the generic snmptraps host instead.
Start by modifying /home/zabbix/bin/snmptraps.sh and adding two lines:
oid=`echo $oid|cut -f11 -d'.'`
community=`echo $community|cut -f2 -d'"'`
zabbixhost=$(HOME=/root mysql -N -e "select host from zabbix.hosts left join zabbix.interface on zabbix.hosts.hostid=zabbix.interface.hostid where ip='$hostname' order by 'hostid' limit 1;" 2>/dev/null)
[[ $zabbixhost ]] && HOST=$zabbixhost
str="$hostname $address $community $enterprise $oid"
$ZABBIX_SENDER $ZABBIX_SERVER $ZABBIX_PORT -s "$HOST" -k "$KEY" -o "$str"
So what do these do? The first line queries the MySQL database and checks whether a host is defined with the same IP as the trap source. If it is, the Zabbix host variable gets the hostname, as defined in Zabbix, assigned. Returned results are sorted by host ID and only the first match is taken. Thus, if there are multiple hosts with the same IP address (which is perfectly fine in Zabbix), only the oldest entry is selected. Any error output is discarded (redirected to /dev/null), so in case of a database misconfiguration, traps are not lost but end up in the generic trap-handling host.
The second line simply sets the host used for sending data to Zabbix to the entry returned from the database, if it exists.
But what's that HOME variable in the first line? The mysql command used there does not specify user, password, or any other connection information, so for the command to succeed, it would have to get this information from somewhere. For MySQL, this information can be placed in the .my.cnf file located in the user's HOME directory. Given that snmptrapd runs as root, but services often do not get all the environment variables normal logins do, we are directing further commands to look in /root for that file.
This means we're not done yet; we have to create the /root/.my.cnf file and fill it with the required information. As root, create /root/.my.cnf and place the following content in it:
[client]
user=zabbix
password=mycreativepassword
For the password, use the same one you used for the Zabbix server and frontend (if you don't remember this password, you can look it up in zabbix_server.conf).
Now, we should prepare for trap receiving on the Zabbix side. Open Configuration | Hosts, click on Items next to Another host, and then click on the Create item button. Enter these values:
- Name:
snmptraps - Type: Zabbix trapper
- Key:
snmptraps - Type of information: Character
When you are done, click on the Add button at the bottom.
Before we send a test trap, let's do one more thing: make sure that snmptrapd does not perform reverse lookups on received traps. While that might slightly decrease the prettiness of the data, we want to keep this script simple for now and this will also improve performance a bit. To do this, add the -n flag for snmptrapd to the startup scripts and restart it. This procedure is distribution specific.
Finally, we are ready to test our tricky setup. From Another host, execute this:
$ snmptrap -Ci -v 2c -c public <Zabbix server> "" "NET-SNMP-MIB::netSnmpExperimental" NET-SNMP-MIB::netSnmpExperimental s "test"
Replace <Zabbix server> with the IP or DNS name of the Zabbix server. This command should complete without any error messages.
Back in the frontend, navigate to Monitoring | Latest data:

Great, snmptrap instances are now successfully sorted by host, if present.
In case this trap was not sorted properly and still went into the snmptraps host, it could be caused by different output in some Net-SNMP versions. Instead of passing the IP address or hostname of the incoming connection as the first value, they pass a string like this:
UDP: [192.168.56.11]:56417->[192.168.56.10]:162
In that case, try adding another line before the zabbixhost assignment:
oid=`echo $oid|cut -f11 -d'.'`
community=`echo $community|cut -f2 -d'"'`
hostname=$(echo "$hostname" | awk -F'[][]' '{print $2}')
It will extract the first string enclosed in square brackets from the hostname variable. After making this change to the script, send the trap again.
That took us some time to set up, but now it's very simple. If we want traps from some host to be handled by a specific host, we create that host and an snmptraps item for it. All other traps go to the generic snmptraps host and snmptraps item.
But what about item lookup? The database holds information on item keys as well, so perhaps we could try using that.
We need to retrieve the item key from any database field based on the information received in the trap. As traps include SNMP OIDs, they are the best candidates to map traps against items. Now, the OID can be in numeric or textual form. In the Zabbix configuration, we have two fields that could be used:
- Name: While pretty much a freeform field, it is a "friendly name," so we'd better keep it human-readable.
- Key: This field has more strict rules on the characters it accepts, but OIDs should be fine. While not used by humans much, this field is still referred to in the trigger expressions.
That means we will use the Key field. To keep it both short enough and somewhat human-readable, we'll set it to the last part of the received textual-form OID. As the trap will be received by snmptraps.sh, it will try to match the received OID to the item key and based on that decide where to send the data.
Again, as root, edit the /home/zabbix/bin/snmptraps.sh script. Replace the two lines we just added, so that it looks like this:
community=`echo $community|cut -f2 -d' '`
enterprise=`echo $enterprise|cut -f2 -d' '`
oid=`echo $oid|cut -f11 -d'.'`
community=`echo $community|cut -f2 -d'"'`
hostname=$(echo "$hostname" | awk -F'[][]' '{print $2}')
zabbixhostid=$(HOME=/root mysql -N -e "select hosts.hostid,host from
zabbix.hosts left join zabbix.interface on
zabbix.hosts.hostid=zabbix.interface.hostid where ip='$hostname' order
by 'hostid' limit 1;" 2>/dev/null)
zabbixhost=$(echo $zabbixhostid | cut -d" " -f2-)
[[ "$zabbixhost" ]] && {
zabbixid=$(echo $zabbixhostid | cut -d" " -f1)
trapoid=$(echo $oid | cut -d: -f3)
if [ "$trapoid" ]; then
zabbixitem=$(HOME=/root mysql -N -e "select key_ from
zabbix.items where key_='$trapoid' and hostid='$zabbixid';" 2> /dev/null)
if [ "$zabbixitem" ]; then
HOST=$zabbixhost
KEY=$zabbixitem
fi
fi
}
[[ $KEY = snmptraps ]] && {
if [ "$(HOME=/root mysql -N -e "select key_ from zabbix.items where
key_='snmptraps' and hostid='$zabbixid';" 2> /dev/null)" ]; then
HOST=$zabbixhost
fi
}
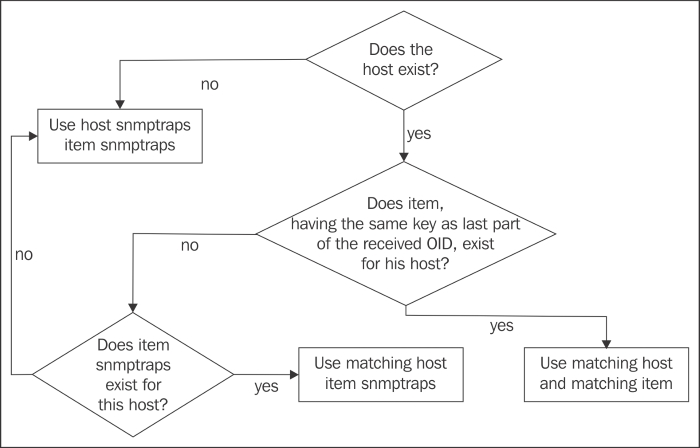
str="$hostname $address $community $enterprise $oid"Save the file. Functionally, for our current configuration, it will work exactly the same as the previous version, with one minor improvement: if you look at the previous version carefully, you'll see it only checks for host availability, so if you created a host but forgot to create an item with the snmptraps key for it, the sent trap would be lost. This version will check whether an item with such a key exists for that host. If not, the generic host, snmptraps, will receive the trap.
Note that this is one benefit of the custom-script solution over the embedded Perl trap receiver we configured earlier. It is easier to have triggers for traps landing in this fallback host than checking for them in the Zabbix server logfile.
Additionally, it will now check whether the host also has an item with a key, matching the last part of the OID received. A simple decision flow representation is shown in the following figure:
To test this, send an SNMP trap from Another host (there is no need to restart snmptrapd):
$ snmptrap -Ci -v 2c -c public <Zabbix server> "" "NET-SNMP-MIB::netSnmpExperimental" NET-SNMP-MIB::netSnmpExperimental s "test"
Replace <Zabbix server> with the Zabbix server's IP or DNS name. If you now check Monitoring | Latest data for Another host, the trap should be correctly placed in the snmptraps item for this host. A trap sent from any other host, including the Zabbix server, should be placed in the snmptraps host and snmptraps item—feel free to try this out. Previously, a trap sent from the Zabbix server would be lost, because the script did not check for the snmptraps item's existence—it would find the host and then try to push the data to this nonexistent item.
Let's try out our item mapping now. Go to the Zabbix interface, Configuration | Hosts, click on Items next to Another host, and click on the Create item button. Fill in these values:
- Name:
Experimental SNMP trap - Type: Zabbix trapper
- Key:
netSnmpExperimental - Type of information: Character
When you're done, click on the Add button at the bottom. Again, send a trap from Another host:
$ snmptrap -Ci -v 2c -c public <Zabbix server> "" "NET-SNMP-MIB::netSnmpExperimental" NET-SNMP-MIB::netSnmpExperimental s "test"
In the frontend, look at Monitoring | Latest data. If all went right, this time the trap data should have been placed in yet another item—the one we just created:
Now, whenever we have a host that will be sending us traps, we will have to decide where we want its traps to go. Depending on that, we'll decide whether it needs its own host with an snmptraps item, or perhaps even individual items for each trap type.