
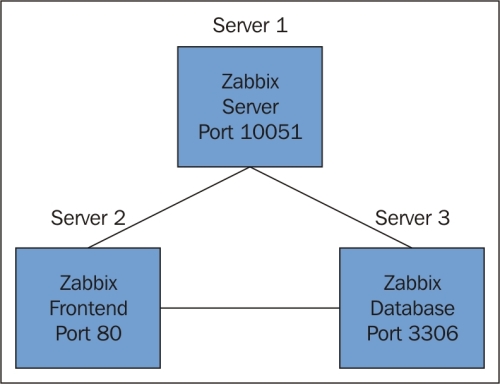
Next, we will see how to install the Zabbix server in a distributed way. This means that we will install all three components on different servers. In big setups, this can be a win as the frontend, Zabbix server, and database will have their own hardware.
For this setup to work, we need three machines, all with the latest version from Red Hat 6.x or CentOS 6.x with proper host name resolution, either by Domain Name System (DNS) or by host file. In this setup, I will talk about the setup of the server, db, and frontend. This time, we will disable SELinux on all machines as it is slightly more complicated and out of the scope of this book.
- First thing to do is add on every host the Zabbix repository from Zabbix like we have done with our server installation. Remember the repository can be found in the Zabbix installation manual under installation from package.
- On the DB server we install, of course, the MySQLserver:
# yum install  mysql-server
# service mysqld start
# /usr/sbin/mysql_secure_installation (same options as before)
# chkconfig mysqld on
- Open the firewall on the database server and disable SELinux on all servers:
# iptables -I INPUT 5 -m state --state NEW -m tcp -p tcp -- dport 3306 -j ACCEPT
# iptables save
# service iptables restart
# vi /etc/selinux/config
- Change the next value to
permissive:# SELINUX=permissive - Reboot the database server so that SELinux is disabled or type from the prompt:
# setenforce 0 - Next thing we do is create our database and grant rights to it. When granting rights, don't forget to give rights to the Zabbix user from the Zabbix server as our connection is not alone from localhost but also from the server:
# mysql -u root -p
mysql> create database zabbix character set utf8 collate utf8_bin;
mysql> grant all privileges on zabbix.* to zabbix@localhost identified by 'some_password';
mysql> grant all privileges on zabbix.* to zabbix@server-ip identified by 'some_password';
mysql> grant all privileges on zabbix.* to zabbix@frontend-ip identified by 'some_password';
mysql> exit
- Next thing we have to do is upload the correct schemas for the Zabbix installation. For this, we have to copy the schemas from the Zabbix server or install the
zabbix-mysql-serverpackage:# cd /usr/share/doc/zabbix-server-mysql-2.4.x/create # mysql -uroot zabbix < schema.sql # mysql -uroot zabbix < images.sql # mysql -uroot zabbix < data.sql
- Now on the server, install the Zabbix server:
# yum install zabbix-server zabbix-server-mysql
# chkconfig zabbix-server on
- Edit the Zabbix server configuration file:
# vi /etc/zabbix/zabbix_server.conf
DBHost=<ip of the db>
DBName=zabbix
DBUser=zabbix
DBPassword=<some password>
#DBSocket=/var/lib/mysql/mysql.sock (put this in comment) DBPort=3306
- Start the Zabbix server and check the log file if there are no errors logged:
# service zabbix-server start
# tail /var/log/zabbix/zabbix_server.log
- Open port
10051on the firewall:# iptables -I INPUT 5 -m state --state NEW -m tcp -p tcp -- dport 10051 -j ACCEPT # iptables save # service iptables restart
- Install the frontend on the server:
# yum install zabbix-web-mysql
# chkconfig httpd on
- Uncomment the
timezonevalue and replaceRigawith your location:# vi /etc/httpd/conf.d/zabbix.conf php_value date.timezone Europe/Riga
- Open port
80on the firewall:# iptables -I INPUT 5 -m state --state NEW -m tcp -p tcp -- dport 80 -j ACCEPT # iptables save # service iptables restart # service httpd start
- Now let's open our browser and go to the frontend server:
# http://frontend/zabbixAfter the first screens with the PHP option check if we get our screen with the connection settings for the database. Fill in the name or IP of our DB server with the DB name, username, and password:
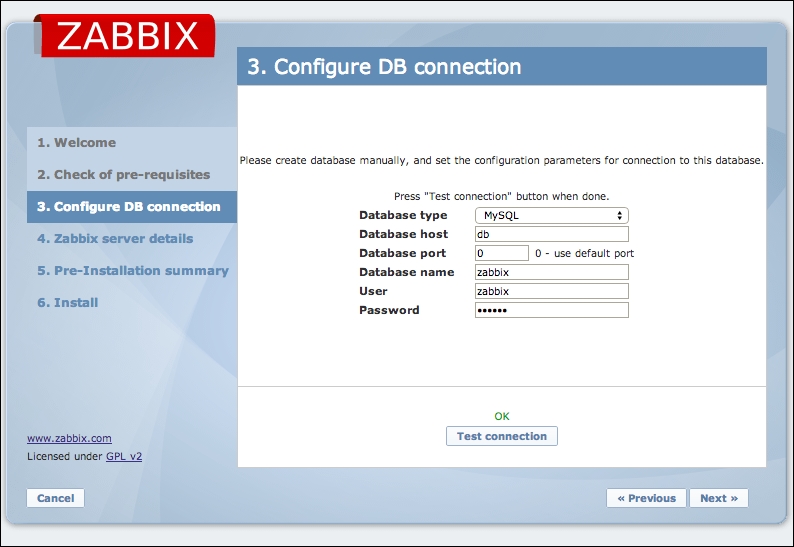
Test the connection to the database, in case of problems, you could try to connect from the shell:
# mysql -h <db ip> -u<username> -p<password> <db name>Or try to telnet
# telnet <db ip> <port> EX: telnet 192.168.1.5 3306When the connection tests are fine you can just click Next. This will bring us to the connection screen of the server as you can see in next screenshot.
- In the location of hostname, we have to fill in the hostname of our Zabbix server. The port is the port the server uses for the communication. Remember we have opened it in our firewall before? The port
10051is the standard port but can be changed in thezabbix_server.conffile in case you want to change this:
For the name, we can give anything that makes sense for our setup. Now when we click Next, our Zabbix server is up and running and we can log in with the standard login and password: Admin / zabbix.
Our Zabbix server, database and frontend are all installed on different servers. Because the database needs to be able to communicate with our server we had to open port 3306 in our firewall and grant the permissions, so that the server and frontend had rights to connect to our database.
The Zabbix server communicates on port 10051, so for the server, we had to open this port in the firewall on the Zabbix server.
Our frontend needs a web server so Apache was installed automatically when we installed the Zabbix package. To be able to see the Zabbix frontend, we had to open port 80 in the firewall.
As the frontend is not aware that we have installed a distributed setup we had to tell the frontend that our database was installed on another location and the same was done for the Zabbix server:
For the port of the database we did not put in 3306 port but 0. This way Zabbix knows that we have used the standard port. In case you changed it in your setup, you have to add the correct port instead of 0.
In case you edit the /etc/httpd/conf.d/zabbix.conf configuration file instead of making changes from the web interface, make sure that you don't remove the 0. If the port is empty, the configuration will not work.
Another issue occurs if Zabbix itself is down. Some companies make use of a small extra Zabbix server that monitors the Zabbix server. This is an easy, not too expensive option.
The setup of Zabbix as a virtual machine is also an option. Just make sure that the database in that case is on dedicated storage as a virtualized database on shared storage is not a good idea.
Yet another solution could be to build a cluster. The Zabbix server itself does not support a cluster setup but it can be done manually. There are several guides on how to do this available on the www.zabbix.org webpage.