
One of the few drawbacks of the whole Zabbix architecture is the lack of built-in security at the Zabbix protocol level. While it's possible to protect both the web frontend and the Zabbix API by means of a standard SSL layer to encrypt communications by relying on different authorities for identification, there's simply no standard way to protect communication between the agents and the server, between proxies and the server, or among nodes. There's no standard way even when it comes to message authentication (the other party is indeed who it says it is), when it comes to message integrity (the data has not been tampered with), or when it comes to message confidentiality (no one else can read or understand the data).
If you've been paying attention to the configuration details of agents, proxies, and nodes, you may have noticed that all that a Zabbix component needs to know in order to communicate with another component is its IP address. No authentication is performed as relying on only the IP address to identify a remote source is inherently insecure. Moreover, any data sent is clear text as you can easily verify by running tcpdump (or any other packet sniffer):
$  zabbix_sender -v -z 10.10.2.9 -s alpha -k sniff.me -o "clear text data"

$ tcpdump  -s0 -nn -q -A port 10051
00:58:39.263666 IP 10.10.2.11.43654 > 10.10.2.9.10051: tcp 113
E....l@[email protected]...........'C..."^......V.......
.Gp|.Gp|{
      "request":"sender data",
      "data":[
            {
              "host":"alpha",
              "key":"sniff.me",
              " value":"clear text data"}]}
Certainly, simple monitoring or configuration data may not seem much, but at the very least, if tampered with, it could lead to false and unreliable monitoring.
While there are no standard counter measures to this problem, there are a few possible solutions to it that increase in complexity and effectiveness from elementary, but not really secure, to complex and reasonably secure. Keep in mind that this is not a book on network security, so you won't find any deep, step-by-step instructions on how to choose and implement your own VPN solution. What you will find is a brief overview of methods to secure the communication between the Zabbix components, which will give you a practical understanding of the problem, so you can make informed decisions on how to secure your own environment.
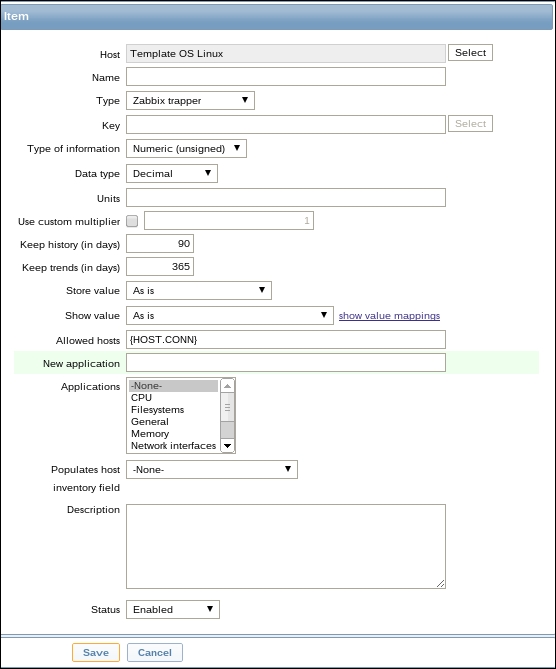
If, for any reason, you can do absolutely nothing else, you should, at the very least, specify a source IP for every Zabbix trapper item so that it wouldn't be too easy and straightforward to spoof monitoring data using the zabbix_sender utility. Use macro {HOST.CONN} in a template item so that every host will use its own IP address automatically:
More importantly, make sure that remote commands are not allowed on agents. That is, EnableRemoteCommands in the zabbix_agentd.conf file must be set to 0. You may lose a convenient feature, but if you can't protect and authenticate the server-agent communication, the security risk is far too great to even consider taking it.
Many environments have a management network that is separated and isolated from your production network via nonrouted network addresses and VLANs. Network switches, routers, and firewalls typically handle traffic on the production network but are reachable and can be managed only through their management network address. While this makes it a bit less convenient to access them from any workstation, it also makes sure that any security flaw in your components (consider, for example, a network appliance that has a faulty SSL implementation that you can't use, doesn't support SNMP v3, or has Telnet inadvertently left open) is contained in a separated and difficult-to-reach network. You may want to put all of the server-proxy and master-child communication on such an isolated network. You are just making it harder to intercept monitoring data and you may be leaving out the server-agent communication, but isolating traffic is still a sensible solution even if you are going to further encrypt it with one of the solutions outlined in the following sections.
On the other hand, you certainly don't want to use this setup for a node or proxy that is situated in a DMZ or another segregated network. It's far more risky to bypass a firewall through a management network than to have your monitoring data pass through the said firewall. Of course, this doesn't apply if your management network is also routed and controlled by the firewall, but it's strongly advised that you verify that this is indeed the case before looking into using it for your monitoring data.
So far, we haven't really taken any measures to secure and encrypt the actual data that Zabbix sends or receives. The simplest and most immediate way to do that is to create an ad hoc encrypted tunnel through which you can channel your traffic.
Fortunately, Secure Shell (SSH) has built-in tunneling abilities, so if you have to encrypt your traffic in a pinch, you already have all the tools you need.
To encrypt the traffic from an active proxy to the server, just log on to the proxy's console and issue a command similar to the following one:
$ ssh -N -f [email protected] -L 10053:localhost:10051
In the preceding command, -N means that you don't want the SSH client to execute any commands other than just routing the traffic; the -f option makes the SSH client go into the background (so you don't have to keep a terminal open or keep a start script executing forever); [email protected] is a valid user (and the real hostname or IP address) on the Zabbix server, and -L port:remote-server:port sets up the tunnel. The first port number is what your local applications will connect to, while the following host:port combination specifies what host and TCP port the SSH server should connect to at the other end of the tunnel.
Now set your Server and ServerPort options in your zabbix_proxy.conf to localhost and 10053 respectively.
What will happen is that, from now on, the proxy will send data to port 10053 by itself, where there's an SSH tunnel session waiting to forward all traffic via the SSH protocol to the Zabbix server. From there, the SSH server will, in turn, forward it to a local port 10051 and, finally, to the Zabbix daemon. While all of the Zabbix components don't natively support data encryption for the Zabbix protocol, you'll still be able to make them communicate while keeping message integrity and confidentiality; all you will see on the network with such a setup will be standard, encrypted SSH traffic data on the TCP port 22.
To make a Zabbix server contact a passive proxy via a tunnel, just set up a listening SSH server on the proxy (you should already have it in order to remotely administrate the machine) and issue a similar command as the one given earlier on the Zabbix server, making sure to specify the IP address and a valid user for the Zabbix proxy. Change the proxy's IP address and connection-port specifications on the web frontend, and you are done.
To connect to Zabbix nodes, you need to set up two such tunnels, one from the master to the child and one from the child to the master.
On the master, run the following command:
$ ssh -N -f [email protected] -L 10053:localhost:10051
On the child, run the following command:
$ ssh -N -f [email protected] -L 10053:localhost:10051
ssh -o ServerAliveInterval=60 -N -f user@zabbix.[child|master] -L 10053:localhost:10051
In the above example, we've seen how to set keep-alive packets; the value of ServerAliveInterval is expressed in seconds and represents the frequency used to send packets to maintain alive the session. Also, it would be a good practice to monitor this channel, and if there are issues, to kill the broken SSH process and restart it.
Similar functionalities can be obtained using the stunnel program. The main advantage of using stunnel over SSH is that, with stunnel, you have a convenient configuration file where you can set up and store all your tunneling configurations, while with SSH, you'll have to script the preceding commands somehow if you want the tunnels to be persistent across your machine's reboots.
Once installed, and once you have created the copies of the obtained SSL certificates that the program needs, you can simply set up all your port forwarding in the /etc/stunnel/stunnel.conf file. Considering, for example, a simple scenario with a Zabbix server that receives data from an active proxy and exchanges data with another node after having installed stunnel and SSL certificates on all three machines, you could have the following setup.
On the Zabbix server's stunnel.conf file, add the following lines:
[proxy]
accept = 10055
connect = 10051

[node - send]
accept = localhost:10057
connect = node.server:10057

[node – receive]
accept = 10059
connect = 10051
On the Zabbix proxy's stunnel.conf, add the following lines:
[server]
accept = localhost:10055
connect = zabbix.server:10055
On the other node's stunnel.conf, add the following lines:
[node - send]
accept = localhost:10059
connect = node.server:10059

[node – receive]
accept = 10057
connect = 10051
Just remember to update the host and port information for proxies and servers in their respective configuration files and web frontend forms.
As you can see, the problem with port-forwarding tunnels is that the more tunnels you set up, the more different ports you have to specify. If you have a large number of proxies and nodes or if you want to encrypt the agent data as well, all the port forwarding will quickly become cumbersome to set up and keep track of. This is a good solution if you just want to encrypt your data on an insecure channel among a handful of hosts, but if you want to make sure that all your monitoring traffic is kept confidential, you'll need to resort to a more complete VPN implementation.
This is not the place to discuss the relative merits of different VPN implementations, but if you do use a VPN solution in your network, consider switching all Zabbix monitoring to your encrypted channel. Of course, unless you want the whole world to look at your monitoring data, this is practically mandatory when you link two nodes or a server and a proxy from distant geographical locations that are connected only through the Internet. In that case, you hopefully already have a VPN, whether a simple SSL one or a full-blown IPsec solution. If you don't have it, protecting your Zabbix traffic is an excellent reason to set up one.
These workarounds will protect your traffic and, in the best-case scenario, will provide basic host authentication, but keep in mind that until Zabbix supports some sort of security protocol on the application level, tunneling and encryption will only be able to protect the integrity of your monitoring data. Any user who gains access to a Zabbix component (whether it's a server, proxy, or agent) will be able to send bogus data over the encrypted channel, and you'll have no way to suspect foul play. So, in addition to securing all communication channels, you also need to make sure that you have good security at the host level. Starting from Zabbix 3.0, the dialogue will support encryption done with TLS, and the support will be given between the server, agent, and proxy. Anyway, this will be available only from Zabbix 3.0. Until then, we will need to continue to use the alternatives explained in this chapter.