
The two basic elements of RT are tickets and queues. The function of a ticket is to keep track of the evolution of an issue. The basic workflow of the tracks' said evolution can be summarized in the following points:
- A ticket is created with the first description of the problem
- An operator takes ownership of the ticket and starts working on it
- The evolution of the problem is recorded in the ticket's history
- After the problem's resolution, the ticket is closed and archived
All of the ticket's metadata, from its creation date to the amount of time it took to close it, from the user who created it to the operator that worked on it, and so on, is recorded and grouped with all the other tickets' metadata in order to build statistics and calculate service-level agreements.
A queue, on the other hand, is a specific collection of tickets and a way to file new tickets under different categories. You can define different queues based on the different organization departments, different products you are providing support for, or any other criteria that can make it easier to organize tickets.
Let's see what we can do to configure RT queues and tickets so that we can transfer all the information we need to and from Zabbix, while keeping any existing functionality as a generic issue tracker as is.
A nice feature of queues is that from the fields that need to be filled out to the details of the workflow, you can customize every aspect of a ticket that belongs to a specific queue. The first step is, therefore, to create a specific queue for all tickets created from a Zabbix event action. This will allow us to define specific characteristics for the corresponding Zabbix tickets.
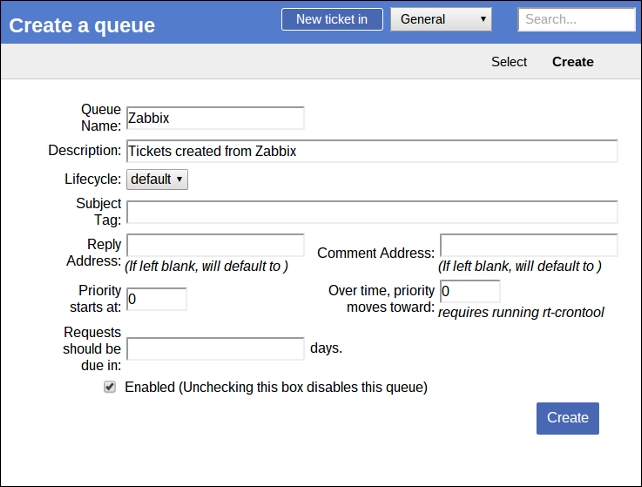
Creating a queue is quite simple. Just go to Admin | Queues | Create and fill in the form. For our purposes, you don't need to specify more than a name for the queue and an optional description, as shown in the following screenshot:
After the queue is created, you will be able to configure it further by going to Admin | Queues | Select and choosing the Zabbix queue. You should grant the user and staff rights to a user group or, at the very least, to some specific users so that your IT staff can work on the tickets created by Zabbix. You will also want to create custom fields, as we will see in a couple of paragraphs.
First, let's move on to look at what parts of a ticket are most interesting from an integrator's point of view.
Keeping in mind our goal to integrate Zabbix actions and events with RT, the Links section of a ticket is of particular interest to us. As the name suggests, you can define links to other tickets as dependencies or to other systems as further referrals. You can insert useful links during ticket creation or while editing it. The following screenshot shows this:
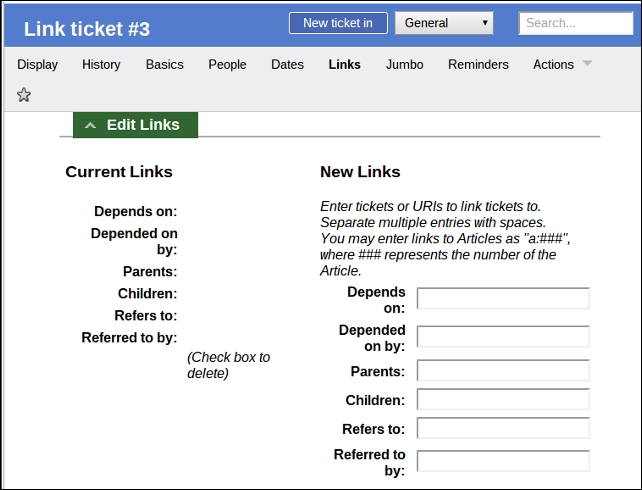
As you probably already imagined, we'll rely on the Refers to: link field to link back to the Zabbix event that created the ticket. As we will see in the following pages, the event's acknowledge field will, in turn, show a link to the corresponding ticket so that you can move easily from one platform to the other in order to keep track of what's happening.
Another interesting field in the Basics section of a ticket is the ticket's priority. It's an integer value that can be from 0 to 100, and it's quite useful to sort tickets depending on their severity level. There is no official mapping of RT priority and a few other descriptive severity levels, such as those used by the Zabbix triggers. This means that if you want to preserve information about trigger severity in the ticket, you have two choices:
- Ignore the ticket's priority and create a custom field that shows the trigger severity as a label
- Map the trigger severity values to the ticket's priority values as a convention, and refer to the mapping while creating tickets
The only advantage of the first option is that the single ticket will be easily readable, and you will immediately know about the severity of the corresponding trigger. On the other hand, the second option will allow you to sort your tickets by priority and act first on the more important or pressing issues with a more streamlined workflow.
While creating a ticket from Zabbix, our suggestion is, therefore, to set ticket priorities based on the following mapping:
|
Trigger severity label |
Trigger severity value |
Ticket priority value |
|---|---|---|
|
Not classified |
0 |
0 |
|
Information |
1 |
20 |
|
Warning |
2 |
40 |
|
Average |
3 |
60 |
|
High |
4 |
80 |
|
Disaster |
5 |
100 |
There is nothing to configure either on Zabbix's or on RT's side. This mapping will use the full range of priority values so that your Zabbix tickets will be correctly sorted not only in their specific queue, but also anywhere in RT.
As we have seen in Chapter 6, Managing Alerts, a Zabbix action can access a great number of macros and, thus, expose a lot of information about the event that generated it. While it makes perfect sense to just format this information in a readable manner while sending e-mails, with the availability of custom fields for RT tickets, it makes less sense to limit all of the event details just to the ticket description.
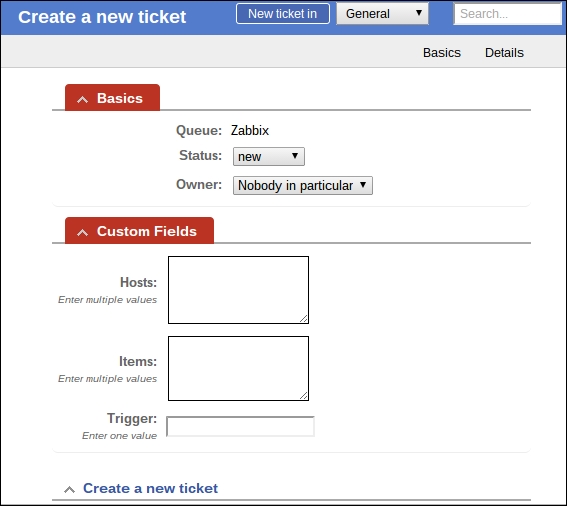
In fact, one great advantage of custom fields is that they are searchable and filterable just as any other native ticket field. This means that if you put the host related to a ticket event in a custom field, you'll be able to search all tickets belonging to the said host for reporting purposes, assign a host's specific tickets to a particular user, and so on. So, let's go ahead and create a couple of custom fields for the tickets in the Zabbix queue that will contain information, which we'll find useful later on. Go to Admin | Custom Fields | Create and create a Hosts custom field, as shown in the following screenshot:
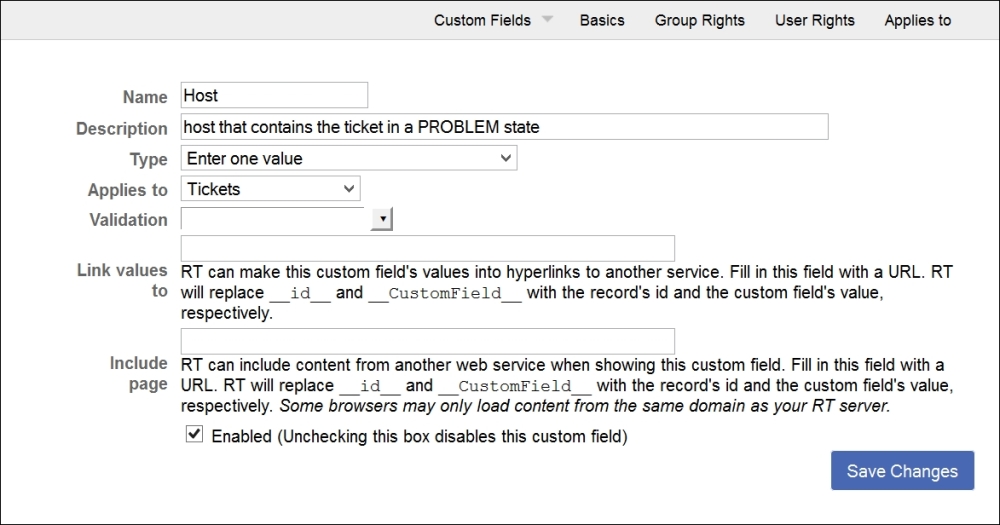
Make sure that you select Enter multiple values as the field type. This will allow us to specify more than a single host for those complex triggers that reference items from different hosts.
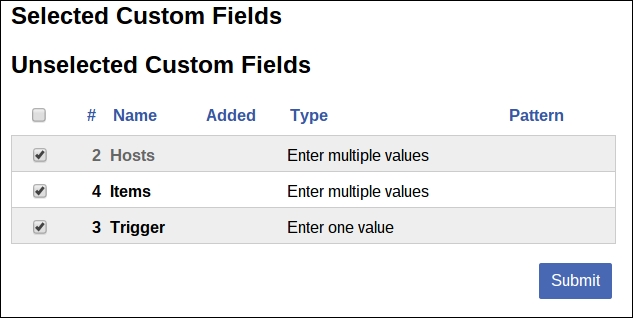
Speaking of triggers and items, you can follow the same procedure to create other custom fields for the trigger name, item names, or keys. After you are done with this, you will need to assign these fields to the tickets in the Zabbix queue. Select the Zabbix queue by navigating to Admin | Queues | Select, and for the Tickets form, go to Custom fields | Tickets. Select the fields that you wish to assign to your tickets:
After you are done, you will see the following fields in every ticket of the Zabbix queue:
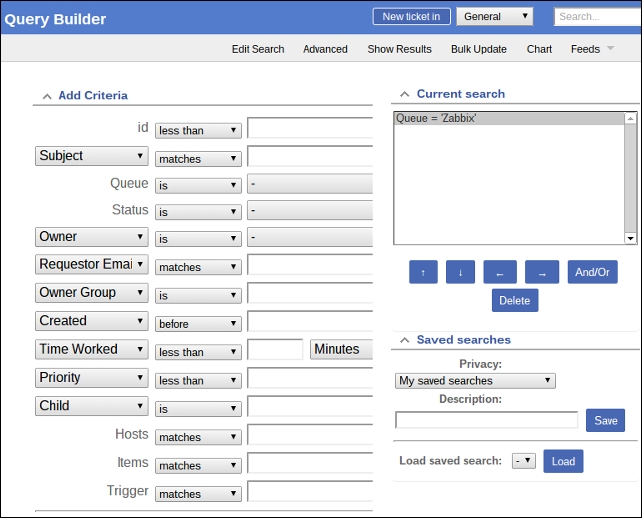
Depending on your needs, you can create as many custom fields as you want for the trigger and event acknowledge history, host's IP interfaces, custom macros, and so on. You will be able to search for any of them, and for the three shown earlier, you can do so by selecting the Zabbix queue in the search page of the RT frontend. At the bottom of the search form, you can see the newly created fields just as expected:
RT exposes a REST-type API that relies directly on the HTTP protocol to handle requests and responses. This means that the API is easily tested and explored using tools such as wget and netcat. Let's do that to get a feel of how it works before introducing the Python library that we'll use for the rest of the chapter.
The base URL for the RT API is located at ../REST/1.0/ after the base URL of Request Tracker itself. This means that if your base URL is http://your.domain.com/rt, the API will be accessible at http://your.domain.com/rt/REST/1.0/. If you try to connect to it, you should get a message asking for credentials (some response headers are removed to improve readability):
$ ncat example.com 80
GET /rt/REST/1.0/ HTTP/1.1
Host: example.com

HTTP/1.1 200 OK
[…]
Content-Type: text/plain; charset=utf-8

22
RT/4.2.0 401 Credentials required
The API doesn't have a special authentication mechanism separated from the rest of the application, so the best way to authenticate is to get a session cookie from the main login form and use it for each API request. To get the cookie, let's use wget:
$ wget --keep-session-cookies --save-cookies cookies.txt --post-data 'user=root&pass=password' http://example.com/rt/
The command that will save the session cookie in the cookies.txt file is as follows:
$ cat cookies.txt
# HTTP cookie file.
# Generated by Wget on 2015-07-10 10:16:58.
# Edit at your own risk.

localhost  FALSE  /rt  FALSE  0  RT_SID_example.com.80  2bb04e679236e58b406b1e554a47af43
Now that we have a valid session cookie, we can issue requests through the API. Here is the GET request for the general queue:
$ ncat localhost 80
GET /rt/REST/1.0/queue/1 HTTP/1.1
Host: localhost
Cookie: RT_SID_example.com.80=2bb04e679236e58b406b1e554a47af43

HTTP/1.1 200 OK
[...]
Content-Type: text/plain; charset=utf-8

RT/4.2.0 200 Ok

id: queue/1
Name: General
Description: The default queue
CorrespondAddress:
CommentAddress:
InitialPriority: 0
FinalPriority: 0
DefaultDueIn: 0
As you can see, the API is quite easy to interact with without any special encoding or decoding. For our purposes, however, it is even easier to use a library that will spare us the burden of parsing each HTTP request. Rtkit is a Python 2.x library that makes it even easier to connect to the API from within a Python program, for which it allows us to send requests and get responses using native Python data structures. The installation is very simple using pip:
$ pip install python-rtkit
Here, we're supposing that you have already installed pip. If not, please install it with this command here:
$ yum install -y python-pip
Once installed, the library will be available upon importing various Rtkit modules. Let's see the same preceding interaction (authenticating and requesting the general queue) from within a Python 2.x session:
 $ python2
Python 2.7.5 (default, Sep  6 2013, 09:55:21)
[GCC 4.8.1 20130725 (prerelease)] on linux2
Type "help", "copyright", "credits" or "license" for more information.
>>> from rtkit.resource import RTResource
>>> from rtkit.authenticators import CookieAuthenticator
>>> from rtkit.errors import RTResourceError
>>>
>>> res = RTResource('http://localhost/rt/REST/1.0/', 'root', 'password', CookieAuthenticator)
>>>
>>> response = res.get(path='queue/1')
>>> type(response)
<class 'rtkit.resource.RTResponse'>
>>> type(response.parsed)
<type 'list'>
>>> response.parsed
[[('id', 'queue/1'), ('Name', 'General'), ('Description', 'The default queue'), ('CorrespondAddress', ''), ('CommentAddress', ''), ('InitialPriority', '0'), ('FinalPriority', '0'), ('DefaultDueIn', '0')]]
As you can see, a response is parsed into a list of tuples with all the attributes of an RT object.
Now that we have a custom queue and custom fields for Zabbix tickets, we are able to interact with the API through the Python code, and the setting up process on RT's side is complete. We are ready to actually integrate the Zabbix actions and the RT tickets.