
We'll start with an active proxy—one that connects to the Zabbix server.
If installing the proxy from packages, we will have to choose a database—Zabbix proxy uses its own database. If compiling the proxy from the sources, use the parameter --enable-proxy and the corresponding database parameter. Additionally, the proxy must have support compiled in for all features it should monitor, including SNMP, IPMI, web monitoring, and VMware support. See Chapter 1, Getting Started with Zabbix, for compilation options.
Which database to choose for the Zabbix proxy? If the proxy will be monitoring a small environment, SQLite might be a good choice. Using SQLite for the Zabbix server backend is not supported, as it is likely to have locking and performance issues. On a Zabbix proxy it should be much less of a problem. If setting up a large proxy, MySQL or PostgreSQL would be a better choice. During this chapter we will use the proxy with a SQLite database, as that is very easy to set up.
Edit zabbix_proxy.conf. We will change three parameters:
DBNameHostnameServer
Change them to read:
DBName=/tmp/zabbix_proxy.db
Hostname=First proxy
Server=<Zabbix server IP address>
The first parameter, DBName, is the same as for the Zabbix server, except we do not just specify the database name here. For SQLite, the path to database file is specified here. While a relative path may be used, in most situations it will be much more complicated to start the proxy, thus an absolute path is highly suggested. We used a file in /tmp to make the setup of our first proxy simpler—no need to worry about filesystem permissions. What about the database username and password? As the comments in the configuration file indicate, they are both ignored when SQLite is used.
Note
On a production system, it is suggested to place the database file in a location other than /tmp. In some distributions /tmp might be cleared upon reboot. On the other hand, for performance reasons one might choose to place the database in a tmpfs volume, gaining some performance but losing the proxy database upon every system restart.
The second parameter, Hostname, will be used by the proxy to identify itself to the Zabbix server. The principle is the same as with the active agent—the value, specified here, must match the proxy name as configured on the server side (we will set that up in a moment), and it is case-sensitive.
The third parameter, Server, acts the same way as it did with active agents again. The active proxy connects to the Zabbix server and we specify the server IP address here.
Note
If you are running the proxy on the same machine as the Zabbix server, also change the port the proxy listens on—set ListenPort=11051. The default port would conflict with the Zabbix server.
As with the Zabbix server, you must ensure that the appropriate pollers are configured to start. For example, if you want to monitor IPMI devices through a proxy, make sure to set the StartIPMIPollers parameter in the proxy configuration file to a value other than the default 0.
Start the Zabbix proxy now. Wait, we did not create the database for the proxy. What will it do? Let's look at the proxy log file—check /tmp/zabbix_proxy.log, or the location set in the proxy configuration file. Paying close attention, we can find some interesting log records:
  20988:20151120:064740.867 cannot open database file "/tmp/zabbix_proxy.db": [2] No such file or directory
 20988:20151120:064740.867 creating database ...
It first failed to open an existing database file, then proceeded to create the database. The Zabbix proxy can automatically create the required SQLite database and populate it. Note that this is true for SQLite only—if using any other database, we would have to create the database manually and insert schema. This is also possible for SQLite—using the sqlite3 utility, we would do it like this:
$ sqlite3 /tmp/zabbix_proxy.db < schema.sql
But schema only! Not just for SQLite—for all databases—the proxy needs schema only. No data, and no image SQL files should be used. If the Zabbix proxy detects some extra data in the database, it exits, complaining that it cannot use the server database. Older proxy versions could crash or even corrupt the server database in such a case.
Note
Do not create an empty file. Either allow the proxy to create the database file, or create it yourself and populate it using the sqlite3 utility. An empty file will be perceived as an empty database and the proxy will fail to start up.
If a proxy complains that it cannot work with a server database, it will have found entries in the users table.
We could also verify that the Zabbix proxy is listening on the port it should be by running the following:
$ ss -ntl | grep 10051
The output should confirm that everything is correct:
LISTEN 0 128 *:10051 *:*
There are probably a few log entries that indicate something is not working properly:
cannot send heartbeat message to server at "192.168.56.10": proxy "First proxy" not found
cannot obtain configuration data from server at "192.168.56.10": proxy "First proxy" not found
We only configured and started the proxy daemon, but we did not configure anything about proxies on the server side. Let's monitor a host through our new proxy.
Now that we have the proxy configured and running, we have to inform Zabbix about it somehow. To do this, open Administration | Proxies in the frontend, then click on the Create proxy button. Enter First proxy in the Proxy name field.
In the following section, Hosts allows us to specify which hosts will be monitored by this proxy. To make one host monitored by the proxy, select Another host in the Other hosts list box and click on the ![]() button:
button:
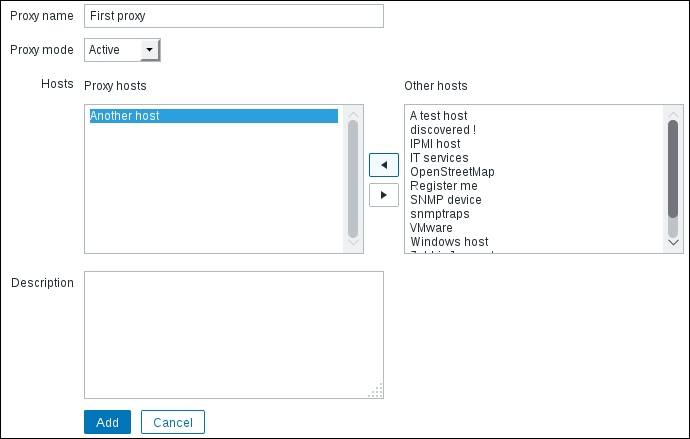
When done, click on Add. Next time the proxy connects to the server, the names should match and the proxy should get the information on what it is supposed to monitor. But when will that next time be? By default, the Zabbix proxy connects to the Zabbix server once per hour. The first connection attempt happens upon proxy startup, and at one-hour intervals from then on. If you configured the frontend part soon after the proxy was started, it could take up to an hour for the proxy to get the configuration data and start working. There are two ways to force re-reading of the configuration data from the Zabbix server:
- Restart the proxy
- Force reloading of its configuration cache
The first one would be acceptable on our test proxy, but it would not be that nice on a larger production proxy that is actively collecting data already. Let's see how we can force reloading of the configuration cache. First run:
# zabbix_proxy --help
In the output, pay attention to the runtime control section and the first parameter in it:
  -R --runtime-control runtime-option   Perform administrative functions
    Runtime control options:
      config_cache_reload        Reload configuration cache
When an active proxy is told to reload its configuration cache, it connects to the server, gets the new configuration data, and then updates the local cache. Let's issue that command now:
# zabbix_proxy --runtime-control config_cache_reload
Tip
Runtime commands depend on the PID file being properly configured. When you run the previous command, it looks for the PidFile option in the default proxy configuration file, looks up the PID from the PID file, and sends the signal to that process. If multiple active proxies are running on the system, a signal can be sent to a specific proxy by specifying its configuration file with the -c option.
The reload command should be processed successfully:
zabbix_proxy [19293]: command sent successfully
Check the proxy logfile now:
forced reloading of the configuration cache
received configuration data from server at "192.168.56.10", datalen 6545
First, the proxy logs that it has received an order to reload the configuration cache. Then it connects to the server and successfully retrieves the configuration data from the server.
Tip
We will discuss reloading of the configuration cache in somewhat greater detail in Appendix A, Troubleshooting.
You can verify whether the proxy can successfully connect to the server by opening Administration | Proxies again. Look at the LAST SEEN (AGE) column for the new proxy. Instead of saying never, it should show some time period. If it does not, check that both the Zabbix server and proxy are running, and that you can open a connection from the proxy host to the Zabbix server, port 10051.
But if you look at the HOSTS column, you'll see that it is empty now. What happened here? We clearly added Another host to be monitored by this proxy—why did it disappear? This could be a challenging task to figure out, and a situation like that could easily arise in a production environment, too. The reason for the host disappearing from the proxy configuration is active-agent auto-registration. We configured it in Chapter 12, Automating Configuration, and the agent has been sort of repeatedly auto-registering ever since. But why does that affect the host assignment to proxy? When an active agent connects and auto-registration is active, it matters where it connects to. Instead of creating a new host, the Zabbix server reassigns that host to the Zabbix server or some proxy, whichever received the agent connection. It considers that agent as having migrated from the server to some proxy or vice versa, or from one proxy to another. We assigned a host to our new proxy, the agent kept on connecting to the server, and the server reassigned that host back to be monitored directly by the server. How could we solve it? We have two options:
Let's try the second, fancier approach. On Another host, edit zabbix_agentd.conf and change ServerActive to the proxy IP address, then restart the agent.
Note
If you installed the Zabbix proxy on the same system as the Zabbix server, make sure to specify the proxy port in this parameter, too.
Do not set the proxy address in addition to the server address—in that case the agent will try to work with both the server and proxy in parallel. See Chapter 3, Monitoring with Zabbix Agents and Basic Protocols for more detail on pointing the agent at several servers or proxies.
Check the proxy list again. There should be Another host in the HOSTS column now, and it should not disappear anymore. Let's check data for this host in Monitoring | Latest data. Unfortunately, it looks like most items have stopped working. While we changed the active server parameter in the agent daemon configuration file and active agent items work now, there are more item categories that could have failed:
- Passive agent items do not work because the agent does not accept connections from the proxy
- ICMP items likely do not work as
fpingis either missing or does not have proper permissions - While Another host does not have items of SNMP, IPMI, and other types, those could have started to fail because appropriate support was not compiled into the proxy, or respective pollers were not started
- If you configured the proxy on the Zabbix server system, passive items will work, as the IP address the agent gets the connections from will stay the same
Let's fix at least the passive agent items. Edit zabbix_agentd.conf on Another host and change the Server parameter. Either replace the IP address in there with the proxy address, or add the proxy address to it, then restart the agent. In a few minutes, most of the passive agent items should start receiving data again.
As for the ICMP items, refer to Chapter 3, Monitoring with Zabbix Agents and Basic Protocols for fping configuration. It's the same as on the server side; it's just that the changes have to be performed on the proxy system now.
In general, when a host is monitored by proxy, all connections to and from that host must and will be performed by the proxy. The agent must allow connections from the proxy for passive items and connect to the proxy for active items. Even the Zabbix sender must send data to the proxy for Zabbix trapper items, not the Zabbix server anymore.
With the host monitored by the proxy, let's check whether there is any indication of that in the frontend. Open Configuration | Hosts, make sure Linux servers is selected in the Group dropdown, and take a look at the NAME column. As can be seen, Another host is now prefixed by the proxy name and reads First proxy:Another host:

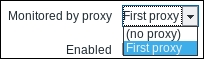
But do we always have to go to Administration | Proxies whenever we want to have a host monitored by proxy? Click on Another host in the NAME column, and observe the available properties. There's a dropdown available, Monitored by proxy. Using this dropdown, we can easily assign a host to be monitored by the chosen proxy (remembering to change the server IP address in the agent daemon configuration file):
Tip
If you decide to monitor A test host through the proxy, be very careful with its address. If the address is left at 127.0.0.1, the proxy will connect to the local agent for passive items and then report that data to the server, claiming it came from A test host. That would also be not that easy to spot, as the data would come in just fine; only it would be wrong data.