
Implementing high availability for a database is not an easy task. There are a lot of ways to implement a high-availability configuration using different software and complexity.
The architecture proposed here is fully redundant; it is one of the possible solutions that are widely used in large environments. You need two database servers and two installations of the same software and operating system to implement this solution. Obviously, since servers are twins and tied together, they need to have the same software, have the same release patch, and basically, be identical.
Since we are going to have two different servers, it is clear that the data needs to be replicated between them; this implies that your server needs to be interconnected with a dedicated network connection that is capable of providing the needed throughput.
In this design, your server can be placed in the same location or in two different data centers that provide a reliable disaster-recovery solution. In this case, we are going to provide a highly available design.
There are different ways to provide data replication between two servers. They are as follows:
- Filesystem replication
- Shared disk failover
- Hot/warm standby using PITR
- Trigger-based master-standby replication
- Statement-based replication middleware
- Asynchronous multimaster replication
- Synchronous master replication
There are positive and negative sides to each one of them. Among all these options, we can exclude all the solutions that are trigger-based because all of them introduce an overhead on the master node. Also, adding a user-lever layer can be imprecise/inexact.
Between these options, there are a few solutions that permit a low or really low mean time to recovery and are safe from data loss. The following solutions guarantee that, if there is a master failure, there will no data loss:
- Shared disk failover
- Filesystem replication
- Statement-based replication middleware
A solution that adopts a shared disk failover cluster implies the use of a shared SAN. This means that if you want to place your server on a separate server farm in a different location, this system will be really expensive.
If the solution adopts a warm and hot standby using Point-In-Time Recovery (PITR) and your node goes down, you need enough free space to handle and store all the transaction log files generated. This configuration, by design, needs a secondary database (identical to the master node) that is a warm standby and waits for the log transaction. Once the transaction has arrived, the RDBMS needs to apply the transaction on your secondary node.
In this case, if the secondary node goes down, we need to be warned because the primary database will produce the archived log files that are not shipped, and this can bring your infrastructure to a halt. In a large environment, the transactional activity is normally heavy, and if the fault happens to be out of the normal working hours, this HA configuration needs to be handled.
Another way is the PostgreSQL synchronous replication. If the secondary node goes down, this configuration would need a reload to prevent the hanging of the transaction from hanging.
Trigger-based configurations are heavy and dangerous because they imply that a trigger can go on firing every insert and replicate the same insert on the secondary node by introducing a feasible overhead. Partitioning with inheritance is not supported well by this method. Also, this method does not give us a warranty against data loss when the master fails.
Infrastructures that include a second standby database introduce a second actor, that is, if the database is down or unreachable, it shouldn't cause a master to hang. Nowadays, with PostgreSQL 9.1, synchronous replication is a viable solution. These configurations unfortunately add certain constraints: the transmission must be acknowledged before the commit happens, and the transmission doesn't guarantee that you will get a reply.
This practically means that if the secondary node goes down, the primary database will hang until the slave receives the transaction and notifies back to the master that this one has been acquired. The result is that a primary node can hang for an indefinite period of time, and this practically doubles the risk of downtime.
An issue on the slave's node shouldn't impact the primary node. This practically doubles the risk of downtime and is not acceptable in the context of high availability.
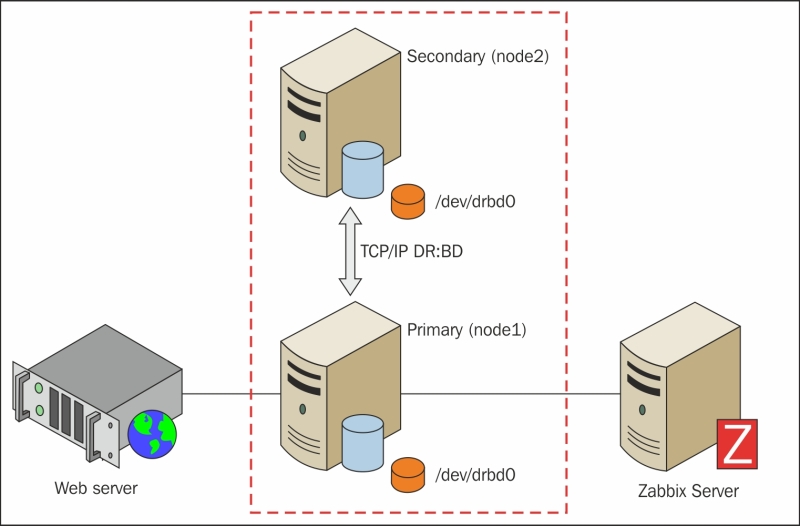
The cluster presented here is simple and designed to have as few actors in play as possible but with the high-availability design in mind.
The architecture shown in the following diagram is efficient. It has a minimum number of actors in play and is easy to monitor, maintain, and upgrade:
LVM2 is the Linux implementation of Logical Volume Manager (LVM) on the Linux logical device mapper framework. LVM2, apart from the name, doesn't have anything in common with the previous one.
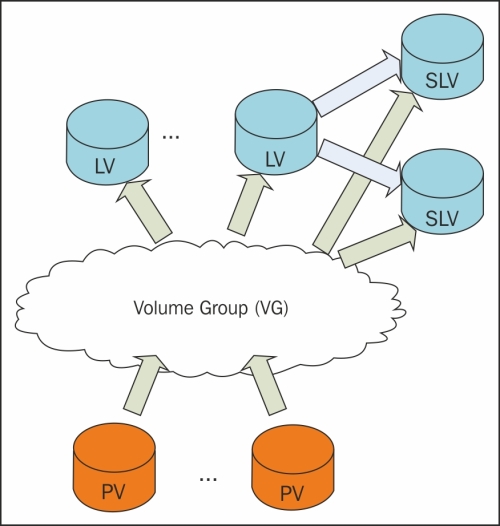
The basic concepts of LVM2 are as follows:
- Physical Volume (PV): This is the actual physical partition or storage system on which the LVM system is built.
- Volume Group (VG): This is the basic administrative unit. It may include one or more PVs. Every VG has a unique name and can be extended at runtime by adding additional PVs or enlarging the existing PV.
- Logical Volume (LV): This is available as a regular block device to the Linux kernel, and its components can be created at runtime within the available volume groups. Logical volumes can be resized when online and also moved from one PV to another PV if they are on the same VG.
- Snapshot Logical Volume (SLV): This is a temporary point-in-time copy of an LV. The strong point is that if the size is really big (several hundred gigabytes), the space required is significantly less than the original volume.
Since a logical volume, once created, is simply seen as a block device, you can use DRBD on it.
While setting up DRBD on LVM, there are certain basic steps to bear in mind:
- LVM needs to know about your DRBD devices
- LVM caching needs to be disabled
- Remember to update
initramfswith the new kernel device map
LVM, by default, scans all block devices founded on /dev while looking for PV signatures; hence, we need to set an appropriate filter on /etc/lvm/lvm.conf:
filter = ["a|sd.*|", "a|drbd.*|", "r|.*|"]
This filter accepts all the SCSI and DRBD disks. Now, we need to rescan all your volume groups with the following command:
# vgscan
It is important that you remember to disable LVM caching because DRBD disks will disappear in the event of a failure. This is normal when we face a fault, and if caching is not disabled, it is possible that you will see the disk as available when in reality it is not.
This is done by adding the following line in /etc/lvm/lvm.conf:
write_cache_state = 0
Now that the cache has been disabled, it is possible that we still have a portion or piece of cache on your disks that was generated previously. We need to clean up the following location:
/etc/lvm/cache/.cache
Now it's better to regenerate the kernel device map files with the following command:
# update-initramfs –u
Now it is possible for us to go ahead with the configuration.
Now that your caching is disabled and the LVM is properly configured, we need to create your PV. To initialize your SCSI partitions as physical volumes, we run the following commands from the root account:
$ pvcreate /dev/sda1
  Physical volume "/dev/sda1" successfully created
$pvcreate /dev/sdb1
  Physical volume "/dev/sdb1" successfully created
The given output tells us that the volume has been initialized. Now you can create a low-level VG, vgpgdata:
$ vgcreate vgpgdata /dev/sda1 /dev/sda2
  Volume group "vgpgdata" successfully created
Finally, you can create your volume or a better logical volume that will be used as DRBD's block device:
$ lvcreate --name rpgdata0 --size 10G local
  Logical volume "rpgdata0" created
All these steps need to be repeated in the same order on both your nodes. Now you need to install DRBD on both nodes using the following command:
$ yum install drbd kmod-drbd
Now edit the drbd.conf file located in /etc/drbd.conf and create the rpgdata0 resource as follows:
resource rpgdata0 {
  device /dev/drbd0;
  disk /dev/local/rpgdata0;
  meta-disk internal;
  on <host1> { address <address_host1>:<port>; }
  on <host2> { address <address_host2>:<port>; }
}Make sure that you have copied the drbd.conf file on both nodes before proceeding with the next section. Disable automatic start for DRBD because it will be managed by Pacemaker:
$ chkconfig drbd off
Now, before we initialize our DRBD service, it is important to do a bit of server-side configuration. Here, SELinux can cause quite a few issues, so the best approach with RedHat 6.X is to disable SELinux.
To disable or set SELinux to permissive, you need to edit the configuration file /etc/sysconfig/selinux by setting the SELinux option as follows:
SELINUX=permissive
This needs to be done on both nodes; once done, you need to reboot and can check whether the status has been properly retrieved with this command from root:
# sestatus
SELinux status:                 enabled
SELinuxfs mount:                /selinux
Current mode:                   permissive
Mode from config file:          permissive
Policy version:                 24
Policy from config file:        targeted
Here, we see that Current mode is set to permissive.
Now it is time to add an iptables rule to allow connectivity across port 7788 by adding the following rule to our iptable. We can directly edit the /etc/sysconfig/iptables file by adding the following line:
-A INPUT –m stat –state NEW –m tcp –p tcp –-dport 7788 –j ACCEPT
Then, we need to restart iptables with:
# service iptables restart
iptables: Setting chains to policy ACCEPT: nat mangle filte[  OK  ]
iptables: Flushing firewall rules:                         [  OK  ]
iptables: Unloading modules:                               [  OK  ]
iptables: Applying firewall rules:                         [  OK  ]
Now that the configuration file has been copied on all your nodes and we've finished with SELinux and iptables, it is time to initialize the device and create the required metadata.
This initialization process needs to be executed on both nodes and can be run from root using the following command:
$ drbdadm create-md rpgdata0
v08 Magic number not found
Writing meta data...
initialising activity log
NOT initializing bitmap
New drbd meta data block successfully created.
Now you can enable the rpgdata0 resource:
$ drbdadm up rpgdata0
The process can be observed by looking at the /proc virtual filesystem:
$ tail /proc/drbd
version: 8.4.1 (api:1/proto:86-100)
GIT-hash: 91b4c048c1a0e06837625f65d312b38d47abara80 build by buildsystem@linbit, 2013-02-20 12:58:48
 0: cs:Connected ro:Secondary/Secondary ds:Inconsistent/Inconsistent C r-----
    ns:0 nr:0 dw:0 dr:0 al:0 bm:0 lo:0 pe:0 ua:0 ap:0 ep:1 wo:b oos:524236
At this point, DRBD has allocated the disk and network and is ready to begin the synchronization.
The primary promotion is quite easy; you need go to the primary node and run the following command:
$ drbdadm primary rpgdata0
Now the server on which you run this command becomes the master of the replication server, and you can create the PV on that new device. So, on the master node, you need to run the following command:
$ pvcreate /dev/drbd0
Physical volume "/dev/drbd0" successfully created
Create your VG, which, in this example, will be secured_vg_pg:
$ vgcreate secured_vg_pg /dev/drbd0
Volume group "secured_vg_pg" successfully creatced
Finally, it is possible to create an LV on that PV using the following command:
$ lvcreate -L 6G -n secured_lv_pg secured_vg_pg
In this example, we reserved a space for snapshots; so, if you ever want one, you have enough space for that. Finally, it is possible to set up the filesystem.
Now it is important to check whether the DRBD service is disabled from the startup and shutdown lists because this service will be managed directly from Pacemaker. Once you disable the service, it is possible to create the filesystem on the new device but before that, it is important to do the following:
- Create a mountpoint
- Create a filesystem
- Mount the filesystem and make it available
You can create your own mountpoint, but this step-by-step installation will use /db/pgdata:
$ mkdir -p -m 0700 /db/pgdata
Now, there are different filesystems supported by most of the distributions; RedHat 6.0 completely supports XFS. XFS has an important feature that permits parallel access to the filesystem. It supports parallel read/write. XFS allows us to write the same files from multiple threads concurrently; this, obviously, is a big improvement for a large database table, and it also reduces the contention on filesystems.
To install XFS and the relative utils, use the following command:
$ yum install xfsprogs
Once installed and available, you can format the logical volume using the following command:
$ mkfs.xfs /dev/secured_vg_pg/secured_lv_pg
Now you can mount the filesystem using the following command:
$ mount -t xfs -o noatime,nodiratime,attr2 /dev/secured_vg_pg/secured_lv_pg /db/pgdata
Everything can be changed to your PostgreSQL process owner, usually postgres:
$ chown postgres:postgres /db/pgdata
$ chmod 0700 /db/pgdata
Now the filesystem is mounted, formatted, and ready for PostgreSQL.
Pacemaker makes DRBD extremely powerful in a really wide variety of scenarios. There are some attention points that have already been discussed when we presented Pacemaker/Corosync. These points are as follows:
- Disable STONITH
- Disable Quorum
- Enable stickiness
As discussed earlier in this chapter, it is really important to avoid split-brain scenarios and STONITH death matches. Just as a reminder, to disable STONITH, you can run the following command:
$ crm configure property stonith-enabled="false"
Since this again is a two-node cluster, it is strongly recommended that you disable Quorum. The command that permits us to do this is as follows:
$ crm configure property no-quorum-policy=ignore
Now, it is preferred that stickiness be enabled. This argument has been discussed earlier in the chapter. Anyway, as a quick reminder, we can say that, by enabling stickiness, we have a guarantee of a preferred node over another. This will help you to keep your cluster on one side and have a preferred site where everything should run. The command for this is as follows:
$ crm configure property default-resource-stickiness="100"
This section explains how to enable the DRBD-backend service in your Pacemaker cluster. There are a few steps to be followed:
- Add DRDB to Pacemaker
- Add and define the master/slave resource
You need to have a master/slave resource that controls which node is primary and which one is secondary. This can be done with the following command:
$ crm configure primitive drbd_pg ocf:linbit:drbd
params drbd_resource="rpgdata0"
op monitor interval="15"
op start interval="0" timeout="240"
op stop interval="0" timeout="120"
Once done, you need to set up a resource that can promote or demote the DRBD service on each node. Keep in mind that the service needs to run on both the nodes at all times with a different state, thus defining a master/slave resource as follows:
$ crm configure ms ms_drbd_pg drbd_pg
meta master-max="1" master-node-max="1" clone-max="2"
clone-node-max="1" notify="true"
Now you need to configure Pacemaker to:
- Manage the LVM
- Manage the filesystem
Because of the design and working of DRBD, the actual active volume will be invisible on the secondary node. On the secondary node, you can't mount or handle this volume. Having said that, you need to help DRBD to find devices:
$ crm configure primitive pg_lvm ocf:heartbeat:LVM
params volgrpname="secured_vg_pg"
op start interval="0" timeout="30"
op stop interval="0" timeout="30"
With the preceding configuration, Pacemaker will search for a usable volume on DRBD devices and will be available using the DRBD resource promotion. Since the filesystem adopted on DRBD devices is XFS, you need to define how to mount and handle this device:
$ crm configure primitive pg_fs ocf:heartbeat:Filesystem
params device="/dev/secured_vg_pg/secured_lv_pg" directory="/db/pgdata"
options="noatime,nodiratime" fstype="xfs"
op start interval="0" timeout="60"
op stop interval="0" timeout="120"
Since LVM is the last layer on this configuration, you can take advantage of snapshot capabilities and a good level of isolation.
Now you can add the PostgreSQL configuration to the cluster.
Note
PostgreSQL installation is not covered here because it is already discussed in Chapter 1, Deploying Zabbix.
The following lines add a primitive to Pacemaker that will set a PostgreSQL health check every 30 seconds and define a timeout of 60 seconds to retrieve the response:
$ crm configure primitive pg_lsb lsb:postgresql
op monitor interval="30" timeout="60"
op start interval="0" timeout="60"
op stop interval="0" timeout="60"
Pacemaker uses those parameters in a primary manner to determine whether PostgreSQL is available or not.
Up until now, you haven't configured a predefined IP address for PostgreSQL. Since it doesn't make sense to have different addresses in the event of a switchover or failover, you need to set up a virtual IP that will follow your service. This prevents any change of configuration for all your clients. You can use a cluster name or an IP address. For that, you need to issue the following lines:
$ crm configure primitive pg_vip ocf:heartbeat:IPaddr2
params ip="192.168.124.3" iflabel="pgvip"
op monitor interval="5"
NOTE: change the address 192.168.124.3 with your own.
Here, it is not specified that the ARP address, IPaddr2, will automatically send five ARP packets, and this value can be increased if necessary.
Now you have all the required components ready to be tied together in a group that will contain all your resources. The group is PGServer:
$ crm configure group PGServer pg_lvm pg_fs pg_lsb pg_vip
$ crm configure colocation col_pg_drbd inf: PGServer ms_drbd_pg:Master
The Master server specifies that your PGServer group depends on the master/slave setup reporting a master status that happens exclusively on an active node. It is also true that the PGServer group depends on the DRBD master.
Now it is important to specify the right order to start and shutdown all the services. We will use the following command to do so:
$ crm configure order ord_pg inf: ms_drbd_pg:promote PGServer:start
Finally, the cluster is ready! What do we do next? It is simple! You can break your own cluster, play with the configuration, and verify that all is fine before we go live with this new infrastructure.
The faults that need to be tested are as follows:
- The node goes offline
- Manual failover of the cluster
- Primary crash
- Secondary crash
- Forceful synchronization of all the data
Run the following command:
$ crm node standby HA-node2
If all is fine, crm_mon will respond with the following:
Node HA-node2: standby
Online: [ HA-node1 ]
You can easily fix this state by firing the following command:
$ crm node online HA-node2
Until now, it has been quite easy. Now you can try a failover of the whole cluster using the following command:
$ crm resource migrate PGServer HA-node2
The server can be migrated back with the following:
$ crm resource unmigrate PGServer
Now you can switch off the secondary node and Pacemaker will respond with the following:
Online: [ HA-node1 ]
OFFLINE: [ HA-node2 ]
Master/Slave Set: ms_drbd_pg [drbd_pg]
Masters: [ HA-node1 ]
Stopped: [ drbd_pg:1 ]
After that, you can start up the secondary node again. Now switch off the secondary node and Pacemaker will respond with the following:
Online: [ HA-node1 HA-node2 ]
Master/Slave Set: ms_drbd_pg [drbd_pg]
Masters: [ HA-node1 ]
Slaves: [ HA-node2 ]
Now, as a final test, you can invalidate all the data on the secondary node with the following command:
$ drbdadm invalidate-remote all
Alternatively, from the secondary node, you can run the following command:
$ drbdadm invalidate all
This will force DRBD to consider all the data on the secondary node out of sync. Therefore, DRBD will resync all the data on the secondary node before getting it from the primary node.
There are certain aspects that can be improved and that should be considered when you implement a DRBD cluster. There are some optimizations that can be applied. You need to consider that if your database, or more specifically, the second node of the DRBD cluster, is in a different location that is far away from your data center, the network bandwidth can have efficient synchronization, which plays a fundamental role. Another thing that needs to be considered on a disaster recovery site is the bandwidth and its cost. It is also important to calculate and understand how much data is required and the transfer rate that we can reach or need.
Synchronization is a distinct process and can't be considered on the same lines as device replication. While replication happens only the first time you start up the device, synchronization and resynchronization as well are decoupled from incoming writes. On the proposed architecture, synchronization is necessary when:
- The link has been interrupted
- The server has a fault on the primary node
- The server has a fault on the secondary node
DRBD doesn't synchronize blocks sequentially and not in the order they were originally written.
The service will continue to run on the primary node while the background synchronization is in progress. Since this configuration has an LVM layer on top of DRBD, it is possible to use snapshots during the synchronization; this is a strong point of this architecture. While synchronization is ongoing, you are in a delicate phase because there is a single point of failure; only the primary node is working fine, and if something happens here, you might completely lose all the data and the secondary node might contain bad data. This critical situation can be mitigated with the LVM snapshot.
Tip
The use of snapshots before beginning synchronization can give you hands-on experience in that situation because data on the secondary node is consistent and valid but not recently updated. Enabling snapshots before beginning synchronization will reduce the Estimated Time to Repair (ETR), which is also known as Recovery Time Objective (RTO).
To automate the snapshot, you can add the following lines to your DRBD configuration:
resource RESOURCE_NAME {
  handlers {
    before-resync-target "/usr/lib/drbd/snapshot-resync-target-lvm.sh";
    after-resync-target "/usr/lib/drbd/unsnapshot-resync-target-lvm.sh";
  }
}
The snapshot-resync-target-lvm.sh script is called before we begin the synchronization, and the unsnapshot-resync-target-lvm.sh script will remove the snapshot once the synchronization is complete.
To optimize the synchronization support for DRBD, a checksum-based synchronization is required. A checksum-based synchronization is more efficient in the sense that brute force overwrites and blocks synchronization, which is not enabled by default. With these features enabled, DRBD reads blocks before synchronizing them and calculating a hash of the contents. It compares the hash calculated with the same data obtained from the same sector on the out-of-sync secondary node, and if the hash matches, DRBD omits rewriting these blocks.
To enable this feature, you need to add the following lines on the DRBD configuration:
resource <resource>
  net {
    csums-alg <algorithm>;
  }
  ...
}
The <algorithm> tag is any message digest supported from the kernel cryptographic API, usually one among sha1, md5, and crc32c.
Online verification enables a block-by-block data integrity check in a very efficient way. This is particularly interesting for efficiency in bandwidth usage; additionally, it doesn't interrupt or break redundancy in any way.
DRDB, with this functionality, will calculate a cryptographic digest of every block on the first node, and then this hash is sent to the peer node that will do the same check. If the digest differs, the block will be marked out of sync and DRBD will retransmit only the marked blocks. This feature is not enabled by default and can be enabled by adding the following lines in drbd.conf:
resource <resource>
  net {
    verify-alg <algorithm>;
  }
  ...
}
Also, here <algotithm> can be any digest supported by the cryptographic API, usually by sha1, md5, or crc32c. Once configured, it is possible to run online verification with the following command:
$ drbdadm verify <resource>
If you have an out-of-sync block, it is possible to resync it simply with the following command:
$ drbdadm disconnect <resource>
$ drbdadm connect <resource>
When you use a block-based filesystem over DRBD, it is possible to improve the transfer rate, enlarging Maximum Transmission Unit (MTU) to higher values.
A block-based filesystem will have a noticeable improvement. Block-based filesystems include EXT3, ReiserFS, and GFS. The filesystem proposed here on this architecture is extent-based and is not expected to see high improvement by enabling the jumbo frame.
DRBD permits us to set up the synchronization rate. Normally, DRBD will try to synchronize the data on the secondary node as quickly as possible to reduce the inconsistent data time. Anyway, you need to prevent the degrading of a performance that is caused by the bandwidth consumed for the synchronization.
The maximum bandwidth used from the background process of resynchronization is limited by a parameter rate expressed in bytes; so, 8192 means 8 MiB. To fix the rate, you can change the DRBD configuration file by adding in the following code:
resource <resource>
  disk {
    resync-rate 50M;
    ...
  }
...
}The sync rate follows exactly the same rule and can be specified as well on the drbd.conf file:
resource <resource>
  syncer {
    rate 50M;
    ...
  }
...
}
Tip
The syncer rate can be temporarily modified with the following command:
drbdsetup /dev/drbdnum syncer -r 120M
The resync rate can be temporarily changed with the following command:
drbdadm disk-options --resync-rate=110M <resource>
Both these rates can be reverted with the following command:
drbdadm adjust resource
DRBD gives us other interesting parameters to fine-tune the system and optimize performance; of course, those that follow are not solutions to all the throughput issues. They can vary from system to system, but it is useful to know that they exist, and you can get some benefit from them.
In particular, there are two parameters. They are as follows:
max-buffersmax-epoch-time
The first property (max-buffers) represents the maximum number of buffer DRBDs. The second property (max-epoch-time) represents the maximum number of write requests permitted between two write barriers. Both can be changed inside the drbd.conf file:
resource <resource> {
  net {
    max-buffers 8000;
    max-epoch-size 8000;
    ...
  }
  ...
}There is another network optimization that can be done. Change the send buffer of the TCP/IP. By default, this value is set to 128 K, but if you are in a high-throughput network, such as a gigabit network, it make sense to increase this value to 512 K.
resource <resource> {
  net {
    sndbuf-size 512K;
    ...
  }
  ...
}To close this optimization section, it is important to say that DRBD manages certain other parameters:
no-disk-barrierno-disk-flushesno-disk-drain
My personal advice is that you stay away from them if you don't really know what kind of hardware you have. Set them to represent a big iron on the system RAID. These parameters disable the write barriers, disk flush, and drain. Usually, all these features are managed directly from the controller. It doesn't make any sense to enable DRBD to manage them.